Sometimes when you’re working on a song, you want to change the playback speed of your project or parts of your project. This can be used for composing, practicing instruments, track syncing, and even editing. REAPER presents a few ways of achieving this depending on the specific use case and your needs, let’s check them out!
Recommended Read: Change (Increase & Decrease) Tempo in REAPER + BPM Settings
Project Playrate
The first way of speeding up or slowing down in REAPER is changing the playrate, you will find the option the right side of your transport bar. It works as a multiplier of the speed of your project playhead. 1.0 is the normal playback speed, values above 1.0 are faster than normal, and values below 1.0 are slower than normal.

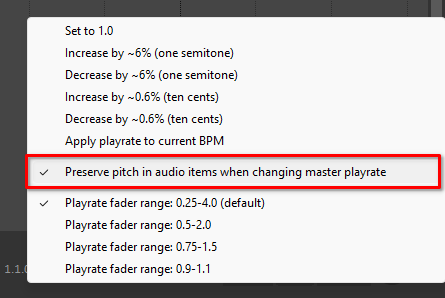
Before changing the Playrate value, you may want to set it up to preserve the pitch of the audio, just right click on the knob/slider and activate the option. When this option is not active the results can be quite funny! try them out some time to have a good laugh.
The playrate uses the corresponding time stretch/pitch shift algorithm associated with the items that are being played. If you want to know a little bit more about the algorithms that REAPER uses, check the first part of this article.
This is an awesome tool if you’re trying to learn a song or polish a section and you need to practice the song to a metronome at a slower speed. Sync the song to a metronome, loop a section and change the playrate according to your progress, for me, this is the best practicing tool.
Playrate Envelope
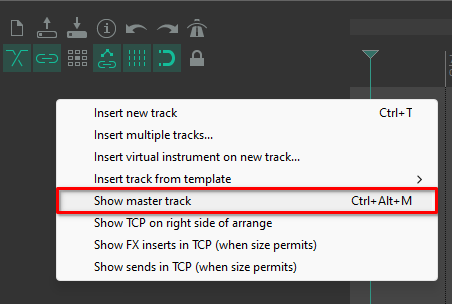
Playrate is also automatable, just like Tempo works as an envelope. To show the Playrate envelope, you must show the master track by right clicking on the empty part of the Track panel.
Then, open the master track Automation settings and check the Playrate box.
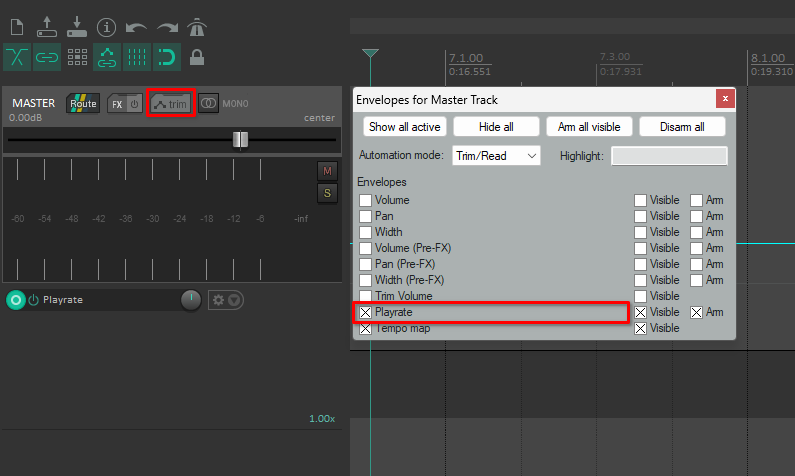
This Playrate envelope, just like the playrate knob/slider, works completely disconnected from the project tempo. This means that it’s a really good tool to humanize all MIDI performed songs, or create smooth variations in classical compositions without messing with complex tempo maps.
Recommended Read: Change Tempo in REAPER without Stretching (Timebase)
Item Playrate
Now, aside from changing the playrate of the whole project, you can also change the speed of any item in the timeline. One way of doing this is opening the item settings and changing the playrate.
To do this, you can double click the item you want to modify, or select all the items you want to modify together, right click, and select Item properties… .
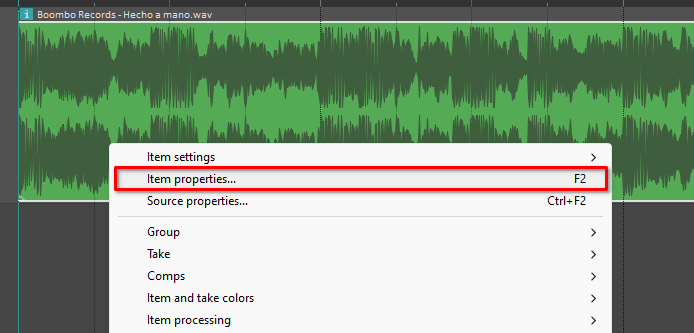
Then go to the middle section of the properties to find the Playback rate option.
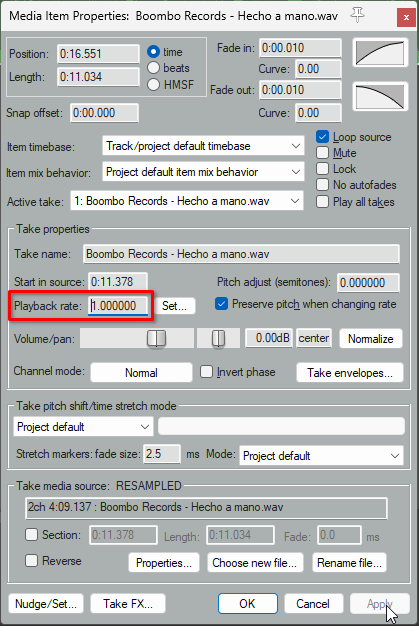
This can be set as a multiplier in the textbox that is just beside the name of the property or change the source BPM setting with the Set button.

You must know that this method of changing the speed of an item only affects the content, not the boundaries. This means that the item will stay in place, but the contents will be stretched, if you want the boundaries to follow the content, check this next section.
Item Stretch
Aside from just changing the playrate, you can use mouse modifiers to grab and move the start or end point of an item while stretching the contents inside. The default modifier for this action is Alt on Windows or Opt on Mac.

You can add the Shift modifier on top and stretch the item while ignoring the grid snapping.
These are the basics for item stretching, but there’s much more to dig in this aspect. Stretching while ignoring item grouping, using razor edits, and even using stretch markers to stretch only a part of an item. If you want to dive in, check This article about stretching. This method really suits when you already have a tempo map and a grid, and you want to adapt songs or recordings to the timeline of your project.
Conclusion
Speeding up and slowing down projects or items is just the starting point for many many tools that REAPER has at your disposal. Along the article I wanted to propose a few examples where the specific tools may work, but limit yourself to only those use cases, feel free to try them out and incorporate them in your workflow as you need them. I hope you find many more uses for these tools and have fun!

- Mixing in REAPER [ULTIMATE Guide!] - September 18, 2023
- How to Record in REAPER (Guitar & Vocals) - August 2, 2023
- Writing MIDI Drums in REAPER - July 3, 2023
")


