Mixing can often be an obscure process, even for experienced musicians and producers. It essentially has the objective of bringing out the potential of the music performances to their maximum so that they work together properly.
Fortunately, I believe that REAPER is one of the best tools that you can use to realize that process, while staying out of your way. So let’s peek at how the mixing process can look inside REAPER.
The Mindset
I like to picture the image of a cook, once he/she has all the necessary ingredients(Recorded performances) at hand. He/she has to have the image(Sound scope) in his mind to finally cook(Mix) the elements into a suitable dish(Song). Such is the role of a mixing engineer in a music production process.

When it comes to sound perception, I like to think of it as if I was placing each musical element in a room. Please keep these two analogies in mind as I will reference them throughout the article.
Mix Prep
So following up with the cooking analogy, you first need to get all your ingredients at hand, wash them, and start cutting them if needed. Here’s where the project and workspace preparation allows you to have all your ingredients at hand and ready so that you can focus on the mixing.
Keep in mind that REAPER tracks are just tracks, and can take different roles even at the same time. However, I like to separate them conceptually based on the purpose I intend for them in any given project. These are the roles they can take in my mind.
Audio/MIDI tracks: These are your bread and butter, they contain media and usually represent just one item on the ensemble: a guitar, a vocal, your Kick drum, and so on. You can create one just by double-clicking on the TCP or using the shortcut Ctrl+T / Cmd+T. Also, if you drag a new file into the empty space below tracks, REAPER will automatically create a new track for it.
Keep in mind that there are audio files that may only be “one perspective” of an element, like how you can have a “Kick In.wav” and a different file called “Kick Out.wav”, or “Snare Top.wav” and “Snare Bottom.wav”. In these kinds of situations, I like creating Track folders to sum these different “perspectives” into a single fader.
Folders and The Master parent send: Folders in REAPER are one of my favorite features. You can organize your project in “subgroups” or Folders extremely quickly without even having to mind your routing! All REAPER tracks by default send to their Parent track which can be either the Master track or the track they’re “under” or “inside of”.
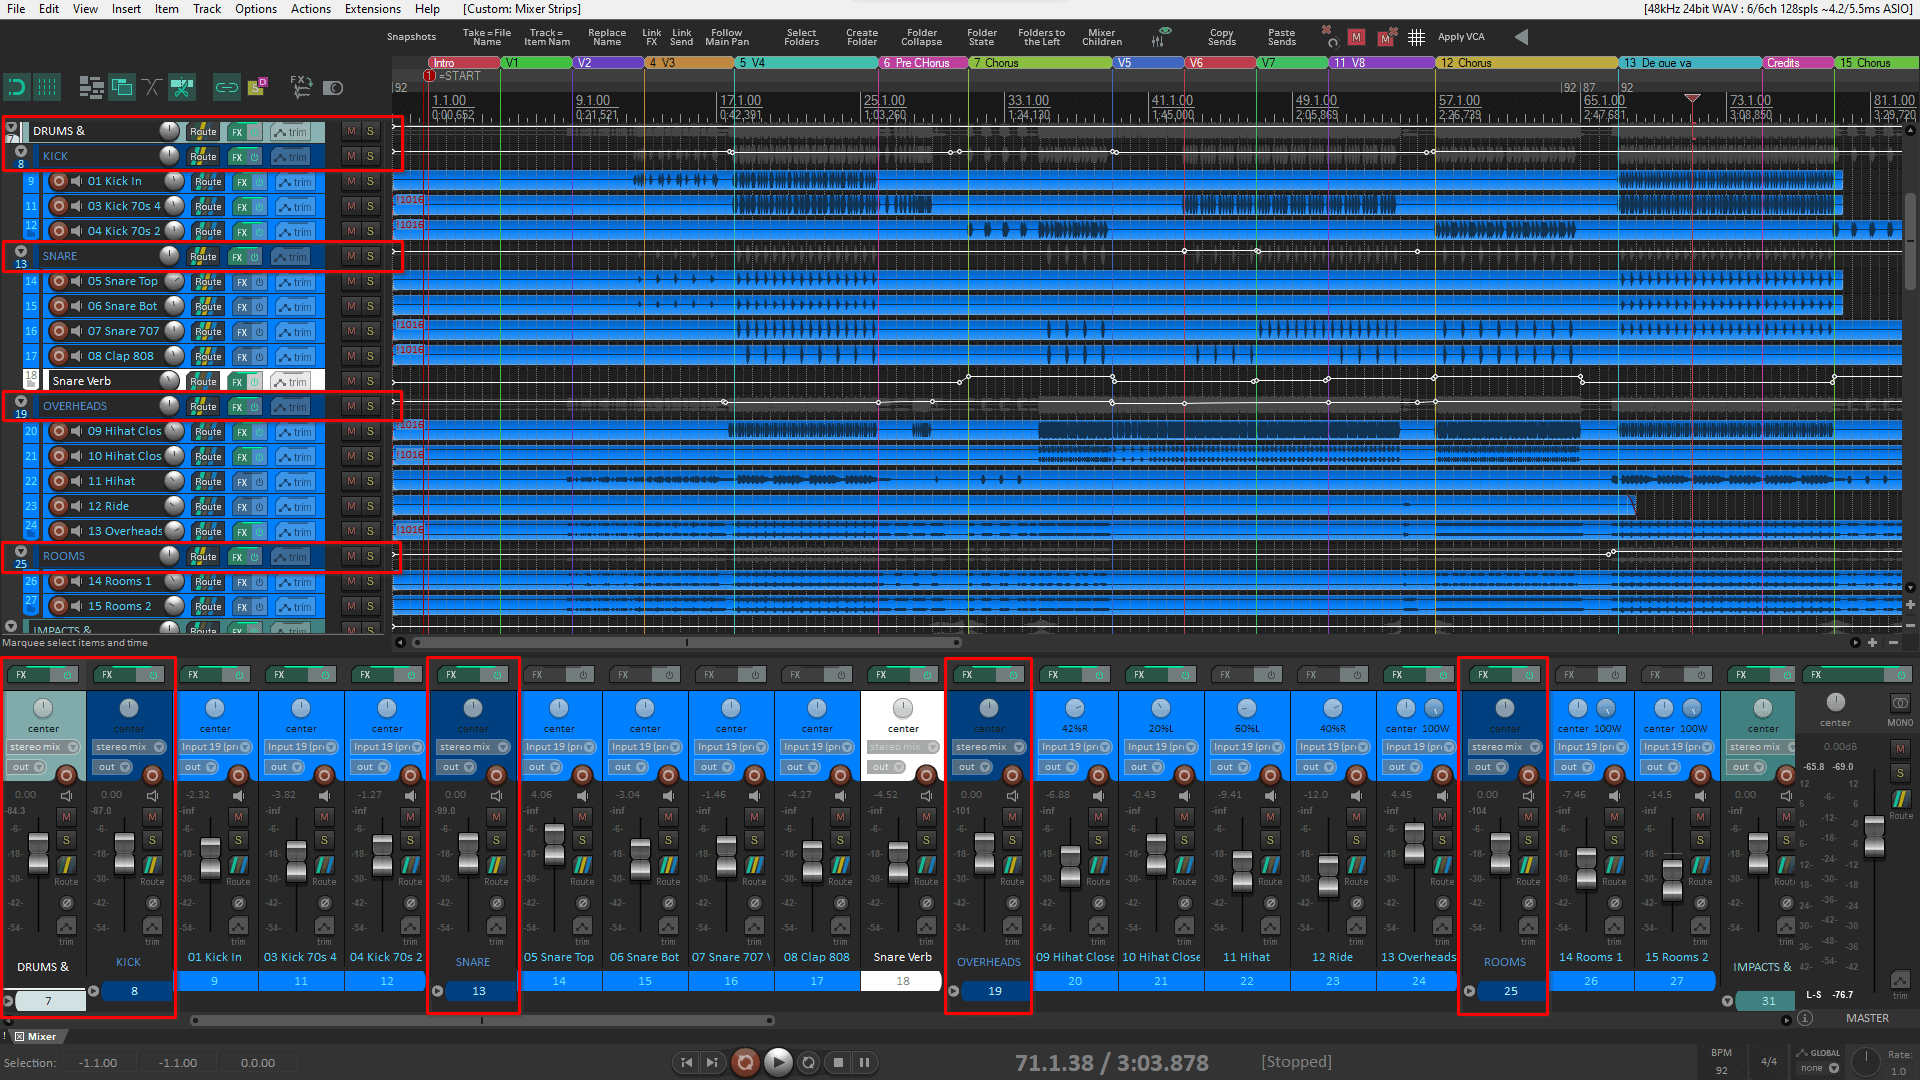
Create a track folder by dragging a track “into” the intender Folder track, you will see a blue or gray highlight showing the indenting of the intended Child track. Or by clicking the folder button on the intended Folder track.
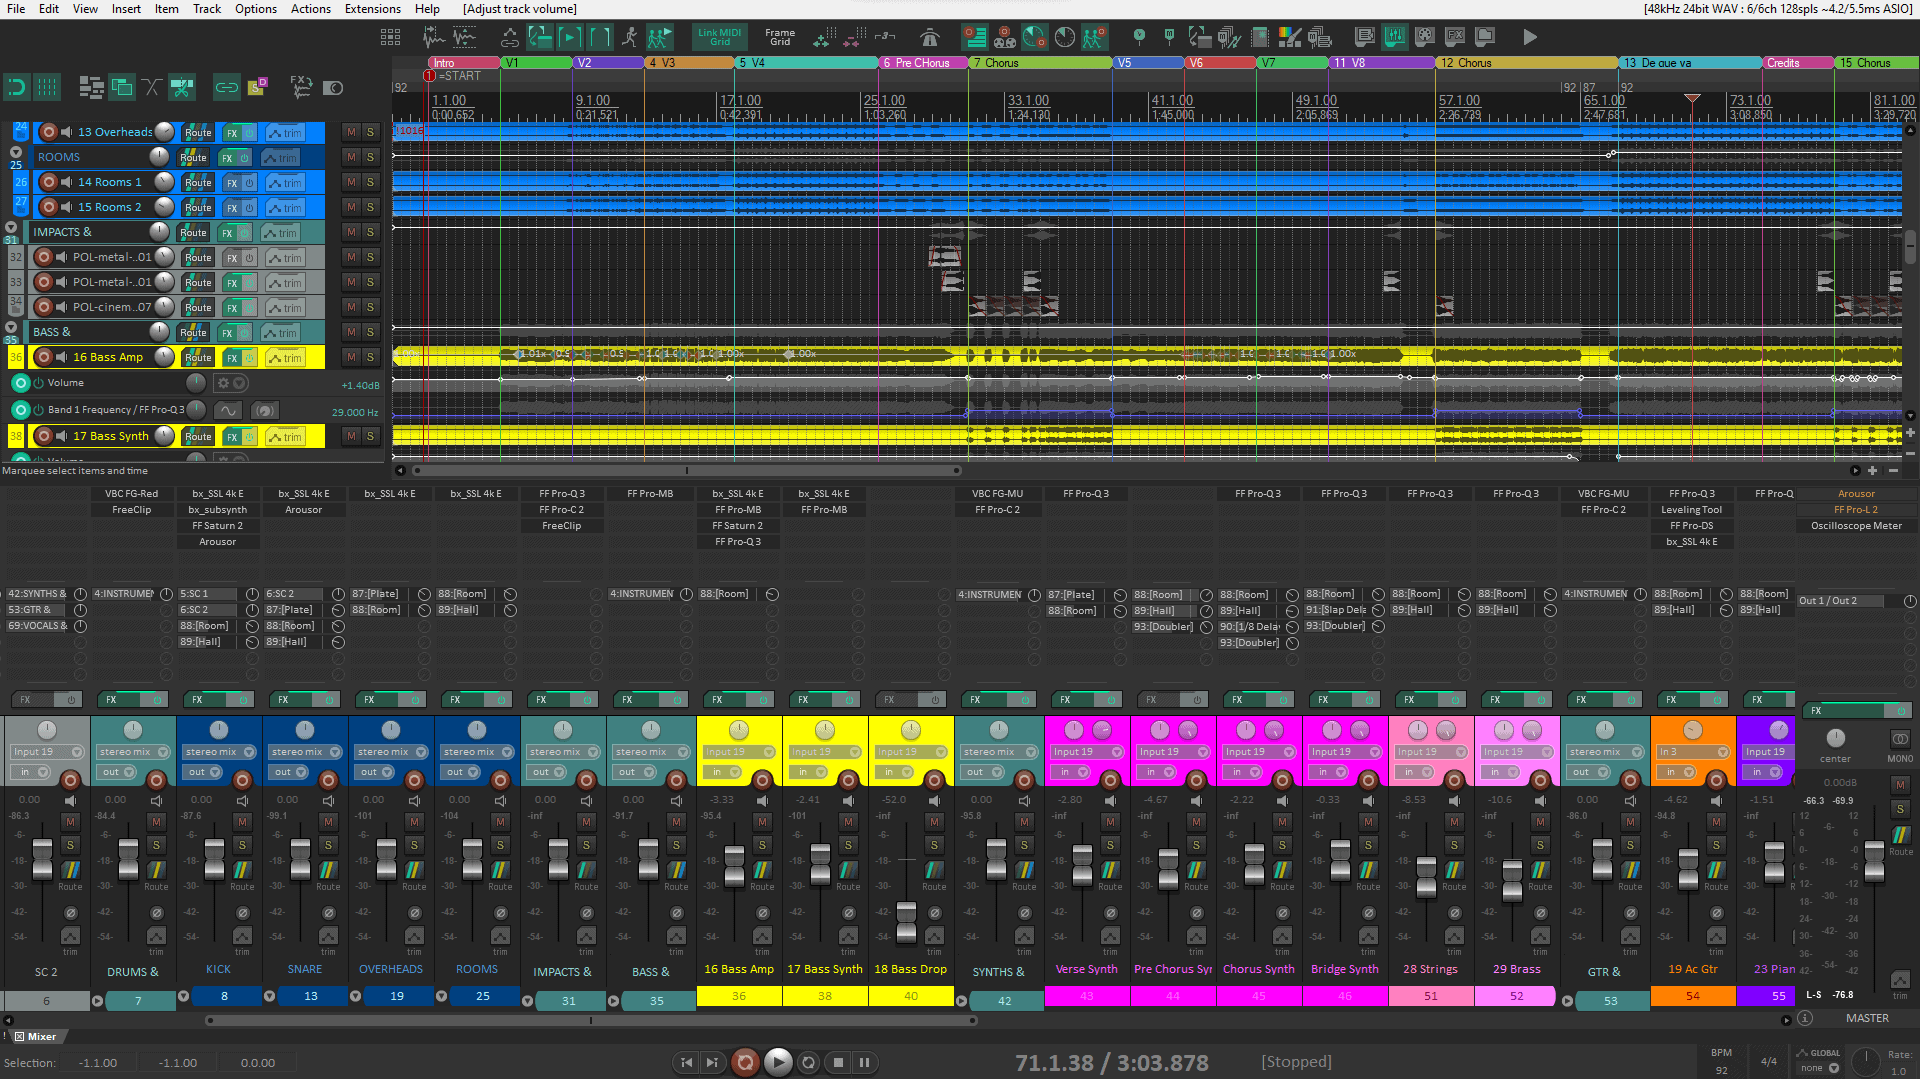
Auxiliaries, sends, and receives: Here’s where you dip your feet into REAPER’s absurdly powerful routing capabilities. Each track can send to the Parent or not, and outside of that, can send or receive audio or MIDI from any other track in the Project. That is how “Auxiliaries” are born in my mind, it’s a concept borrowed from other DAWs which basically means: Tracks that are meant to receive audio via a Send to process a sound or group of sounds in parallel. This is how Reverb, Delay, FX, and “Crush” tracks work for me.
After creating your aux tracks, you can drag from the Route button of the sending track into the receiving or “Aux” track. Hold Shift to send all selected tracks, this is the fastest way of creating sends in REAPER. However, you can also open the Routing window by clicking the button and manage all your sends and receives from there
I like to save specific track setups and layouts that differentiate these last two conceptual types of tracks as Track templates. This way I can load them at any time and not have to worry about setting them up every time, while at the same time keeping them different visually from audio/MIDI tracks.
Regarding grouping, REAPER has Track groups, which allow you to link select track controls and/or item editing. Select the tracks you want to group and press Shift+G, the grouped elements will get a colored ribbon by default indicating which Group number they lead or follow. These may prove quite useful in the next stage of the mixing process.
Note that these groups do not include FX or Send parameters, the Scripts section of this article will include further information on that. However, I don’t lose faith in having this feature natively in REAPER someday.
The Rough mix
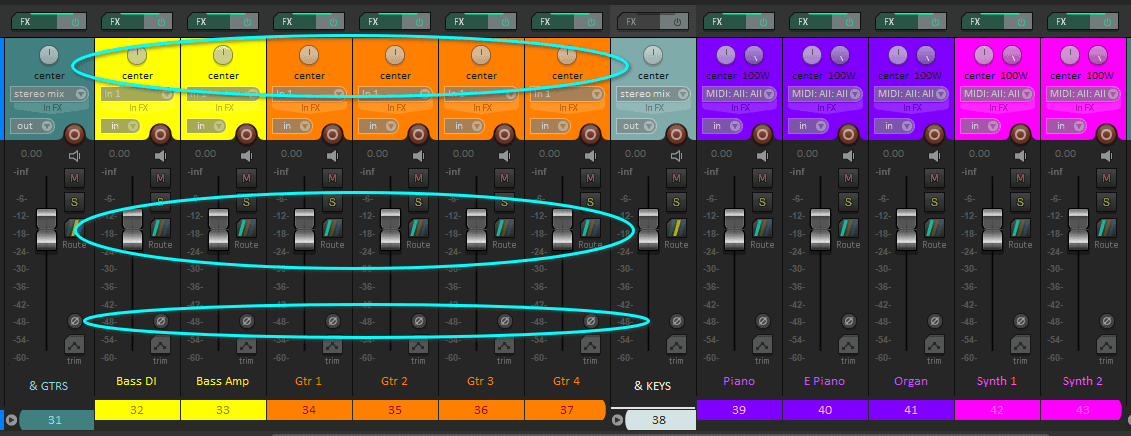
A rough mix for me consists in only setting up your Levels using Faders, your panorama (Stereo sense) using your panning knobs, and the polarity of your track using the polarity button.
This is by far the most important part of a mix. In the process, you will determine the quality of the elements provided, as well as the importance of each and its place in the Mix. A good start is by having all your faders down and your pan knobs in the center, then, raising each fader to tase and moving things away from the center as you feel necessary.
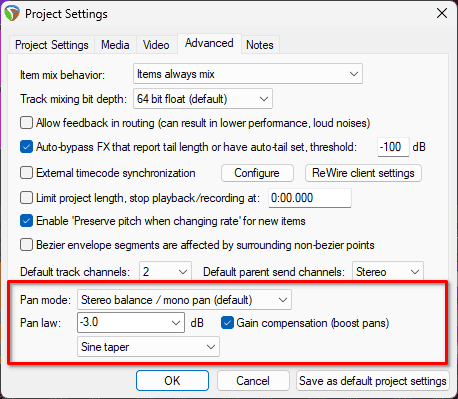
If you ever feel like you need to worry about Pan law you can do so by going into Project settings in the Advanced tab. However, keep in mind that you will naturally compensate for Pan Law with your fader placement, so basically stick to whichever feels more comfortable, don’t mind it too much, I will show you my preferred Pan law settings
EQ, Compression, and Other FX
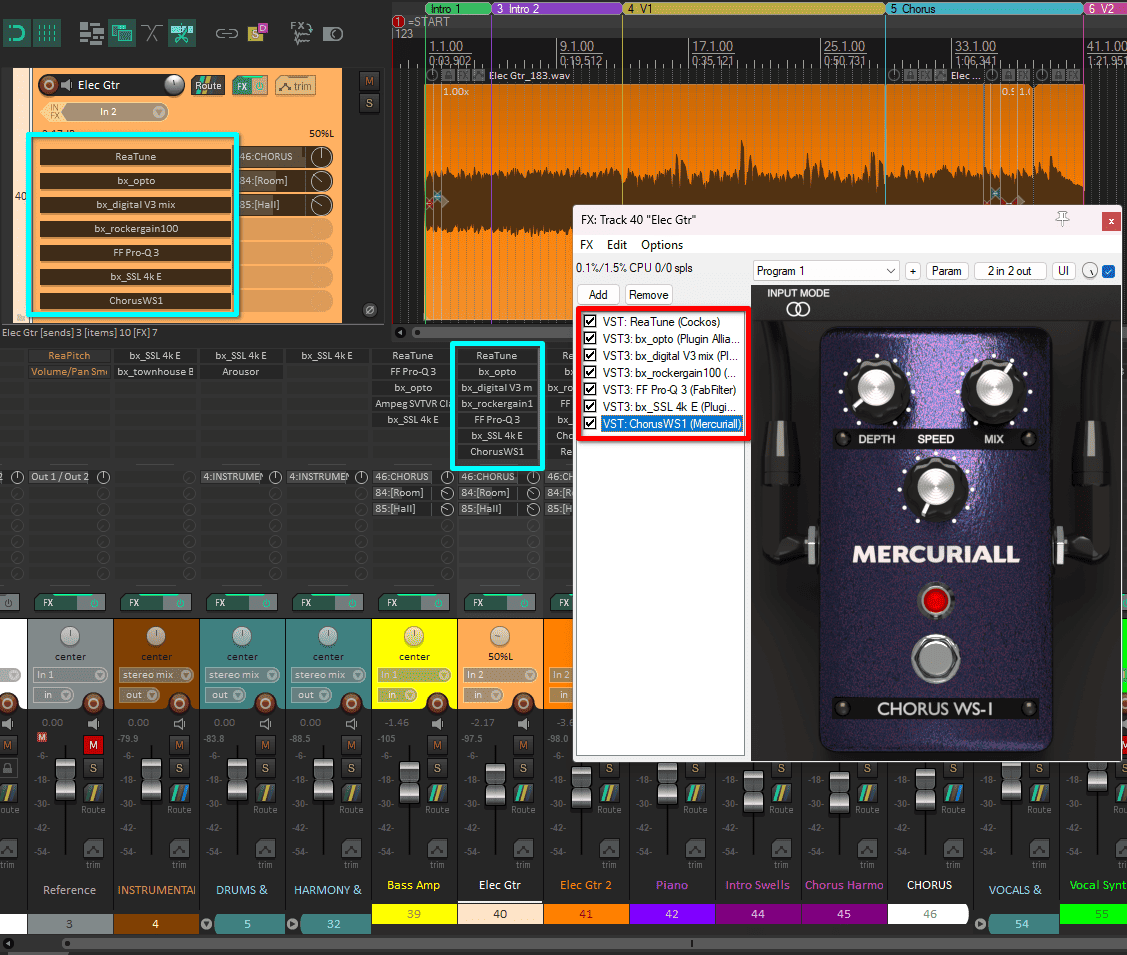
After getting a feel for how the raw material sounds, it’s time to process.
Some people think about EQ and compression as different processes, but in my mind, they are the same in the sense that, any tool that I choose to use is guided by the same fundamental question ‘What is this sound asking for in this context?’.
There are a few more questions that help guide the answer like ‘What role does this sound accomplish in the song or the section?’ and ‘Where do I want this sound to sit?’. Keep in mind that this may make you rethink your mix prep and routing, and that’s ok, this is ultimately an iterative process.
Now, I know that there are a lot more effects that can help you shape your tracks. However, with the right EQ and Compression, you will get most of the way there. Also, these questions make me very conscious of my mixing decisions, prevent me from over-processing when there’s no need to, and give me more confidence on when it’s really necessary to apply those dreaded, almost-infinite FX chains
The one other type of effect I can’t do a proper mix without is Distortion or Saturation. I tend to think about using different kinds and amounts of distortion on most of my tracks. This way, the mix feels denser and a little rougher around the edges, while being more pleasing to the ear, more controlled in terms of peaks, and less clinical.
There’s a trick in this section that makes mixing in REAPER much much faster than any other DAW, FX shortcuts. Essentially, you can assign any key combination to the action of loading specific plugins to the selected track or tracks. This makes it so that you can cut down your thinking process and dramatically speed up the loading time of your most used effects.
Right-click the FX you want to add a shortcut to inside the FX browser, then, select the option “Create shortcut” and assign the shortcut as you would so with any other action inside the Action list.
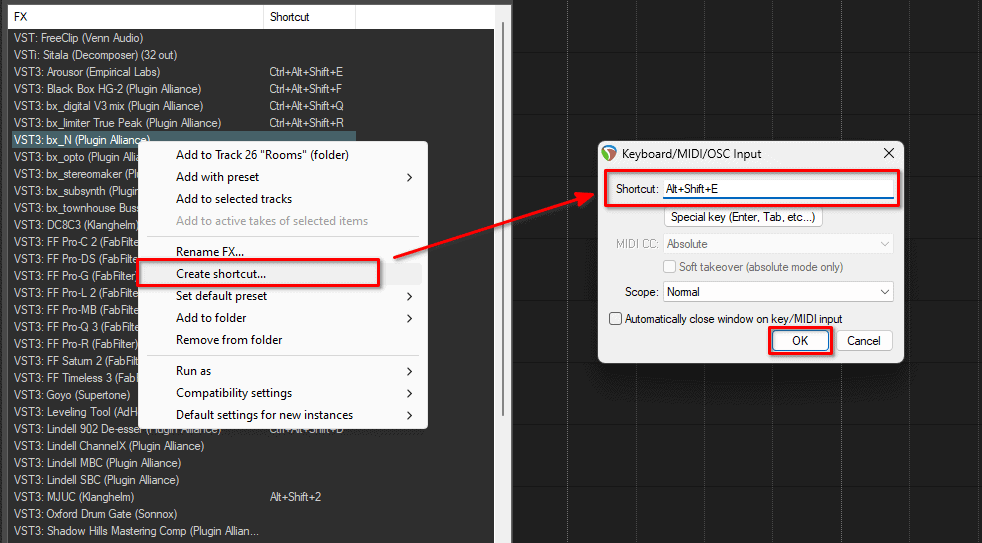
Furthermore, these effects will be added as an action to your Action list, making it possible to create toolbars with buttons that load all your favorite plug-ins into your selected tracks. This way you don’t have to memorize shortcuts if that’s your style.

Ambiance and Time Effects
This is what gives your mix the most sense of depth. This means that if you picture your mix as elements in a room, this will allow you to place elements further back or more up-front by controlling the basics of ambiance: Reverb and Delay. As a rule of thumb, the dryer a sound it, the more in your face it feels, and the more washed in reverb, the further it feels.
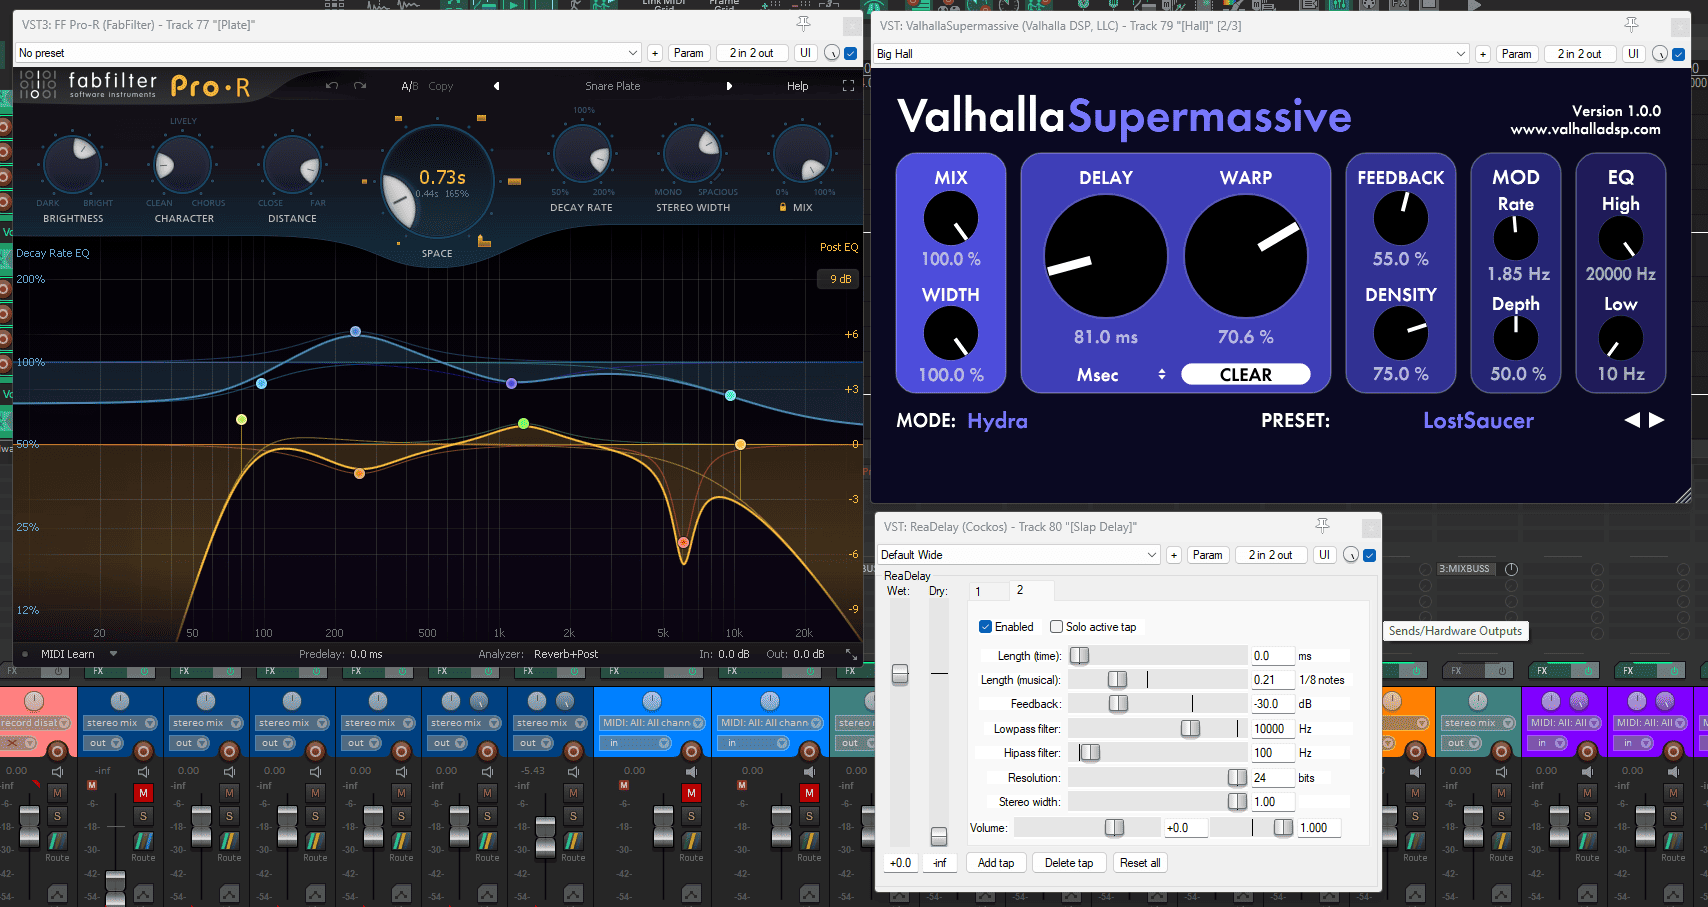
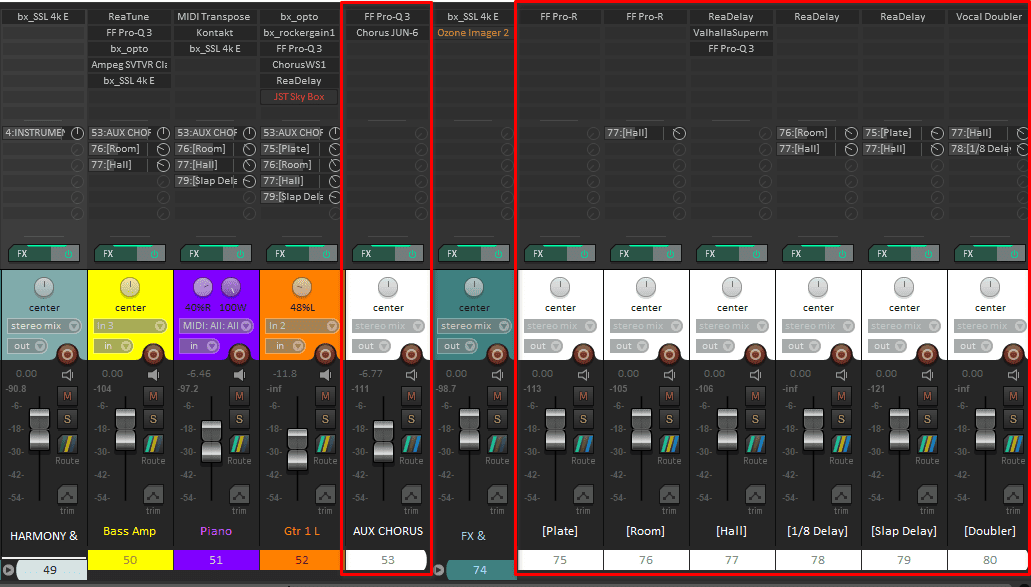
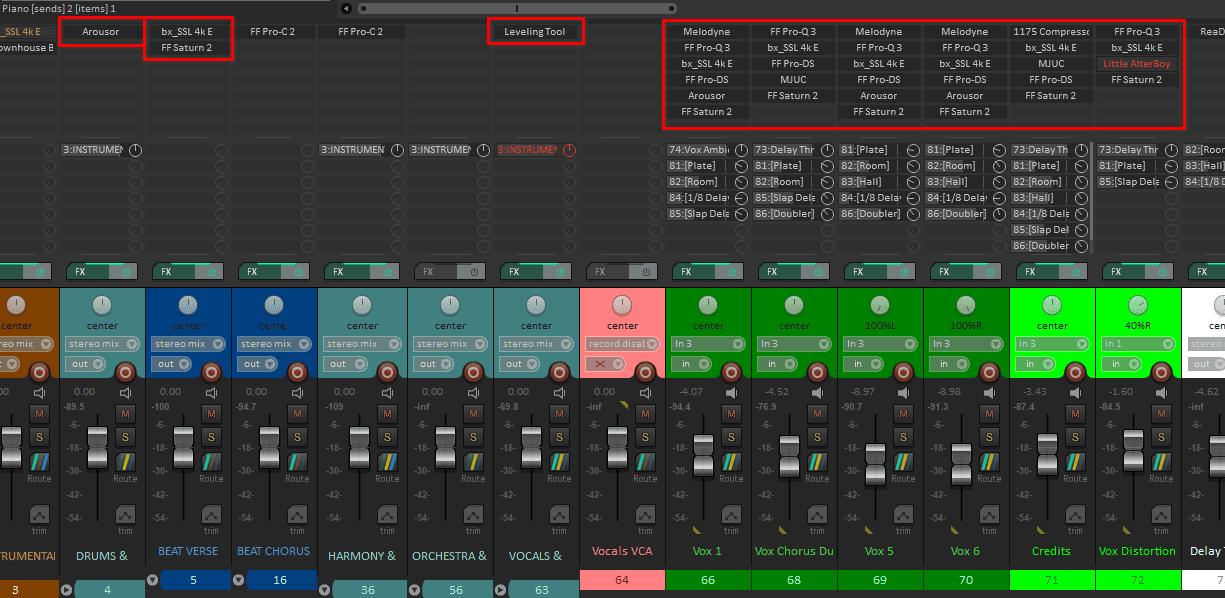
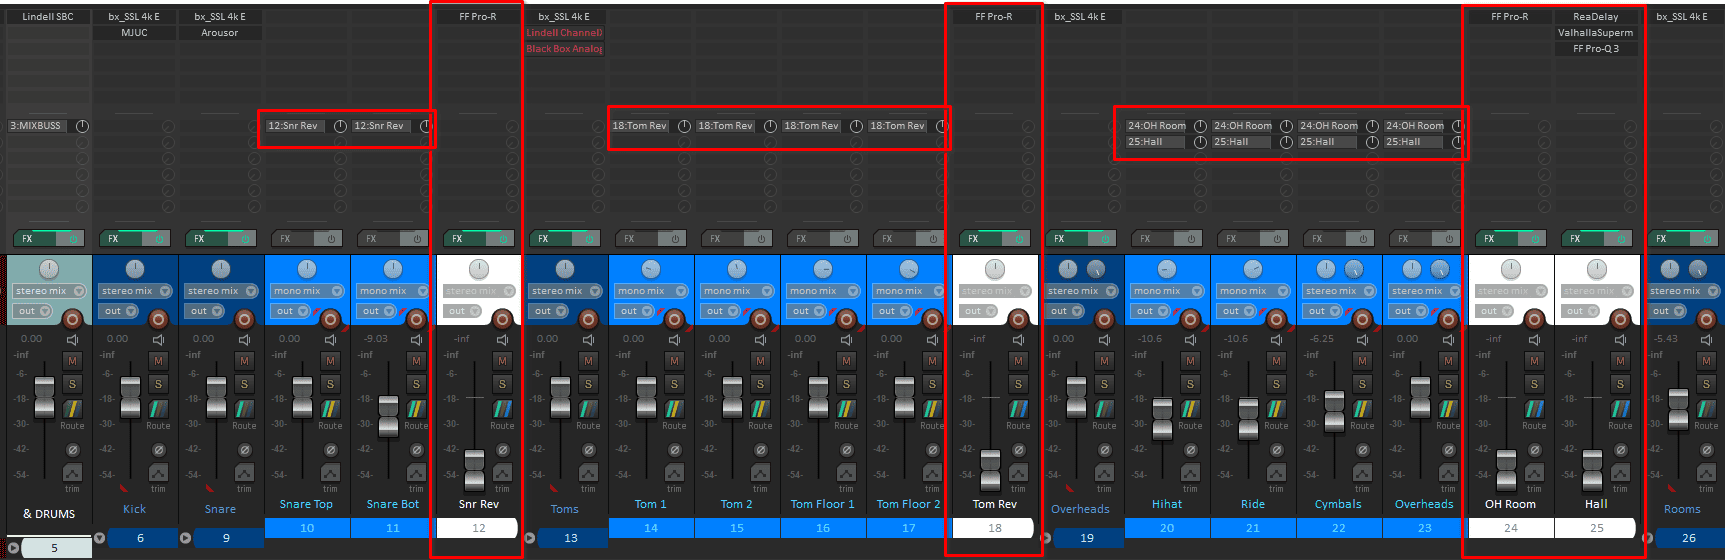
However, there are a couple of considerations when thinking about the ambiance in a mix. You most likely want your mix to sound cohesive like the elements in it are all in a similar space, and an absurdly easy way of achieving that is by using “Aux tracks”. This saves you a monumental ton of CPU and Ram resources because instead of loading 30 to 50 reverb plug-ins, you can load around 5 or 6 global ambiance plugins for the whole mix.
I like creating a Folder only for the Ambiance tracks, “FX buss” if you will. This folder goes directly to the Master track to be processed globally with the rest of the elements of the mix. Then, each “Element” can go individually to one or multiple FX Auxes depending on the element’s needs. In this case, I don’t talk about tracks because sometimes it’s better to create sends from folders to the ambiance tracks instead of plain “Audio/MIDI tracks”.
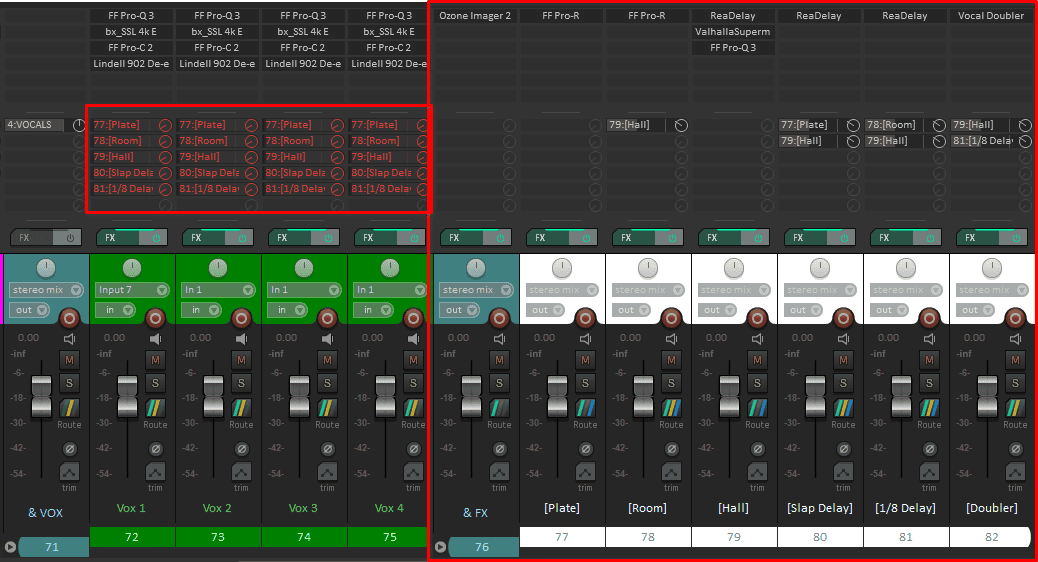
Other people may prefer creating Aux tracks for each Instrument group or Folder. This way you may end up with a bit more Ambiance plug-ins loaded into your project, but can give you finer control of how the ambiance reacts and is processed along with each group of elements.
Automation or “Envelopes”
The first reflex while mixing music is processing each track so that it somewhat works across the whole song. However, music is not static, it has different sections that evolve one into the other constantly.
This is where Automation comes in. Digital automation allows you to “tell” REAPER, what value you want each parameter to have at every moment along the arrangement, giving you a more precise control of each sound throughout the song, and as a result, a better control of the emotional impact of the song.
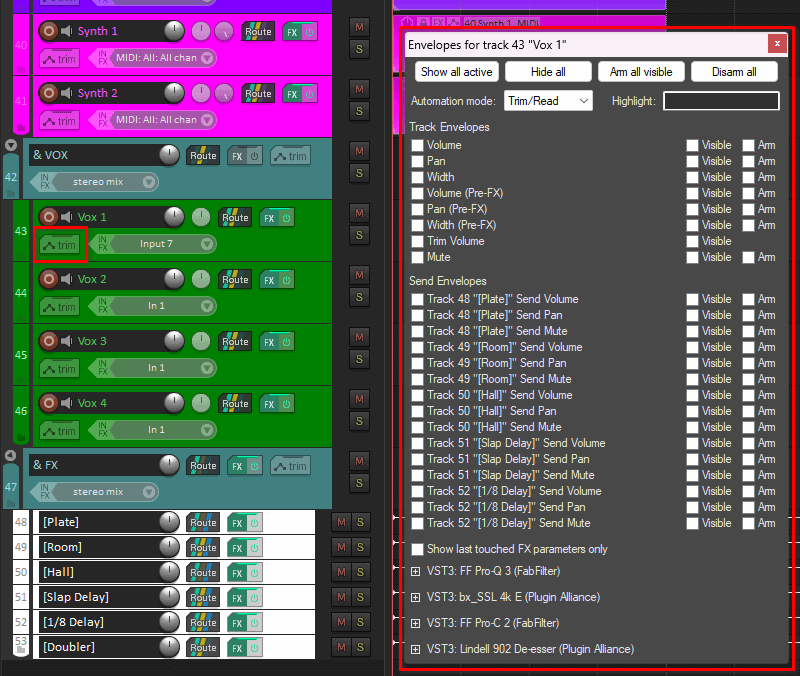
The basic way to start automating any parameter is by clicking the Automation button on the track your want to apply automation to. This will open the Parameter automation window, where you can pick and choose which parameters you want to show as lanes and automate.
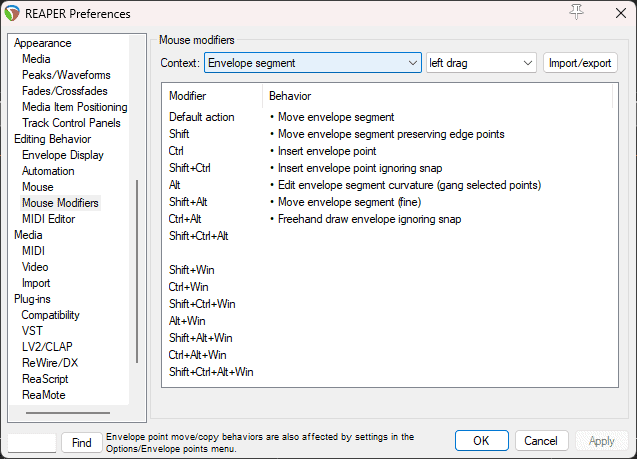
Once your Automation lane is shown, you can create and draw points, or edit segments. I dearly recommend exploring and even customizing your Preferences > Mouse modifiers for the automation and “Envelope” contexts.
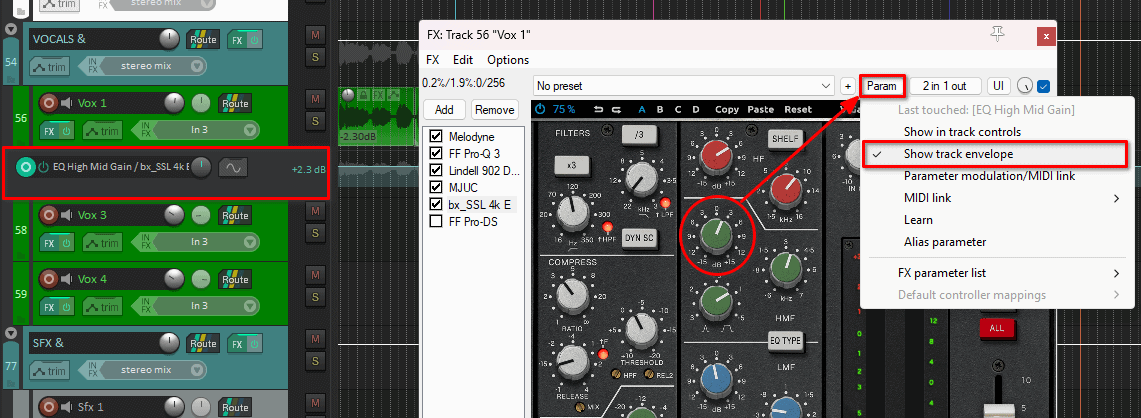
However, a faster way of automating FX parameters is by first, clicking the parameter you want to automate. Then go to the Param button on the top right of the FX window. It will show you a small sub-menu with the name of the parameter you just clicked in gray, next step is clicking the option Show track envelope.
Scripts
Scripts are a great way to add functionality to REAPER, you can create your own or ask in the community, make sure to get ReaPack installed, and take a look at the scripts that are included. I’m sure you will find things that
My favorite script for mixing is “Script: spk77_Link selected tracks FX parameters.lua”, it allows you to select several tracks and move copies of the same plug-in at the same time in all the selected tracks.
And I also created my own script, based on spk77’s, that similarly links the sends of the selected tracks. For now, it only works using the Mixer’s Send list, and sometimes breaks but it gets the job done in most applications for me! So I’m proud of getting it to work at all in any practical way.
After Mixing
After you have your mix ready and to your satisfaction (just kidding, one is never truly satisfied with a mix), you may think about Rendering it to send it to Mastering, make sure to take a look at these articles to get an idea of how these processes go. Aside from that, I can only suggest you try and stay away from over-tweaking your mix, most of the time it ends in disappointment.
Conclusion
I really hope this article gave you a good overview of how mixing in REAPER works. I truly believe it is the best mixing DAW because of its versatility and how efficient it is in resource management. I dare you to explore it and make the most out of it, there is a lot more to explore, but for now, happy mixing!

- Mixing in REAPER [ULTIMATE Guide!] - September 18, 2023
- How to Record in REAPER (Guitar & Vocals) - August 2, 2023
- Writing MIDI Drums in REAPER - July 3, 2023
")
![REAPER Metronome and Click Track Setup [FULL GUIDE]](https://ProRec.com/wp-content/uploads/2022/12/word-image-3592-3-180x180.png "REAPER Metronome and Click Track Setup [FULL GUIDE]")
