As an Amazon Associate ProRec.com earns from qualifying purchases. Any links that take you to products are affiliate links, and we may earn a commission if you make a purchase. We appreciate your support.
All text and image links lead to Amazon unless stated otherwise. All product scores are based on ProRec’s in-house scoring model
| Thumbnail | REAPER Interfaces | ProRec Score | Price |
|---|---|---|---|
 | 9.4 | Check Price on Amazon | |
 | 8.7 | Check Price on Amazon | |
 | 8.5 | Check Price on Amazon |
Introduction
Audio Interfaces are an absolute essential for music production. They let you record high quality vocals, guitar tracks, drums and pretty much everything else. One thing you should know is that interfaces are not DAW dependent, any interface will work with any DAW. They are external sound cards that basically plug into your computer and enable you to record externals.
When choosing the best audio interface for REAPER, the answer will vary based on your individual requirements, budget and the port selection your computer has. If you’re looking to lay a few tracks at once then you can get something with a couple channels and you’ll be fine. However, if your need is to record multiple instruments simultaneously, then you can go for a more elaborate 8 to 16 channel I/O configuration.
A pivotal metric in your selection criteria should be the quality of the preamps (these help amplify low level signals). Most preamps in the same price range are going to be pretty similar. However, the higher your budget, the better preamps you’re going to get. The sound quality is also subjective, so you may prefer one type of preamp over the other. You also want to take into account the A/D D/A converters that convert the analog signal from your mic/instrument into your DAW and then again for playback.
Most interfaces in the market come with a USB-C port, since it is more universally applicable. You’ll also find interfaces with Thunderbolt, which is great if you’re a Mac user. Once you get past the basics your money is basically going into additional features such as an on board DSP, ADAT/SPDIF expansion, DC Coupled I/O, Bluetooth ability, bunded plug-ins and so on.
If your budget is low, it is totally fine to get a more affordable interface, just make sure you choose one from a well known manufacturer such as Focusrite or SSL. You can always save up for an upgrade later down the road when your requirements start going beyond the basics.
One thing you want to make sure is that the interface you choose works flawlessly with your OS. This is dependent on how good the manufacturer is with driver support. All three interfaces reviewed in this guide are tired and tested offerings by well-known manufacturers that stand behind their products. Any of these, for you, could be the best audio interface for REAPER!
Recommended Read: How to Choose an Audio Interface
Best Audio Interface for REAPER Reviews
All text and image links lead to Amazon unless stated otherwise. All product scores are based on ProRec’s in-house scoring model
Motu M4 is a 4-in/4-out USB-C audio interface featuring ESS Sabre32 Ultra™ DAC technology, similar to that of many high-end interfaces. The 24-bit/192kHz audio along with an outstanding 120 dB dynamic output range and ESS-powered headphone out sets the interface apart, especially at this price point. The interface comes with a USB-C to USB-A cable.
The front panel features two XLR/TRS combo jacks on the right side. Next to each jack is an individual GAIN knob for input signal boosting up to 60 dB. Here you will also see the individual 48V phantom power switches and a MON button that engages direct monitoring for each input. Followed by INPUT MONITOR MIX which helps maintain a balance between computer output and live inputs. Below this is a switch that engages hardware direct monitoring for inputs 3-4 (present on the rear panel). Next to these is a high-solution LCD that displays the metering for all ins and outs. It is followed by a big volume control knob for the monitors, along with its volume control knob to the left.
The back panel has a power switch and K-lock to the right, followed by the standard MIDI ports and a USB-C port. You will also find unbalanced RCA analog outs that can connect another set of speakers, as well as balanced/unbalanced DC-coupled outputs for your studio monitors and line inputs for line-level sources.
The unit has excellent build quality, thanks to the durable metal dials and housing. The awesome design allows for most controls to be accessed directly on the hardware, saving you time on the unnecessary back and forth.
To get started, we connected the M4 to a MacBook, which required an additional driver to access all features. We initiated the download after registering online and while the process was a bit elaborate, it was trouble-free and we were good to go in no time.
We directly plugged in our Neumann TLM 102 and Fender Stratocaster guitar along with Node NTH-100 headphones and began tracking. The output was nearly flawless. The preamps sounded quiet and clean even at higher gains. We noticed plenty of headroom while we recorded and monitored, and the amp quality remained superb despite our active pickups. The 120 dB dynamic range of main outs is outstanding, and with its ESS Sabre32 Ultra converters, the unit undoubtedly has a best-in-class conversion at an amazing price point.
We were able to monitor vocals directly through the unit while simultaneously running our guitar via the virtual amp modeling. We haven’t really seen any other entry-level interface offering these features including individual monitoring and phantom power switches. The unit was super compatible with Reaper and we had a rock-solid experience finding the right sound for our final mix. The latency tests were also virtually non-existent – our results suggested only 2.7 ms roundtrip at 24-bit/96 kHz. Also, something we personally like to see that this unit also features is a practical rocker-style power switch that makes it super easy to turn the set off without needing to unplug it.
The M4 was released alongside the M2 in 2019, and they share a lot of similar features in terms of DAC technology, software processing, dynamic ranges, and audio resolution. The main difference between the two is the I/O configuration – M2 features a 2×2 configuration while M4 has 4×4 ins/outs. Also, the knob that controls the direct and software mixing is only present on M4. M4 also additionally has a button that controls direct monitoring for the third and fourth input. Recently, MOTU released the M6 which is an upgraded version of the M2 & M4 with a more elaborate 6 in/6 out I/O config.
While the M4 packs a strong punch, there are a few shortcomings that you need to know. For starters, you can’t balance the mic ins and lines 3/4 as the gain on 3/4 is fixed and if you really do need the balanced mix, this interface is probably not for you. Also, there’s only 1/4″ headphone outs and the units lack 1/8″ jack. Another thing is that if you need more than 4×4 configuration, you might want to reconsider as there is no option to expand. On the contrary, if this configuration works, this interface would be a solid purchase for you.
All in all, the Motu M4 is an unbelievable drop that has raised the bar with its astounding features at a cut-down price. They have given each aspect detailed attention whether it’s the discrete phantom power and monitoring buttons, power switch, low latency, DC coupling, seamless integration with DAWs – and basically feature after feature that sets it apart! At this price tag, the Motu M4 is as spectacular as it gets.
Motu M4 Benefits
Astounding features including individual +48V and monitoring buttons, the power switch, DC coupling, the Loopback driver etc
Best-in-class ESS Sabre32 Ultra converters
Comes with workstation software (Motu Lite, Ableton Live Lite), virtual instruments, etc
Motu M4 Drawbacks
Can’t balance the mic ins and lines 3/4 as the gain on 3/4 is fixed
1/4″ headphone out (no 1/8″ connector)
Lacks expandability
All text and image links lead to Amazon unless stated otherwise. All product scores are based on ProRec’s in-house scoring model
SSL 2+ is a 2-in-4-out, 2.0 USB-powered audio interface that offers 24-bit/192 kHz conversion. Inspired by the SSL’s 4000 series consoles, the unit also features a 4K-Legacy switch that injects a sweet-sound harmonic distortion to the signals. The high-class preamps capture true analog depths and the Monitor Mix Control makes low-latency monitoring easier than ever. The unit comes with both Type C-to-Type C and Type C-to-Type A cables.
The front panel consists of a section on the right side that is dedicated to the input controls for channels 1 and 2. On the top, you will see the +48V phantom power switch along with the LINE and HI-Z switches. Below these is an LED meter that indicates the level of the signal being recorded. This is followed by a GAIN control knob that maintains the preamp gain and lastly, the LEGACY 4K switch that adds the analog magic needed to enhance sounds. The same controls are present for the second input as well.
The left section of the front panel is dedicated to the monitoring controls. Here you will see a MONITOR MIX knob, on the top-left corner, that controls the audio coming from your headphones and monitors. Turning the knob to the left-most position will allow you to hear the sources connected to the input channels 1 and 2, while switching to the right-most position will allow you to listen to your computer’s USB stream. Below the green USB LED is the MONITOR LEVEL that controls the volume levels sent from the outputs to your monitors. Other than the PHONES A and PHONES B control set, you will also see a 3 & 4 SWITCH next to PHONES B that switches between the source that feeds the headphone output.
The rear panel features a combo XLR / ¼ -inch jack for inputs 1 and 2 on the left side where you can connect the microphone, instruments, and/or keyboards. Next to these are two balanced ¼-inch TRS jacks to connect your monitors, followed by two pairs of unbalanced line RCA outputs. Next, you will find two stereo headphone outputs along with the ins/outs for MIDI equipment. On the far right, there is a USB 2.0 port and the Kensington Security Slot present.
We had no trouble setting up the interface with our MacBook. The unit is class-compliant on Mac which saved us from the entire driver installation process. Once connected, we plugged in our SE VR2 mic, SE Paul guitar, and Yamaha HS-5 headphones before diving in to test the interface.
The preamps were transparent and sterile and were also quite powerful considering that we needed very little gain to get a solid DI signal. The noise floor was impressively low and with the AKM technology, the conversions got us a sound as clean as we were expecting. This powerful circuitry made the unit super flexible for seamless DAW integration. Personally, our experience with Reaper helped our creative process and was flawless to say the very least.
Just like we have seen on the higher-end consoles, the 4K-legacy switch of the SSL 2+ did not disappoint. It delivered that cohesive color to enhance any dull signals, and the fact that this 4K processing is analog really impressed us. The individual switches for each input made it easy for us to figure out where this extra coloration was actually required. This made it super convenient to make sure all the sounds fit nicely together only at the tracking stage. For the record, the phantom power switches are also independent for both inputs, which is another great feature to see on this compact interface.
Also, the interface makes zero latency monitoring possible with the monitor mix for two channels present on the unit itself. With our modest setup, latency under 4ms without glitches was a simple win for us.
Although released simultaneously, SSL 2 – the predecessor, is a slightly laid-back version of 2+ itself. Don’t get us wrong though as both units come with the same built, Neutrik combo connectors, dynamic ranges, converters, audio resolution, and so on. But there are a few aspects that might make 2+ a better purchase without taking much from the pocket.
In comparison to its predecessor, the SSL 2+ features the five-pin MIDI in and out that is often dropped for most small audio interfaces, as is the case with the SSL 2. Also, the prior version only has a single headphone output and features just one pair of balanced monitor outputs. With the 2+, you get an additional headphone socket as well as two pairs of RCA outs. Obviously, it has another monitor control knob for the second headphone on the front panel (while 2 only has one for its single headphone). This greatly enhances the versatility, and if you do not want a one-person interface, 2+ is a better option over SSL 2 in that case.
However there are a few shortcomings that you need to keep in mind. For starters, the unit offers input level at +6.5dBu max in mic mode, which can be a bit limiting for drums. Alternatively, to record drums on SSL 2+, you might want to invest in either insensitive mics or inline pads. Also, while the unbalanced RCA outs would be helpful for DJ mixers, we would’ve personally preferred balanced RCA outputs.
That said, with 2+, SSL has once again come up with the best combination of audio quality and circuitry that fits the affordable range at an amazing value. If you are looking for a portable pro kit that doesn’t break the bank yet performs exceptionally well, SSL 2+ wouldn’t disappoint.
SSL 2+ Benefits
Comes with extraordinary additional features (4K legacy switch, Monitor Mix Control, MIDI, two headphone outputs)
Lots of clean mic preamp gain
SSL Production Pack that features virtual instruments and plug-ins ( from Ableton, Celemony etc)
SSL 2+ Drawbacks
Not best suited for recording drums
Unbalanced RCA outputs aren’t the first choice for most.
All text and image links lead to Amazon unless stated otherwise. All product scores are based on ProRec’s in-house scoring model
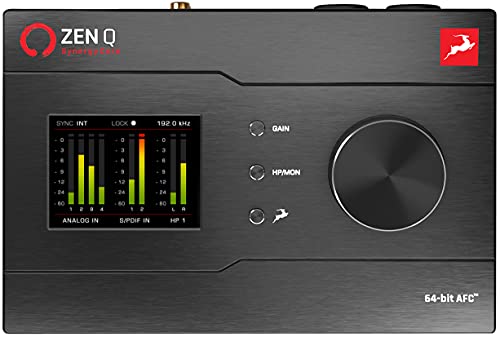
Antelope Audio Zen Q Synergy Core is a 14 in/10 out Thunderbolt/USB audio interface with a sample rate of 192kHz/24-bit resolution. The unit’s ultra-linear amps and solid AD/DA conversion (up to 127 dB) help in capturing precise sound. With 64-bit AFC clocking, you can always enjoy the sense of depth and spaciousness in the tracks. The flawless speedy routing and real-time onboard FX processing based on FPGA and DSP chips helps take excessive load off your computer. While the Thunderbolt 3 variant lacks its cable, the USB cable does come with the USB A to USB C cable.
To the right of the top panel, there’s a display screen that shows the Gain for three outputs at a time, along with indications for clock source, locking, and sample rates. On the left, there is a rotary encoder that controls important parameters like gain and volume, etc., while also helping in navigating other menus. In the center, there is a Gain button right next to the HP/MON, and Antelope function keys.
The front panel features a pair of Line/Hi-Z instrument inputs and a pair of stereo headphone outputs. As for the rear panel, you will see a pair of ¼ inch analog ins for mic/line/high-impedance instruments. Next there are dual stereo monitor outputs and line outputs that also have an ¼ inch jack. Here you will also find the stereo SPDIF digital audio channels along with ADAT input to expand to up to eight more digital audio sources. Other than the Kensington lock on the left, there is also a Thunderbolt 3/ USB C port (depending on which variant you have purchased).
It is a sturdy unit with a robust construct, innovative display and easy to access controls making it perfect for home studios as well as recording on-the-go.
We connected our MacBook with the Thunderbolt 3 cable. It took us around 30 minutes to get the entire system set up after all the activation and installation. The DSP/FPGA allows you to run plugins directly in the virtual mixer or the DAW. we set the AFX2DAW in Reaper on 128 sample buffers and hooked up a Fender electric guitar and a Rode NT1 for vocals. The routing with this unit is impressive given that we were able to plug in our electric guitar into the HiZ input, create two tracks of the same channel in the console, keep one to monitor the amp emulation, and then track both DI and emulation simultaneously. Despite being such a large project, we were able to work with Reaper seamlessly without a single glitch.
There is no doubt that the mic preamps sound crystal-clear and the sound stage and conversion are unmatched. Even on virtual instruments the focus, clarity, and depth remained consistent. We even recorded some operatic sopranos with this unit which really do utilize the dynamic ranges of the poreamp in all aspects. Even though at loud soprano passages, we have seen most preamps grow harsh and even give up, Zen Q took on the challenge with smoothness and transparency.
A little toned down in comparison with its predecessor Zen Tour, but featuring more options than Zen Go, Zen Q basically serves as the middle ground between the two. Both Zen Tour and Q provide ADAT and SPDIF compatibility and two headphone-outs for simultaneous monitoring. And of course, the onboard processing is also common to both that keeps your PC from slowing down. That said, the interfaces have their differences when it comes to their input/output configuration. While the newer version follows its compact approach with one pair of preamps and HiZ inputs and two pairs of lineouts; the predecessor has got its deck full. On top of these similar connections to the Zen Q, Tour also offers two additional preamps and four more inputs along with a D-sub out to cater to eight analog channels.
It’s a bit disappointing to see that the unit only has stereo S/PDIF and lacks optical ADAT which limits its expansion options. In fact we would’ve preferred the inclusion of MIDI compatibility as well. Also, it’s no secret that driver installations with AA interfaces still remain problematic for most Windows users. However, personally on our Mac we had no troubles there.
However, there is no doubt that Zen has gone above and beyond with this spectacular little machine. With its high-class audio quality and conversion, along with the impressive room for expansion – Antelope Audio Zen Q Synergy Core is a rock-solid interface that can easily serve as one of your best purchases.
Antelope Audio Zen Q Synergy Core Benefits
Combination of both DSP and FPGA that keeps latencies at minimal
Comes with great extras including ADAT/SPDIF compatibility, USB Loopback, AFC, etc.
Allows access to 32 AFX effects
Antelope Audio Zen Q Synergy Core Drawbacks
Lacks optical ADAT and MIDI
Driver glitches on Windows
Verdict
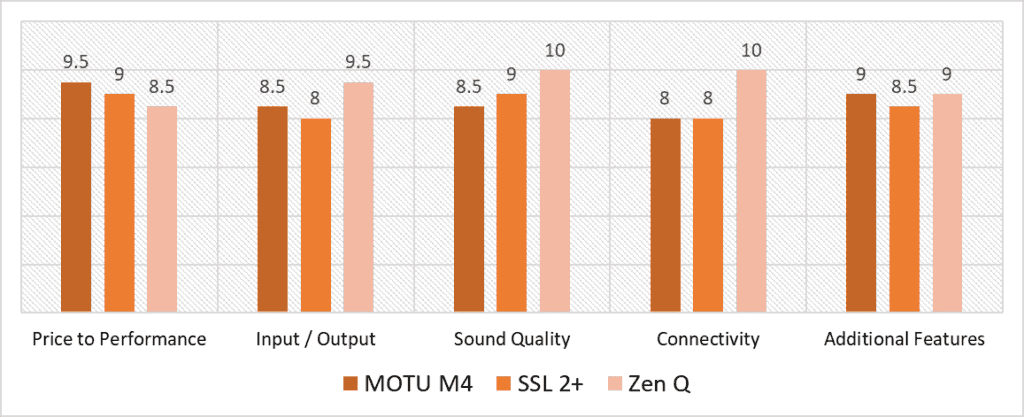
According to our scoring model, the categories with the highest variance in scores are Connectivity and Sound Quality. Zen Q undoubtedly excels in the first one as it offers two distinct variants for both USB 2.0 and Thunderbolt 3 protocols while the SSL 2+ and MOTU M4 feature only USB 2.0 connections. It also scores a solid 10 when it comes to Sound Quality, followed by M4 and 2+ which rival closely with each other but nowhere close to what Zen Q offers in terms of rich sonic analog depth.
Zen Q has performed exceptionally consistently across four out of five categories, with Price to Performance being an exception. Considering that it is priced almost twice as much as the other two interfaces on the list, the lack of MIDI compatibility and necessary cables (in the TB3 variant) is a disadvantage. Both M4 and 2+ stand out in this regard which pushes them to the top two ranks in this category. However, Zen Q makes up for this in terms of Input/Output by remaining the top contender with its 14×10 configuration over M4’s 4×4 and 2+’s 2×2 ins/outs.
The runner-up is MOTU M4, which is also a rock-solid interface with an average score of 8.7 points. It takes precedence in the Price to Performance category given that it is loaded with more features and connections than you would expect in such a humbled price range. While SSL’s 4K legacy switch gives unique coloration to the recordings, M4 still boasts better audio quality with its 120 dB dynamic range, DC coupling, and best-in-class ESS converters.
However, the best audio interface for Reaper is Zen Q with the highest average score of 9.4 points. It has all the features you need for seamless DAW integration without putting much load on your PC, thanks to its stunning DSP/FPGA technology. You also get to enjoy one of the best routing options with this unit at a configuration that would work perfectly for any recording situation. The unit does not disappoint when it comes to excellent sound quality and rightfully so, given its outstanding 127 dB dynamic range, onboard FX, and the award-winning 64-bit AFC™ & Jitter Management algorithm that gives extra depth and transparency. If you are willing to spend a few extra dollars that will still bring you all the value you expect from a solid pro interface, Zen Q is highly recommended.
Frequently Asked Questions
What audio interface works best with Reaper?
According to our scoring model, the Zen Q is the audio interface that works best with Reaper. It seamlessly integrates with DAWs without putting much load on your PC, thanks to its stunning DSP/FPGA technology. Besides its 127 dB dynamic range; its onboard FX processing, AFC technology, and outstanding routing makes it a perfect fit altogether.
How do I add an audio interface to Reaper?
Once you have Reaper installed on your Windows/Mac, go to Options, select Preferences and then choose your desired audio device settings.
Can you use multiple audio interfaces in Reaper?
Yes, you can use multiple audio interfaces in Reaper by combining your multiple audio interfaces into one virtual aggregate device.
Why is Reaper not picking up my audio interface?
If Reaper is not picking up your audio interface, make sure that your interface’s latest drivers are installed. Also check that all inputs are assigned to a track and that their ranges are defined and enabled as well.
![Best DC Coupled Audio Interface (Input & Output) [2024 Reviewed]](https://ProRec.com/wp-content/uploads/2022/07/2-channel-interface-180x180.png "Best DC Coupled Audio Interface (Input & Output) [2024 Reviewed]")
![Best Audio Interface for Streaming and Gaming [2023 Reviewed]](https://ProRec.com/wp-content/uploads/2023/05/Streaming-180x180.jpg "Best Audio Interface for Streaming and Gaming [2023 Reviewed]")
![Best 48v Audio Interface with Phantom Power [2023 Reviewed]](https://ProRec.com/wp-content/uploads/2023/01/phantom-power-180x180.png "Best 48v Audio Interface with Phantom Power [2023 Reviewed]")
![Best 8 Channel Audio Interface [2023 Reviewed]](https://ProRec.com/wp-content/uploads/2022/06/8-channel-audio-interface-180x180.jpg "Best 8 Channel Audio Interface [2023 Reviewed]")