As an Amazon Associate ProRec.com earns from qualifying purchases. Any links that take you to products are affiliate links, and we may earn a commission if you make a purchase. We appreciate your support.
All text and image links lead to Amazon unless stated otherwise. All product scores are based on ProRec’s in-house scoring model
| Thumbnail | Cheap Budget Audio Interfaces | ProRec Score | Price |
|---|---|---|---|
 | 8.1 | Check Price on Amazon | |
 | 7.9 | Check Price on Amazon | |
 | 7.5 | Check Price on Amazon |
Introduction
An audio interface is an extremely multifaceted tool. Finding one that does the job well on a budget can be a bit challenging since the market for interfaces is quite competitive. You’ll find an incredible amount of offerings at a wide range of prices. There are units that go for as low as $50, mid range ones around $200 and some that cross the $1000 dollar mark.
While you’re not going to get a 32 bit interface, with the recent progression in technology, you can score some entry-level interfaces that output sound quality at a level often indiscernible from something twice the price.
When choosing the best budget audio interface, you’ll have to first establish what you need your unit for. If you’re looking to record external instruments, then you should put a lot of emphasis on sound quality while making sure that it has enough I/O channels (minimum 2 to 4 Inputs) to house all your gear. For a live streaming/podcasting setup, you want a unit that has loopback connectivity so you could merge audio streams from the inputs to your computer.
If all you need is a substitute for your computer’s built-in soundcard, then your most important criteria should be choosing a unit with a powerful DAC (Digital-to-Analog Converter). To be more specific, try to find a unit that doesn’t impose any notable latency and provides a high dynamic range (so you don’t compromise on sound quality). You should also make sure that the headphone amplifier can drive any pair (including high-impedance headphones) while providing enough volume.
To avoid exceeding your budget, make sure not to go for any extravagant features that you won’t really need. You’ll be presented with a lot of different features such as TB3 connectivity, a built-in DSP, built-in preamp emulators, ADAT/SPDIF etc. However, most of these features come at a premium price, so unless you’re planning to really use those features and don’t mind paying the extra buck, focus on choosing an interface that gets all of the basics right.
Another important aspect you should keep in mind when choosing an audio interface is driver compatibility/stability. While there are some class-compliant budget audio interfaces, a lot of units require that you install certain mandatory drivers. However, one of the most common issues in cheap interfaces is driver instability. Some units aren’t optimized for a certain operating system and would present some volatile behavior. Other units don’t even work on certain machines, so make sure to research an interface’s drivers beforehand.
Best Cheap Budget Audio Interface Reviews
All text and image links lead to Amazon unless stated otherwise. All product scores are based on ProRec’s in-house scoring model
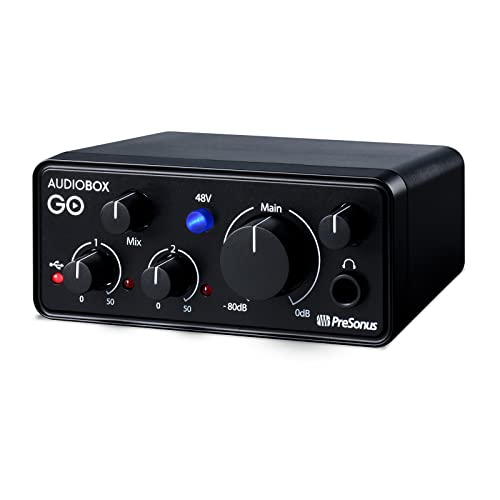
Starting off with the cheapest audio interface on the list, the AudioBox Go is the latest model in Presonus’s renowned AudioBox series. It’s an extremely compact USB 2.0 interface that features 2 inputs and 2 outputs.
Unlike most audio interfaces, the Audiobox is very popular as a consumer grade unit. A lot of people buy the unit for its playback capability, more specifically the built-in converters which outclass a computer’s default sound card. Therefore, we had to test the AudioBox GO both as an audio playback unit and a recording hub.
On its backside, you’ll find 2 input sockets which are a TRS/XLR combo input and a ¼’’ line input. You’ll also find the 2 monitor output sockets that sit below the USB-C port. This port acts as both a pc connector and a power transmitter.
The front panel features 5 different knobs, a 48V power toggle, a ¼’’ headphone output socket, and a bunch of LED indicators. The largest knob you’ll find is a monitor dial which can be used to control the output volume. To its left are 2 gain knobs for the two separate inputs and a mix knob that can be used to indicate the output audio source. Finally, you’ll find a headphone encoder knob on the rightmost part of this panel.
Physically speaking, the AudioBox Go is one of the lightest and smallest interfaces we’ve ever tested. It has a black finish and a Box like design hence the ‘box’ name. Everything from the housing to the gain knobs are plastic, but it doesn’t really feel cheap.
In terms of sound quality, the AudioBox Go features a maximum sample rate of 96kHz and a 24 bit depth which is remarkable considering its price. It is equipped with good AD and DA converters that can virtually retain all audio data with great detail. To test the unit’s DAC, we tried running a couple of soundcloud tracks while monitoring through a pair of Aonic 40 headphones. The output was mostly granular and clear, and sounded exceptionally better than our computer’s default sound card’s audio.
The headphone amps were decently powerful and fairly loud. They have a rated impedance of 55Ω which is sufficient to power most headphones, although they’re not suitable for high-impedance pairs.
The preamps on the AudioBox go provide 50 dB of gain which can effectively drive most microphones. We tried recording using different microphones such as a Shure SM27 and a Sennheiser e945 which the AudioBox handled pretty well, even though we had to max out their gain settings. However, in some gain-hungry dynamic mics we tested, the output sounded incredibly muffled which prompted us to use an external amplifier.
We also noticed that those preamps add a slight warmth to the recordings, but it’s not too flattery or excessive. it’s extremely subtle and would probably go unnoticed to the untrained ear.
Compared to its latest predecessor (the AudioBox USB 96) the AudioBox GO is much lighter and a lot more compact. The USB 96 version does however offer better specifications than the GO even though it was released beforehand, but it also costs slightly more. For example, the USB 96 offers an extra 10dB of gain range on its mic inputs and an additional 10kHz of frequency range. It also provides around 15 dBA more dynamic range than the GO on A/D conversion and 3 dBA on D/A conversion. However, their I/O channels and controls are the same for the most part, yet the GO has an XLR/TRS input and a line input instead of 2 XLR/TRS combo inputs.
While the AudioBox GO offers incredible performance for its rather inexpensive price tag, we feel there are certain issues that Presonus should’ve addressed beforehand. For instance, the unit’s gain knobs, while incredibly smooth, become nonlinear toward the max values (around the last 10-20 degrees). So a single degree turn might add 1dB or 2dB which can be extremely irritating when dealing with precise values. Additionally, even though the unit is class-compliant, you won’t be able to use it off the bat unless you install a firmware update. Nonetheless, you’ll be able to connect it to any device afterwards including iPads and mobile phones.
Overall, we believe that for such an inexpensive price tag, the AudioBox go offers great sound quality. It is by no means a professional recording unit nor will it significantly complement your inputs. However, if you’re just starting out as a producer or are looking for an interface to passively improve your audio output, then we recommend the AudioBox GO as a solid purchase that’ll definitely provide a ton of value.
Presonus AudioBox Go Benefits
It’s one of the lightest and smallest interfaces in the market.
The built-in converters are as good as something twice the price.
Its preamps can drive most microphones.
You get to monitor through almost any Headphone pair with the GO
It’s class-compliant.
Presonus AudioBox Go Drawbacks
You’ll have to install a firmware update in order to use the unit.
The gain knobs are uneven.
All text and image links lead to Amazon unless stated otherwise. All product scores are based on ProRec’s in-house scoring model
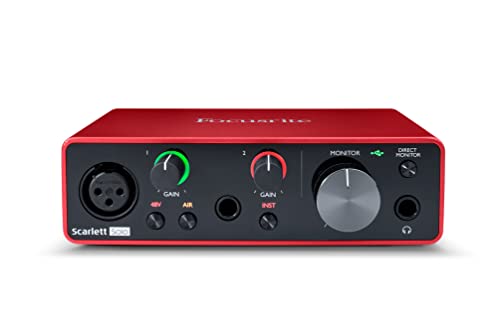
If you’ve already done some research on audio interfaces then you’ve probably come across Focusrite. The Scarlett Solo 3rd gen is the most affordable model in the Scarlett series, a compact 2 channel USB-C audio interface that offers a maximum sample rate of 192kHz and a 24 bit-depth.
Unlike what the name insinuates, the Scarlett Solo actually has 2 input and 2 output sockets. Only 1 of its inputs, however, is tailored towards microphones while the other is adapted for instruments/synths/pianos. The XLR mic input features a gain knob, a 48V toggle(for condenser mics) and an AIR mode button. On the other hand, the TRS line input only features a gain knob and an INST Mode toggle for high impedance instruments.
In addition to those controls and the 2 line outputs on the back panel, the Solo features a ¼’’ headphone socket and a large monitor knob that you can use to control both the output and headphone volume. You’ll also find a direct monitoring switch on the front panel and a USB-C port on the back panel (USB Bus-powered).
In terms of build quality, the Scarlett Solo is extremely durable even though it’s enclosed in aluminum. The knobs and controls are clicky and have just about the right amount of resistance. We didn’t find any major faults with our unit other than the usb connector, which was slightly wobbly.
The Scarlett Solo is extremely beginner-friendly and easy to use. Once we plugged it into our computer, we were presented with easy to follow video instructions that really simplified the setup process. Even the Focusrite Control software has an extremely user-friendly and responsive UI.
Since the Scarlett Solo features 2 input channels, we wanted to recreate a basic guitarist/vocalist performance set with the Solo at its center. So in the mic input channel, we plugged-in a Shure SM58 condenser mic, activated phantom power, then maxed out its gain knob. We then altered between a bass and an electric guitar on the balanced input socket after we activated the INST mode. Sure enough, the audio output was extremely transparent, detailed, and clear. Both inputs synced incredibly well together so we didn’t notice any sort of jitter or latency.
Meanwhile, we had been monitoring through a pair of Presonus E5 studio monitors which simply produced amazing audio. We only had to keep their volume level at around 60% to hear all nuances in sound. We also had a pair of DT 700 headphones for reference connected to the headphones jack, but we couldn’t control their volume separately since the unit doesn’t feature a dedicated headphone encoder.
Compared to its 2nd gen predecessor, the Scarlett Solo 3rd gen is more polished and better sounding. The 3rd gen Solo contains better converters and preamps, hence it has better specifications. For instance, the 3rd gen’s mic-pres offer a finer 56 dB of gain range compared to the 2nd gen’s 50dB. Additionally, while both units feature a similar maximum sample rate of 192kHz, the 3rd gen’s converters are much more detailed and provide an additional 5dB of dynamic range. In terms of ports, the 2nd gen Solo features 2 unbalanced line outputs instead of the 2 balanced outputs you can find on the 3rd gen. The 3rd gen also features a more progressive USB-C port compared to the 2nd gen’s USB-B. However, both units have the same number of I/O channels, similar build quality, and a relatively similar design.
Even though we had a pleasant experience using the Solo, we believe that it has some imperfections. For instance, the unit’s headphone amps sometimes produce a very dull yet audible static noise. While this noise will hardly affect your monitoring experience, it can become extremely annoying over long recording sessions.
Moreover, as we already mentioned, the headphone output doesn’t have its own volume controller. This can be an issue if you’re performing and want to monitor through speakers/studio monitors while also referencing through headphones. In that case, both outputs will produce the same audio signal and you can’t mute either except by disconnecting them.
Additionally, we think that Focusrite Control software is a redundant control and does not have any practical uses. All it does is present the same physical controls that can be found on the unit and permit you to change buffer size/sampling rate settings which you can already do in the Scarlett’s driver section.
Overall, the Focusrite Solo is an overwhelmingly price-efficient audio interface. From its powerful converters, silent preamps, and great build quality, the Solo exhibits amazing performance that’s comparable to something twice the price. It’s also an extremely refined and reliable unit that doesn’t really have any major drawbacks. You don’t have to take our word for it, its overwhelming popularity already speaks to its incredible aptitude.
Scarlett Solo Benefits
The Scarlett Solo is very durable and has great built quality.
It features powerful A/D and D/A converters.
The unit’s preamps are remarkably transparent and offer good headroom.
It doesn’t impose any notable latency.
It can be a great audio playback unit.
Scarlett Solo Drawbacks
The headphone amps sometimes produce a very low static noise.
You can’t control the headphone’s output volume separately.
The control software is in most part useless.
All text and image links lead to Amazon unless stated otherwise. All product scores are based on ProRec’s in-house scoring model
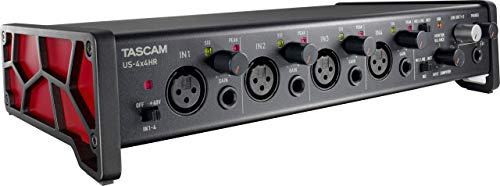
The Tascam US-4x4hr is a powerful USB 2.0 audio interface that features 4 inputs and 4 outputs. It’s a relatively sizey unit that offers high quality audio at an inexpensive price.
Build wise, the Tascam 4x4hr has an extremely robust aluminum housing. The whole unit has a slight tilt that we thought really helps with controls’ accessibility. Everything is well spaced and the knobs feel very smooth which speaks to the unit’s quality.
On the unit’s front panel, you’ll find 4 input channels each of which features both an XLR input jack and a TRS line input. However, you can only use 1 input socket for each channel at a time. These channels also have their separate peak LED, Sig LED, and gain knobs. Moreover, you can activate phantom power for all inputs through a single 48V power switch.
Input channels 1-2 can also power high-impedance inputs if you toggle the INST switch. Other than that, you’ll find a monitor balance knob, an output volume encoder for channels 1-2, and two ¼’’ headphone sockets which can be controlled via a single volume controller.
On the back panel, you’ll find 4 balanced line outputs, an MIDI I/O, the USB-C port, and a 12V optional power port which you can use if you want to operate the US-4×4 with an iPad/mobile phone.
The Tascam 4x4hr is equipped with incredibly powerful converters that can process audio at a 192kHz sample rate and a 24 bit-depth. They offer around 110.8 dB (A-weighted) of dynamic range which translates to incredibly crisp and pristine audio. We also measured its mic input frequency response which yielded an impressive effective range of 20Hz-75000 Hz.
As for the unit’s preamps, the 4x4hr provides around 54dB of gain which is usually enough to power most inputs including dynamic mics like the Shure SM7B. They have an extremely low noise floor sitting at a remarkable -131 dBu which means that you won’t need an external FET-head or preamp. We also noticed that the audio signal only distorts at very high gain settings at which point the gain levels are already too excessive.
The 2 headphone sockets on the US-4x4hr are one of our favorite additions. As simple as it seems, a second headphone socket always adds a ton of value especially if you do client work. The unit’s headphone amps can provide enough amplification to drive almost any headphone including high-impedance pairs. We mainly used a 55Ω K240 and a 250Ω DT 880 which sounded great at around 65% volume despite their different impedances.
The predecessor of the Tascam US-4x4Hr which is the US-4×4 was released almost 6 years prior. So as expected, the 4x4Hr offers better specifications and superior sound quality even though both units have the same number of I/O channels. For instance, the US-4×4 only features a maximum sample rate of 96kHz and provides a slightly lower dynamic range than the US-4x4hr. Additionally, unlike the US-4x4hr, the US-4×4 can’t be bus-powered and has to be connected to an external power supply. It also consumes more power (5W) compared to the US-4x4hr’s 2.25W power consumption. Both units also have different USB ports, namely the US-4×4 features a USB-B connector compared to the US-4x4hr’s USB-C port. However, the preamps used in both units have the same specifications, and most of their controls/features remain the same.
Even though our US-4x4hr worked perfectly well, we believe that there is more room for improvement. For example, the 48V toggle activates phantom power for all 4 inputs at once which can be an issue if you’re planning to record with different types of mics/instruments. In addition to that, it often produces a loud ear-deafening pop once toggled.
Moreover, according to our measurements, the unit has an output impedance of around 67Ω which is relatively high and can negatively impact sound quality. You’ll notice its effect when you hook up a pair of low-impedance monitors/speakers which need a higher current supply that the headphone amp can’t provide. As a result, the output frequency response will be drastically affected, and your output sound quality will deteriorate. Additionally, even though the US-4x4hr can supposedly be bus-powered through USB, our unit won’t function properly unless we connect an external power supply.
Overall, the Tascam US-4x4hr is a remarkably robust unit that has some of the best specifications for a budget-friendly unit. With its incredibly low noise floor, high dynamic range, and remarkably low harmonic distortion, the US-4x4hr is one of the best sounding audio interfaces even by a stringent metric.
Tascam 4×4 Benefits
The unit has a solid build quality and is extremely durable.
It is equipped with some of the best converters in its price range.
It has one of the lowest noise floor measurements.
The US-4x4hr has 2 headphone sockets.
It features loopback connectivity.
Tascam 4×4 Drawbacks
Phantom power only activates for all input channels.
The US-4x4hr has a high output impedance which negatively affects sound quality.
You might need to plug-in an external power supply to operate your unit.
Verdict
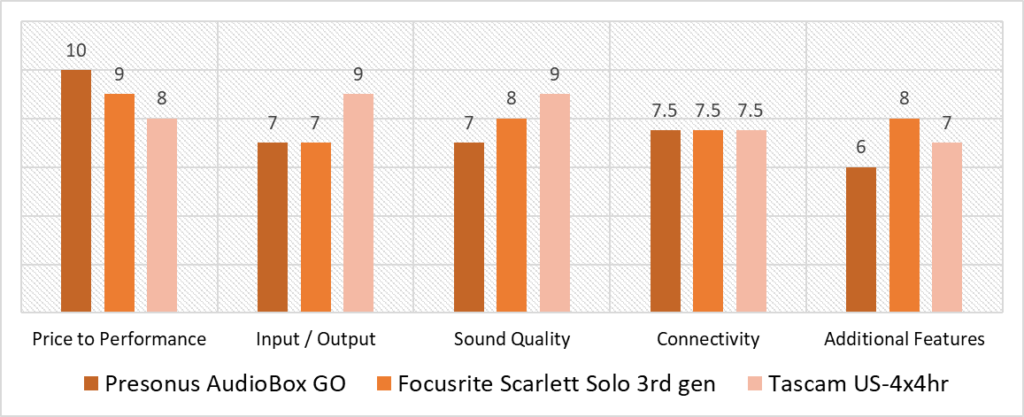
According to our scoring model, the variance between the highest and lowest scoring unit in any given category is 2, except for the connectivity category where all units have the same score of 7.5. You’ll find that while AudioBox Go aces the score in the price to performance category, it scores behind in every other category. On the other hand, the Tascam US-4x4hr seems to score the highest in almost all the categories the AudioBox fails in, but inversely scores the lowest in the price to performance category. Meanwhile, the Scarlett Solo exhibits a stable behavior throughout as it doesn’t score below 7 in any given category.
You can see that the US-4x4hr scores the highest in the sound quality and Input/Output categories which are usually the most important categories for an audio interface. Unlike both the Solo and the AudioBox Go, the US-4x4hr features 4 inputs and 4 ouputs with an additional headphone socket. It also features better preamps and converters than the other units, hence it has the best sound quality score. Nevertheless, you can see that the Tascam US-4x4hr scores the lowest in the price to performance category, but it is only because we are comparing it to the AudioBox Go and the Scarlett Solo which are incredibly price-efficient units.
We should however mention that the Scarlett Solo displays a very similar profile to the Tascam as the average overall variance between both units is only 0.2 which is insignificant. By analyzing the chart further, you’ll find that if we exclude the I/O category the variance between both units in any given category doesn’t exceed 1 which is very small. Not only that but It also scores the highest in the additional features category mainly because of its the renowned AIR emulators.
Nevertheless, when it falls down to it, the best budget audio interface according to our scoring model is the Tascam US-4x4hr. Leading with an overall score of 8.1, the US-4x4hr emerges as an extremely robust interface that offers amazing sound quality. It is equipped with great preamps that are coupled with some of the best converters in the market. Moreover, it has an incredibly low noise floor and an impressively low harmonic distortion which makes it one of the best budget music production units. Nothing speaks to the unit’s quality more than its amazing build quality. That’s why we recommend the US-4x4hr as a secure purhcase that provides a ton of value.
Frequently Asked Questions
Any audio interface can be incredibly useful if you don’t already have a mixer/ audio interface within your recording setup. While a more expensive unit will definitely provide more functionality, a budget interface will be more than enough for converting audio data, amplifying signals, etc. You will just lose out on more premium functions without sacrificing on sound quality. The majority of budget audio interfaces don’t contain a lot of I/O channels which can limit your ability to record live band performances, full drum sets, and several instruments at once. You might also be constrained to a certain number of plugins if you don’t have enough CPU power since budget interfaces don’t have built-in DSPs. However, you’ll be able to do everything else with a budget interface. When choosing an audio interface, your main focus should be getting a unit with the best sound quality. For that reason, you’ll have to look into the quality of the unit’s converters and preamps. Good converters provide a lot of dynamic range and high sampling rates which allows them to retain an incredible amount of details. As for preamps, you’ll have to make sure that your unit can deliver an ample amount of gain sufficient to drive even dynamic mics. THD+N, Noise floor, and transparency are also important metrics that really affect the quality of your recordings. Generally, you won’t have to replace your audio interface for at least a few years. Regardless of its price, an audio interface will keep on providing value as long as it can function properly and reliably. However, it is always a good idea to upgrade to a newer, more powerful unit every 5-6 years.
Are Buget Audio Interfaces a viable choice?
What are the limitations of a Budget Audio Interface?
What is the most important aspect of choosing a Budget Audio Interface?
If I get a Budget Audio Interface, will I have to upgrade in the near future?
![Best Audio Interface for AT2020 [2023 Reviewed]](https://ProRec.com/wp-content/uploads/2022/05/at2020-180x180.jpg "Best Audio Interface for AT2020 [2023 Reviewed]")
![Best Audio Interface for Voice Over [2024 Compared]](https://ProRec.com/wp-content/uploads/2023/03/voice-over-180x180.png "Best Audio Interface for Voice Over [2024 Compared]")
![Best Audio Interface under $200 [2023 Reviewed]](https://ProRec.com/wp-content/uploads/2023/01/studio-monitors-under-200-180x180.png "Best Audio Interface under $200 [2023 Reviewed]")