As an Amazon Associate ProRec.com earns from qualifying purchases. Any links that take you to products are affiliate links, and we may earn a commission if you make a purchase. We appreciate your support.
All text and image links lead to Amazon unless stated otherwise. All product scores are based on ProRec’s in-house scoring model
| Thumbnail | DC Coupled Audio Interfaces | ProRec Score | Price |
|---|---|---|---|
 | Antelope Audio Orion Studio Synergy Core DC Coupled Inputs & Outputs | 9.4 | Check Price on Amazon |
 | DC coupled Outputs only | 8.5 | Check Price on Amazon |
 | Native Instruments Komplete Audio 6 Mk2 DC Coupled Outputs only | 8.1 | Check Price on Amazon |
Introduction
DAWs these days have options for CV (Control Voltage) connectivity built-in, and a good example of this is the Ableton Live CV Tools pack and the Reason Studios’ CV-O CV to Audio. CV is basically a DC signal that you can enable or disable from within your DAW or from your modular rig. It is low frequency (below 20hz) and is used to add volume, rhythm, pitch and other variations to your sound.
DC coupling enables your audio interface to send and receive Direct Current. You can think of this as the flow of electrons down a wire in a single direction, just like water going down a hose. This allows for bending and shaping oscillators within your modular rig. AC signals, on the other hand, have an alternating nature and they keep switching directions, a lot like moving a saw back and forth. As a result, AC coupling filters the lower frequencies, including sustained voltage required for modular synthesis, making it a bad fit for transmitting CV (controlling or tuning oscillators).
To make the most of the CV options available within your DAW, you are going to need a DC coupled audio interface. Since interfaces are usually optimized for audio rate signals, most popular manufacturers stick with an AC coupled I/O configuration. There are plenty of DC coupled interfaces available in the market, but the vast majority of them only feature DC outs for sending Direct Current. This is more than enough for most use cases, but if you require an interface with both sending and receiving capabilities, then you can check out the Antelope Orion Synergy Core reviewed in this guide.
When choosing a DC coupled audio interface, in addition to the DC input and output configuration you also want to pay attention to the regular I/O. Other than that, you want something that has good converters and preamps for sound quality, good driver support, solid build quality and other premium features that you may require (DSP, Bluetooth, ADAT/SPDIF etc)
What is a good interface for you may not be the best choice for someone else. It is pivotal that you first consider your budget and actual use case before you make a purchase. We have three different interfaces at three different price points reviewed in this guide. Each of these is unique and caters to a different segment. We hope that going through these reviews will help you narrow down your selection so you can invest in an interface that satisfies your needs.
Recommended Read: How to Choose an Audio Interface
Best DC-Coupled Audio Interface Reviews
All text and image links lead to Amazon unless stated otherwise. All product scores are based on ProRec’s in-house scoring model
DC Coupled Inputs & Outputs
The Antelope Audio Orion Studio Synergy Core is a robust 32-channel (16-in/16-out) Thunderbolt 3 & USB 2.0 audio interface, featuring a high-definition LED screen. Of the 32 channels, there are 14 inputs and 8 outputs, all of them being analog, dc-coupled, and suitable for CV (control voltage) applications. The unit comes with a Thunderbolt 3 to USB 2.0 cable, along with an optional DC power adapter that is only required when connected to a USB 2.0 host.
The front panel has an On/Standby button and 4 phantom power preamp combo XLR inputs to the left. Right next to these, in the middle, there’s a small TalkBack Button to activate the built-in talkback microphone which is routed to the monitor/headphone outputs.
As we move further, you’ll see a large rotary control for menu navigation and gain adjustments. It is a button-like knob that rotates and can be pressed and held for different operations. Right next to the rotary control there are 3 buttons for gain, headphone and monitor output control. A high definition display screen on the panel lets you observe peak metering, menu options, and shows information for firmware updates.
To the right, there are 3 function buttons (the top button to view current gain values and assignments for preamp/combo inputs, the second button for the current clock source and device sample rate, and the third button to return to peak metering, restarting the cycle, or entering the system menu with a press and hold). Finally, the extreme right has 4 outputs (two of which are headphone outputs with 1/4-inch TRS jacks and white light indicators and two are preamp outputs supporting 1/4-inch mono jacks).
The back panel of the unit has a DC power connection port, a USB 2.0 Type-B port (supports 24 I/O channels), and a Thunderbolt 3 Type-C port (supports all 32 I/O channels). As we move on, there are 4 ADAT inputs and outputs (2 inputs and 2 outputs) and 2 D-SUB 25-pin Line outputs compatible with TASCAM standard pin layout. Followed by 2 Monitor A outputs, 2 Monitor B outputs (that support 1/4-inch TR jacks), 2 S/PDIF I/O ports, and 2 ports to output and accept Word Clock reference signals (both of which use standard BNC cable).
Finally, there are the final 8 preamp/combo inputs that support XLR connectors and 2 1/4-inch TRS inserts to connect external analog equipment (processors and EQs).
Build-wise, it’s a solid compact unit with a sturdy metallic body. It’s sleek and smooth — features strong buttons and a scratch-free knob that you cannot go wrong with.
We started the setup on a 2019 Macbook Pro Retina. The mandatory device activation process and getting around to installing drivers was definitely a hassle and a bit time-consuming. We suggest utilizing the instructions in the user manual to get through. However, once we got done, the drivers were fully stable. We connected the interface with the Thunderbolt 3 cable to make sure it supported all 32 audio channels.
To set up the project in Ableton Live, we brought the audio output from Eurorack down to the line level and connected the output module to the interface. At once, we realized that the menu can take a lot of time while getting used to. It wasn’t possible to test out all the channels at once so we just plugged in the Yamaha F310 acoustic guitar and SM-57 routed the audio from studio monitors and headphones (this is doable from the ‘Routing’ tab in the Control Panel). The project settings were set accordingly in Ableton.
Secondly, to test out the CV application, we connected our Behringer RD6 Classic’s CV input to one of the analog outputs. We noticed that the conversion was definitely a step above and is very close and up to par with Apogee. Testing the RD6 sequencer back and forth was a breeze with the Ableton Live CV Toolkit (the plugins it comes with help send the signals back to the sequencer).
Of course, at this price point, the sound had to be clean and pristine and we expected nothing less. The AD/DA conversions were precise too and we also got around to checking Antelope plugins as well. The subtle reverb, added stereo-widths, flangers, etc. are instant problem-solvers to get a player into the mood. They can be really good for tracks involving bass and drum players where the recorded track needs to be as close to the final mix as possible. Needless to say, the sound quality was excellent throughout and the mic/line preamps were warm and accurate.
Latency with Mac OS was great as well. So after we were satisfied with its clarity and three-dimensional sound-check, our final takeaway says that the potential of this interface is massive. The key to extracting the most out of it is understanding the control panel fully The team concluded our session after short tests to make sure all the channels were working.
In comparison to some of the previous models like the Antelope Audio Orion Studio Rev and Antelope Audio Zen Go Synergy Core (different class), the Antelope Audio Orion Studio Synergy Core has the added Synergy Core FX processing, a higher number of dc-coupled inputs and outputs, added connectivity options, and several more benefits.
The Zen Go Synergy Core is a more compact and portable unit but lacks certain features compared to the Orion Studio Synergy Core. All its predecessors, however, fall behind in most things — CV applications, I/O options, and dynamic range.
The Audio Orion Studio Synergy Core, however, does not support MIDI. We have to say that’s one of its drawbacks as a higher-end unit. The other concern is the complexity of the control panel which is not easy to understand. But that’s more of a necessary step toward learning to get the best out of this interface.
Overall, Audio Orion Studio Synergy Core is an extremely versatile and solid audio interface. It’s not possible for anybody to highlight its uses and potential in a single review. When considering the price per channel and its two-way CV applications, it’s easily the best deal for a high-end audio interface. But in this particular case, you actually get much more than what you pay for.
Orion Studio Synergy Core Benefits
Has both dc-coupled inputs and outputs, making it a good option for anybody who wants CV (Control Voltage) applications out of their interface
Has a solid build, break-free buttons, scratch-free rotatory control, and ports that you cannot go wrong with
Comes with Synergy Core FX processing to emulate different hardware instruments
Orion Studio Synergy Core Drawbacks
MIDI control is not supported.
Does not offer volume automation inside the mixers
There is no grouping/bus/sub-mixing functionality. However, the four full-fledged mixers allow setting up the sub-mixes
All text and image links lead to Amazon unless stated otherwise. All product scores are based on ProRec’s in-house scoring model
DC coupled Outputs only
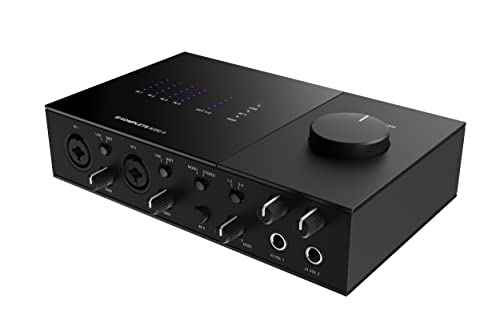
The MOTU UltraLite-mk5 is a versatile 18-in/22-out USB audio interface. The interface features high-quality A/D/A conversion at sample rates up to 192kHz. Of the 22 outputs, 10 are quarter-inch line outputs and DC-coupled, making them apt for CV (Control Voltage) applications. Interestingly, this unit has another rare feature that other USB interfaces usually lack — a power switch. The Motu UltraLite-mk5 comes with CueMix 5, a USB-C cable, a USB-C, USB-A cable, and a power adapter.
The front panel of this unit is divided into two parts — the left has buttons, ports, and knobs and the right has an OLED display screen. Starting from the left, you’ll see 2 Mic/Line/Inst inputs with 48V phantom power and a -20db pad. Each input supports XLR/TRS combo jacks (balanced or unbalanced quarter-inch cable).
Right next to these two input slots is a Phones jack that accepts a quarter-inch headphone plug and its output volume (as well as main output volume) is controlled with a knob right above it (the knob can be pressed and held to switch off the interface). Lastly, we have pad buttons and knobs to control the preamp gain for the two inputs. These knobs, however, are pressable. One of these knobs is used for navigating/selecting the menu and the other knob is used to go back in the menu.
The right side of the front panel features a high-quality display. One portion of the screen displays device settings and the level meters for all analog inputs and outputs. The other section shows digital I/O activity (optical and S/PDIF) and MIDI activity (in and out).
The back panel is divided into three sections. The first section (from the left) features 2 MIDI ports (In/Out), 2 Optical ports (In/Out supporting ADAT optical “lightpipe” jacks), 2 S/PDIF ports (In/Out), a USB-C port, and a Power Adapter port.
The second section features 10 Line outputs and all of them are DC-coupled (two of which serve as the main output pair for stereo analog output). The third and last section (at the extreme right) features 6 Line inputs (all of them are equipped with high-quality 24-bit 192 kHz converters (that support quarter-inch balanced TRS connectors as well as unbalanced but with the ring disconnected).
This much I/O packed into such a small form, makes it a very compact and travel-friendly audio interface. It’s a sleek-looking, efficient, and sturdy audio interface with error-free knobs and buttons. The display screen is super useful too and it looks great in the studio!
To test it out, we connected a Macbook with our Ableton rig to the interface via MIDI, and got the vocal mic running into the first preamp. Happy to say that the conversion sounded great and latency wasn’t an issue — we directed the output out through the main analog line outputs into a monitor.
Don’t forget that this interface runs best on a high-quality USB-C cable (it comes with one). We, however, used a Thunderbolt 3 cable and it worked very well for us. The preamps are amazing, stunningly clear and detailed and DI was pretty good too. We tested the headphone amp too and it was very loud. Needless to say, the testing session was way above our expectations. With that high number of inputs and outputs in such a compact unit, it could be a go-to audio interface for most professionals.
In comparison to to other MOTU devices, the monochrome OLED display is nice, but it would be great if this unit had the same color display as on the M4 — however, the angle-visibility option is resolved now (a problem with MOTU M6). Secondly, MOTU M4 has 4 dc-coupled outputs. The mk5 not only has 18 inputs and 22 outputs (with 10 dc-coupled analog outputs), but it also brings multiple different connectivity options to the table. Sound-wise, Mk5 is definitely a league ahead of M2, M4, and M6.
There isn’t really much to dislike about this interface — however, we would appreciate having proper volume control. Although the existing setting is smart, sometimes adjusting the main volumes becomes a hassle and some folks may consider getting a monitor to bypass it altogether. Secondly, since it’s a compact interface, the knobs are actually too close to each other. So they could feel a little tacked on while rotating. But they’re just concerns — these issues should not in any way be considered dealbreakers.
So all in all, whether you need a studio replacement or have bulky on-stage needs, the MOTU UltraLite-mk5 can be surprisingly good. Great sound, compact build, plenty of connectivity options, and plenty of inputs/outputs with CV applications. It’s a great output-only dc-coupled audio interface at this price point.
MOTU UltraLite-mk5 Benefits
4-band EQ and Compressor on all inputs, along with Gate for mono inputs only.
Stereo pairing for the line-level inputs makes it a great choice for synth players.
CueMix 5 is an excellent DAW and best optimized for this interface if you want the lowest possible latency
MOTU UltraLite-mk5 Drawbacks
The unit wobbles on a flat surface because of the rubber below.
Knobs can feel a little tacked on because of the interface’s small size.
The display screen is bright and not dimmable.
All text and image links lead to Amazon unless stated otherwise. All product scores are based on ProRec’s in-house scoring model
DC Coupled Outputs only
The Native Instruments Komplete Audio 6 Mk2 is a 6-in/6-out USB audio interface. It provides audio recording of exceptional quality with up to 192 kHz/24-bit resolution. Among the array of outputs, 4 of them are analog and quarter-inch TRS outputs and are DC-coupled — making them ideal for CV (Control Voltage) applications. The unit comes with a USB 2.0 cable (can be powered with a higher version though) and Native Instrument’s software pack that includes a DAW (MASCHINE), analog synth library (MONARK), and a couple more useful tools.
Unlike most interfaces with front and back panels, The Audio 6 MK2 has three panels: Front, Rear, and Top (Roof).
The front panel of the interface has 2 input slots, gain knobs, as well as a Line/Inst switch button for each input. Right next to IN 1 and IN 2, there’s a mono/stereo switch that is used to monitor/switch mono and stereo sources directly connected to one of the four input ports (2 ports at the back). For condenser microphones with XLR plugs, the inputs (IN 1 and IN 2) also have a 48V phantom power button. Followed by a “1-2/3-4” switch button that’s used to switch the direct monitoring access (via headphones) between IN1/IN2 and IN3/IN4.
As we move further right, there’s an INPUT/HOST button that’s used to adjust the balance between the inputs (direct monitoring) and audio from the computer for the headphones’ output. Lastly, there are two headphone outputs with their respective gain knobs right above them.
The top panel has a large volume knob that controls the output through OUT 1 and OUT 2 ports (at the back). Secondly, we have status LEDs (for MIDI IN and MIDI OUT) and Metering for inputs and outputs (input levels through IN 1 to IN 4 and combined output levels of OUT 1 and OUT 2).
The rear panel hosts a variety of ports: a USB connector port, MIDI IN and OUT, 4 output ports, 2 input ports (IN 3 and IN 4) as well as SPDIF 5/6 IN and OUT ports for devices utilizing coaxial RCA cables.
The build is sturdy and it’s a robust interface overall. It has non-wiggling knobs and solid switch buttons. Very sleek and well-built. If you’re concerned about it being plastic — don’t be. Plastic is just a few parts around the top otherwise it’s mainly all metal.
We began by installing drivers on a MacBook and connected an SM-57 for recording some vocals and laying acoustic guitar tracks. The preamps offered a crystal-clear and uncolored sound, demonstrating a perfectly flat frequency response. This proved to be exceptional for capturing studio-quality acoustic mono tracks (panned left and right), thereby achieving a wider stereo field through intelligent mic placement. The vocals sounded thick and clear too with a favorable high-end.
To test the CV application, we connected a DC-coupled output to a modular synth’s CV input. Using the interface to send CV signals, we were able to precisely control the synth’s parameters from our DAW (Ableton Live). However, to record the modulations, we had to use a CV-to-MIDI converter (Kenton) that enabled us to capture and record CV modulations from the synth back into the DAW. Nonetheless, Mk2 has always been a breeze to test out for different applications.
We couldn’t help but instantly take notice that Mk2 is a game up from the plain Audio 6 in multiple ways. Firstly, the Komplete Audio 6 Mk2 features direct monitoring and mono/stereo switching — with an ability to blend playback by switching channels (1-2/3-4). Secondly, the Audio 2 comes with a single headphone output whereas Mk2 has 2 outputs — which is helpful during large-scale live recordings. Thirdly, the VU meters on top of the interface are helpful (which Audio 6 lacks).
Overall, we have no complaints about its CV applications, connectivity options, or even sound quality. It’s just that the VU meters on top can be a bit hard to keep an eye on because we have a tall tabletop. We had to place it where we could see it from the top. So if you’re short or have a similar setting to us, you might want to keep this in mind. Secondly, the knob on top can prevent you from stacking any other device/rig/interface on top of it. Just our two cents about the design.
Otherwise, it’s an extremely solid interface, and the software pack that it comes with is super, super helpful. The DAW and libraries are helpful and often our go-to solution when it comes to hardware emulation. All in all, we’ve found Native Instruments Komplete Audio 6 Mk2 to be a versatile interface that has a good number of I/O and great sound — and at a fair price point. So this one too, is a solid buy for anyone looking for a 6-channel interface with dc-coupled outputs.
Komplete Audio 6 Mk2 Benefits
Has a very diverse and useful software pack that includes a DAW (MASCHINE), libraries, hardware emulators, plugins, etc.
Does not require a power adapter
High-quality pre-amps with individual gain controls for each input
Komplete Audio 6 Mk2 Drawbacks
The VU meters on top (which makes them hard to observe) should’ve been on the front panel instead
No dedicated monitor outputs other than headphone outputs
Some of the knobs have a slightly plastic feel
Verdict
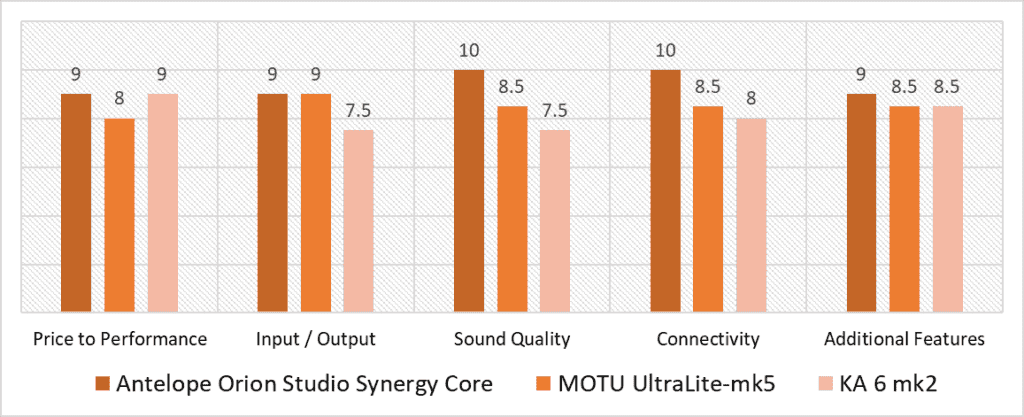
Our scoring model indicates the highest varience in the Sound Quality, Connectivity, and I/O categories. The MOTU UltraLite mk5 ties with the Synergy Core in terms of I/O, and while it has a better config it doesn’t feature DC coupled inputs (Synergy Core has both I/O DC Coupled but also costs 3x as much). In terms of Price to Performance, the MK 2 rises and levels out with the Synergy Core due to being an affordable and feature packed offering.
The Antelope Audio Orion Studio Synergy Core maintains solid scores throughout all categories. It scores 10 in Sound Quality and Connectivity and 9 in the rest of the categories. We attribute these scores to its pristine preamps, I/O config, and Thunderbolt connection. Even though it has a high price tag it is a very worthy interface. The only thing that sets the unit back is its lack of MIDI support, and exclusion of any additional items/features like the other two.
The MOTU UltraLite-mk5 on the other hand is a solid workhorse interface! The lower price tag in comparision to the Synergy Core makes it a very viable option. It is perfect if you are not looking for dc-coupled inputs on your interface. As far as the quality of preamps is concerned, the difference between mk5 and Orion Studio Synergy Core in frequency response is negligible and can easily be made up for during production. This unit is not designed to be premium, so it doesn’t have that feel, but the amount of features you get for the price make it hard to pass!
Overall, our analysis results in the best dc-coupled audio interface among these three being the Antelope Audio Orion Synergy Core with the highest average score of 9.4. The unit gives the engineer unlimited potential and brings dc-coupled inputs to the mix. It is leagues ahead from its 2017 Rev version when it comes to sound. Secondly, the control panel allows engineers to develop sophisticated setups during large-scale performances. It’s a high-end interface, pricier than most but it really delievers as advertised. A solid audio interface with great preamps, unrivaled CV-applications, and several good connectivity options. Highly Recommended!
![Best CHEAP Budget Audio Interface [2023 Reviewed]](https://ProRec.com/wp-content/uploads/2022/06/budget-180x180.jpg "Best CHEAP Budget Audio Interface [2023 Reviewed]")
![Best 4 Input Audio Interface [2023 Reviewed]](https://ProRec.com/wp-content/uploads/2022/06/4-input-audio-interface-180x180.png "Best 4 Input Audio Interface [2023 Reviewed]")
![Best Audio Interface with (Balanced) XLR Output [2024 Compared]](https://ProRec.com/wp-content/uploads/2023/08/audio-interface-1-180x180.jpg "Best Audio Interface with (Balanced) XLR Output [2024 Compared]")
![Best Audio Interface for Vocals [2023 Reviewed]](https://ProRec.com/wp-content/uploads/2023/03/vocals-180x180.png "Best Audio Interface for Vocals [2023 Reviewed]")
 [2024 Reviewed])