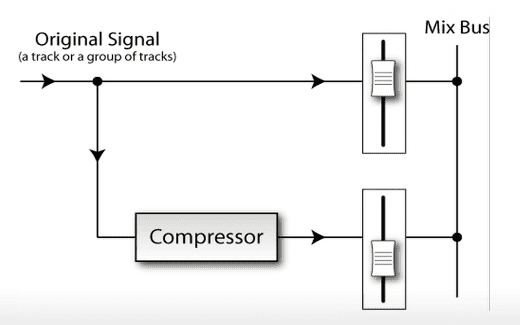
Parallel compression is a mixing technique that involves mixing a dry or lightly processed signal with a heavily processed version of the same signal. It is also referred to as New York style compression. Parallel compression was born from the need to retain the peaks of a signal while also bringing up the level of its quieter information. The result of this type of compression is a signal with a fuller dynamic range without the obvious sound of compression. This makes it work particularly well for adding ‘beef’ and character to drums and vocals
Parallel compression is a form of upward compression because it is used to bring up the level of elements that were low in the signal hence adding a sense of excitement to the mix. Upward compression raises the amplitude of the signal below a set threshold while maintain the amplitude of the signal above the threshold at the same level. In upwards compression only the signal below the threshold is affected. The peaks and overall level of the signal remain the same.
Applying Parallel Compression
Let’s look at how to apply parallel compression in FL Studio. For this tutorial I want to add some parallel compression to my drums to add a little punch without losing its dynamics.
The first step is to route the tracks and set them up for parallel compression so that I can have a bus track where all the individual drum tracks are being sent to. This will be the drum bus. After that I’ll create a duplicate of that original signal where I’ll apply the compression. Lastly, I’ll create another drum bus where I’ll be able to mix both the dry and wet signals together to taste.
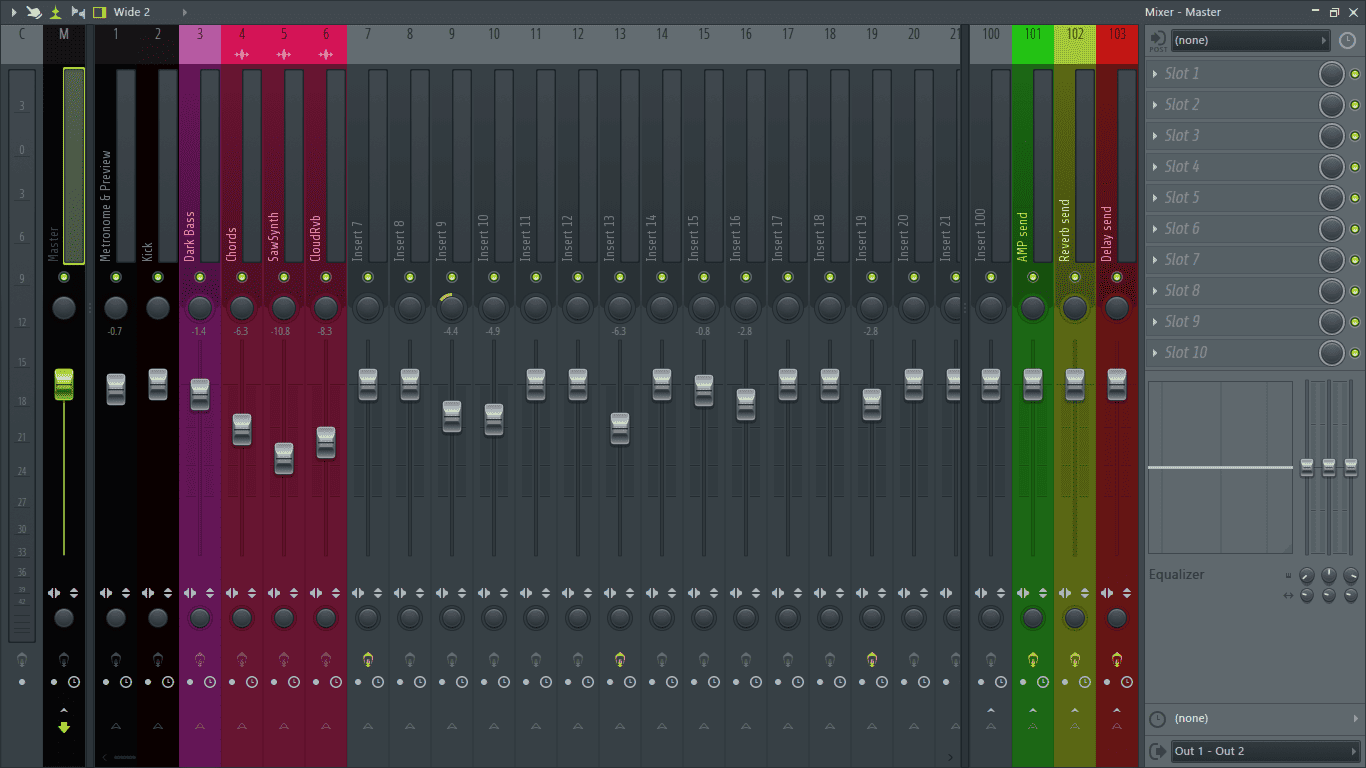
Step 1: First I’ll route my drums to the mixer so that I can begin processing them. I’ll do this by opening my channel rack and selecting my drums in the channel rack. Select tracks by clicking and holding down the left mouse button and clicking on the small box next to the channel name. (Highlighted below in red.) It glows green when selected.

Before selecting.

After selecting.

With the channels still selected, open the mixer by pressing F9 or by clicking on the mixer icon in the toolbar. (The icon glowing orange below.)
Once the mixer is open, right click on an empty track and go to Routing> Channel routing> Route selected channels starting from this track.

Note: Ensure the mixer track you select is the last one used in the mixer and that there aren’t any used mixer tracks after it.
Now all the channels have been routed to individual tracks in the mixer.

Step 2: The next thing to do is to create a bus for all the drum mixer tracks. Do this by first selecting all the drum mixer tracks by holding down Ctrl + Shift on your keyboard and clicking with your mouse on the mixer tracks to be selected.

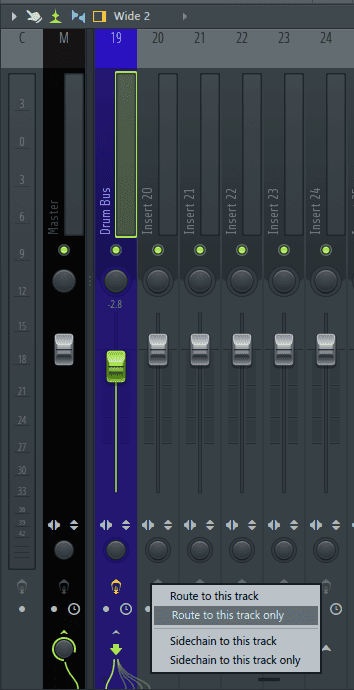
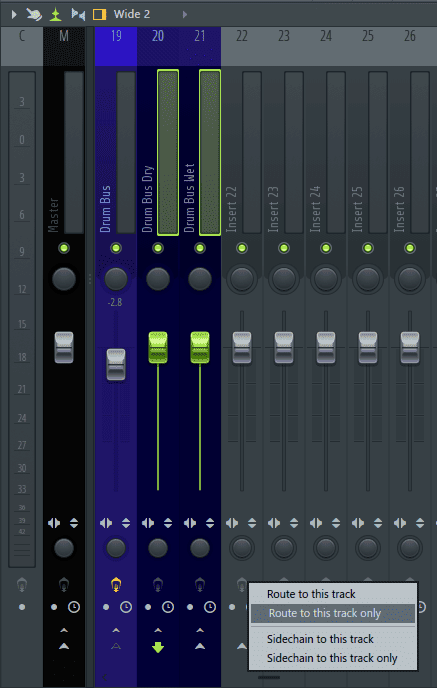
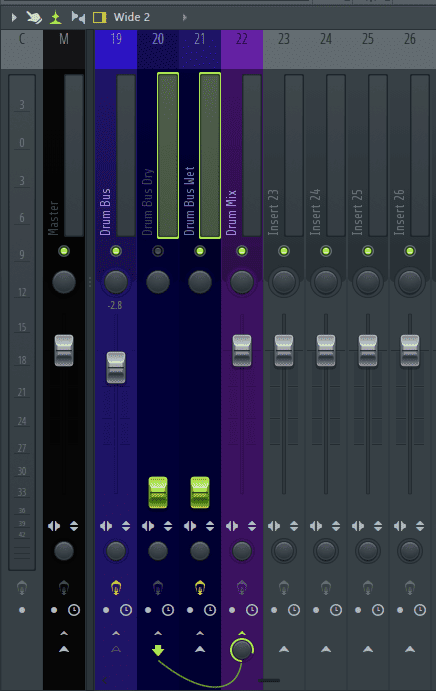
While they are all selected, go to a new mixer track and right click on the arrow at the bottom of the mixer track. (Highlighted in red below.)
This will bring up a menu. Select ‘Route to this track only’.

The selected channels will all be routed to this track only. Please note that this will cancel and remove the routing from the master and any other mixer tracks.
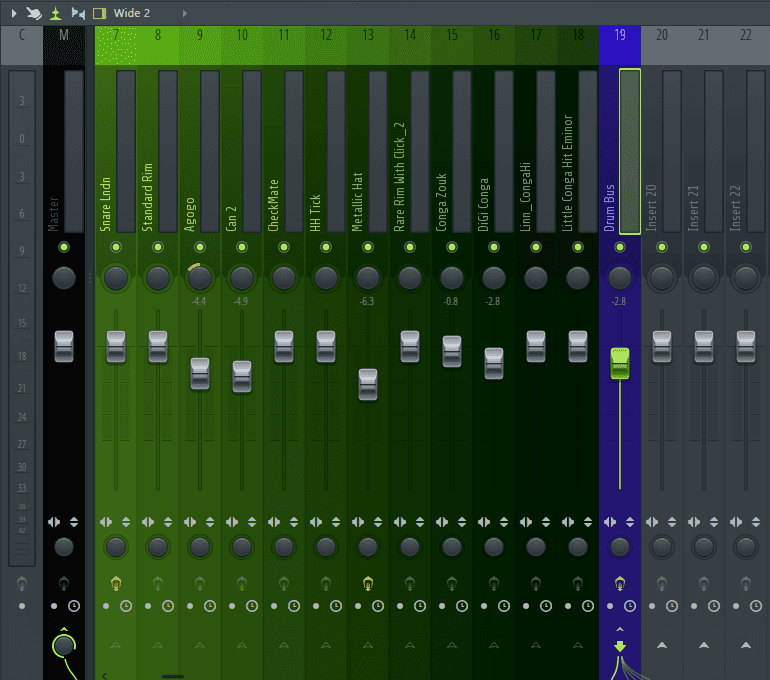
All the drum mixer tracks are now routed to Insert 19. I will rename it and call it ‘Drum Bus’ for easy identification.
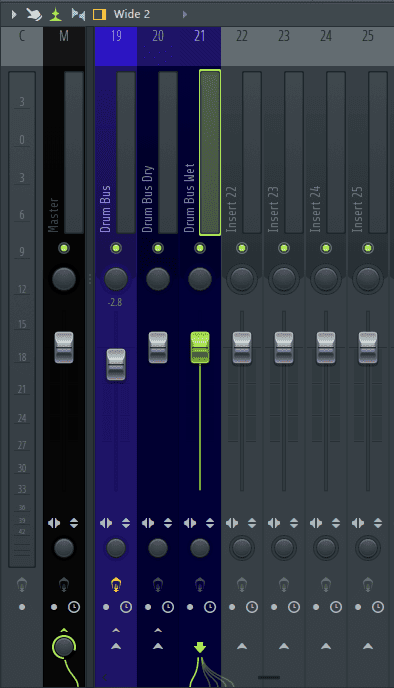
Step 3: Now that I have the drum bus, next is to route the drum bus to two separate mixer tracks so that I can have control on both the drum bus’s wet and dry signal individually. To do this I’ll first select the drum bus by clicking on it.
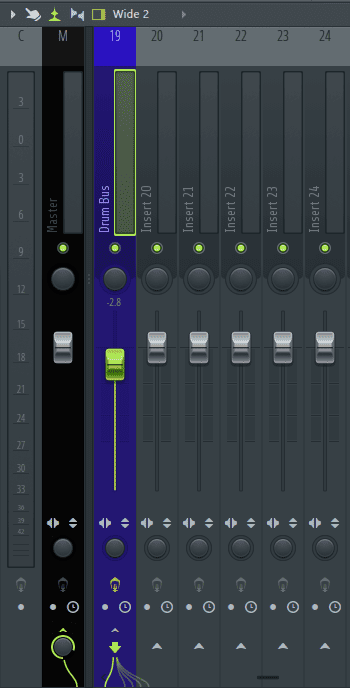
While it is selected, I’ll right click on the arrow on the bottom of the next mixer track (Insert 20) and select ‘Route to this track only’.
This serves two purposes. One, to route it to Insert 20 mixer track, and two, to unroute it from the master track.
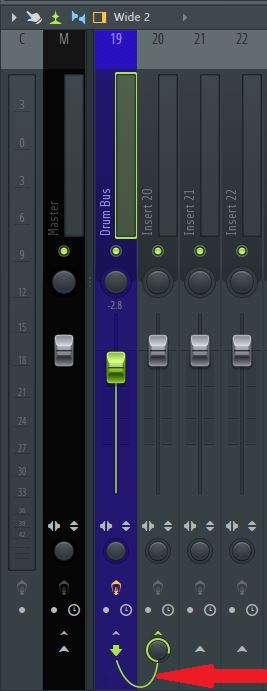
From the image above, we can see the routing of the drum bus by looking at the green virtual cables located at the bottom of the mixer track. It shows it is only routed to Insert 20.
I’ll rename Insert 20 to ‘Drum Bus Dry’.
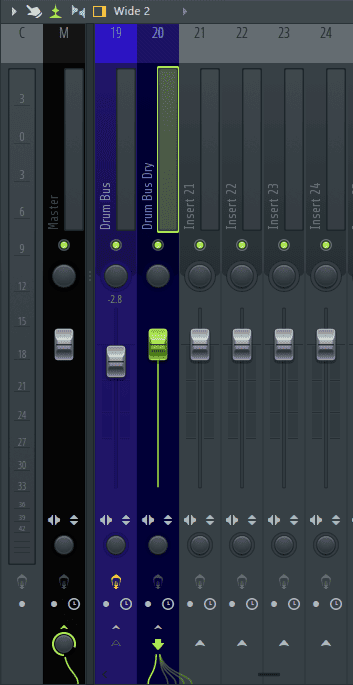
Step 4: Next is to route the drum bus to another mixer track where I will apply the compression. To do this I’ll simply select the drum bus by clicking on it. I want to route it again to Insert 21. While the drum bus is selected, I will right click the arrow at the bottom of Insert 21 and select ‘Route to this track.’
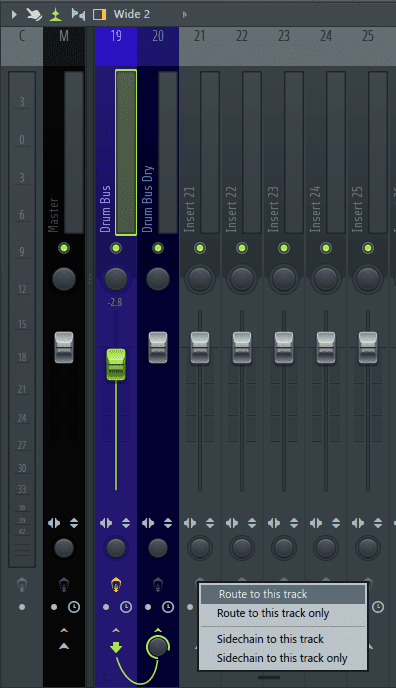
I’ll rename Insert 21 to Drum Bus Wet.
Step 5: Next, I’ll create a bus for the ‘Drum Bus Dry’ and ‘Drum Bus Wet’ mixer tracks. This will enable me to blend the compressed and uncompressed signals together. First I’ll select the ‘Drum Bus Dry’ and ‘Drum Bus Wet’ mixer tracks by holding down Ctrl + Shift and clicking on them.
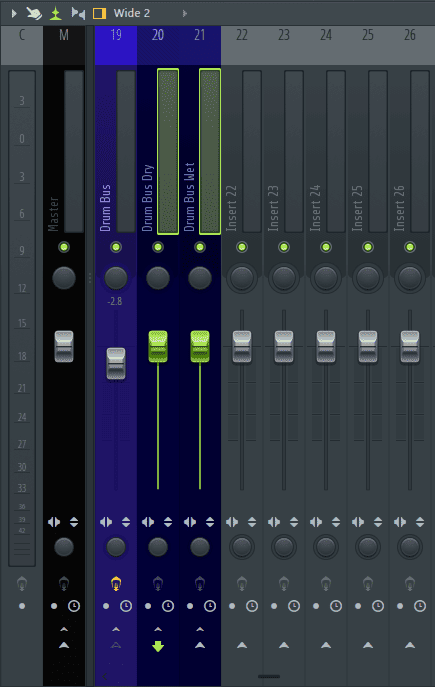
I want to route them to Insert 22. While they are still selected, I’ll right click on the arrow at the bottom of Insert 22 and select ‘Route to this track only’.
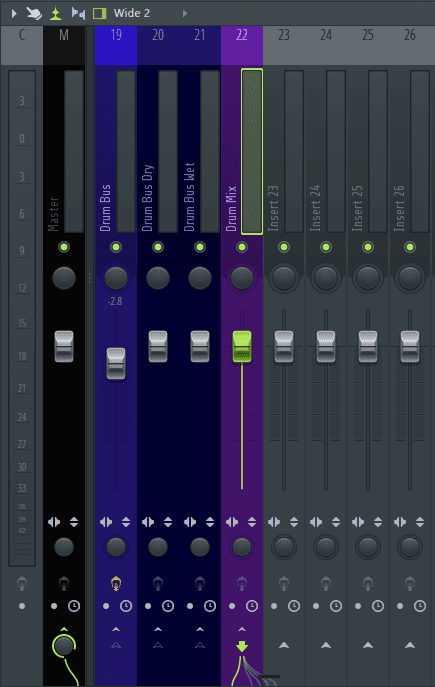
The two tracks are now routed to Insert 22. I will rename it to ‘Drum Mix’.
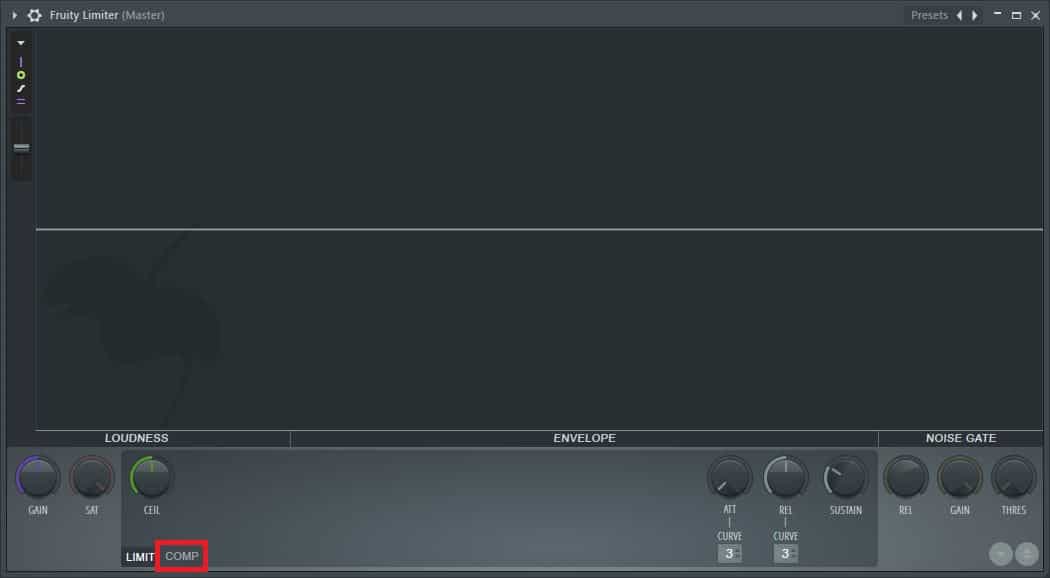
Step 6: Now that I am done with routing, I can start applying compression. To load a compressor, I’ll go to the ‘Drum Bus Wet’ mixer track, click on any slot, and go to Select> Dynamics> Fruity Limiter.

Fruity Limiter is now loaded into the mixer track.

Click on the word ‘COMP’ at the bottom left of the plug-in to turn it from limiting mode to compression mode.
Step 7: Now I’ll dial in the settings on the compressor.
For parallel compression:
A fast attack is preferred to tame the transients, below 2 ms.
A release between 60-200 ms, but tweak to taste.
The threshold should be set so that it is squashing the signal.
The ratio needs to be aggressive. Set it between 8:1 and 20:1.
The knee should be a hard knee.

Step 8: Once you are done dialing in the settings on the compressed signal, all that’s left to do is blend it with the uncompressed signal until you are satisfied with the end result. To do this, I’ll drag both the ‘Drum Bus Dry’ and ‘Drum Bus Wet’ faders all the way down so I can start blending them together.
Note: Make sure the level of the sum of the compressed + uncompressed signal is equal in gain to the level of the uncompressed signal to avoid making biased decisions.
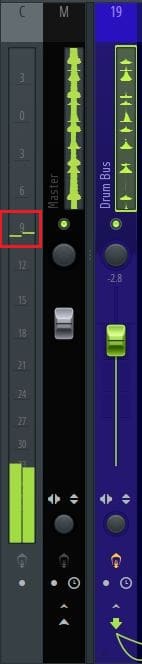
In my case, the ‘Drum Bus’ was originally peaking at -9 dB. After I’m done blending the two signals, I’ll make sure the ‘Drum Mix’ is also peaking at the same level, -9 dB so that it retains the same level in the mix.
Drum Bus peaking at -9 dB. This is the original uncompressed signal.
Drum Mix peaking at -9 dB. This is the sum of the uncompressed signal and the compressed signal mixed together.

Conclusion
Parallel compression can be a little hard to wrap your head around, but once you’ve got it down your mixes will never sound the same. I hope this tutorial has helped you understand the basics of parallel compression in FL Studio and has inspired you to incorporate it into your future tracks. Remember, when it comes to music, always experiment until you find what works best for you.

- How to Add Drum Kits to FL Studio - September 18, 2023
- Best Free Drum Kits for FL Studio - September 18, 2023
- How to Create Drum Patterns & Loops in FL Studio - September 12, 2023


