As an Amazon Associate ProRec.com earns from qualifying purchases. Any links that take you to products are affiliate links, and we may earn a commission if you make a purchase. We appreciate your support.
All text and image links lead to Amazon unless stated otherwise. All product scores are based on ProRec’s in-house scoring model
| Thumbnail | Audio Interfaces for Garageband | ProRec Score | Price |
|---|---|---|---|
 | 8.4 | Check Price on Amazon | |
 | 8.1 | Check Price on Amazon | |
 | 7.2 | Check Price on Amazon |
Introduction
Garageband is one of the most famous DAWs for recording, playing, and sharing your music! However, to get the most out of Garageband, you will need an audio interface. Interfaces are an absolute must when it comes to music production. They’re pretty easy to use as well. All you have to do is plug one into your mac via a Thunderbolt port, or whatever connection you have available on your device (USB for example).
Audio interfaces have a lot more processing power and sound much better than the default soundcard on a mac, plus they often contain a high impedance input socket. Audio interfaces are not DAW specific and will work flawlessly with Garageband, FL Studio, Pro Tools, Logic Pro, Ableton, or any other DAW you have. But before you get one, make sure that it is compatible with your device. To do so, head on to your interface manufacturer’s website and check the minimum system requirements, then compare those to your mac’s specifications.
When choosing an audio interface, you want to decide on a budget, the I/O configuration, what extra features you want e.g. (on board DSP, ADAT/SPDIF capability). As you explore more, you’ll learn more about them. If this is your first time getting one, then an entry level audio interface will not set you back more than a couple hundred dollars. As is the case with anything else, the higher your budget, the better features you’ll have. At the end of the day, if you’re an audio engineer, then a good interface will help elevate your mixing and mastering process.
When setting up your interface for the first time, you should always download and install the latest version of the drivers available. You can usually find those on the manufacturer’s website. Make sure to check the version for macOS. In conjunction with an audio interface, a decent studio monitor will dramatically improve your sound quality. You also run these through your audio interface.
Finally, if you’re running Garageband on an iPad or an iPhone, every USB interface that is class complaint will work just fine! You can connect most of these plug-and-play type peripherals, MIDI controllers, keyboards, and audio interfaces to your IOS device through a Lighting to USB 3 Camera Adapter.
Recommended Read: How to Choose an Audio Interface
Best Audio Interface for Garageband Reviews
All text and image links lead to Amazon unless stated otherwise. All product scores are based on ProRec’s in-house scoring model
The Apogee Duet 3 is a portable/desktop audio interface that has 2 inputs and 4 outputs. Its immaculate breakout cable design makes it ideal for your on-the-go uses. All of Duet 3’s inputs and outputs are packed in a single connection. You can find two ¼’’ outputs for monitors along with 4 inputs: 2 XLR inputs that connect to Apogee’s top-notch preamps and 2 ¼’’ inputs. You’ll also find a single ⅛’’ headphone output on the front panel. Even with all these features, Apogee has managed to keep the device compact and well-designed.
The Duet 3 is compatible with both Windows and Mac devices and is bus-powered via a Type-C Cable. The DSP on the Duet 3 allows you to record through any of the Apogee FX with zero latency, either monitoring the processing or printing it. You also gain access to the Symphony ECS channel strip.
We were thunderstruck by Duet 3’s remarkable sound quality. We have shuffled through several audio interfaces in the 400-500$ range and the Duet 3 is, unmistakably, the best of the bunch. This is certainly expected at its higher price tag. While the sound does come off as full bodied and warm, it’s important to add that it is not really etched, it’s much more gentle and well-rounded. Yet, you can still pick up on the details and you certainly won’t notice any sort of fuzziness. Our mics sound really absolutely smooth through the Duet 3. You can certainly expect the Duet to refine any mic you run through it.
The Duet 3’s industry-leading preamps are incredibly quiet and crisp. Combine this with the ECS DSP channel strip and you’ll be able to add some saturation and comp/EQ. No extra noise, random pops, or unintended clicks. Just smooth transients with immaculate highs and lows.
We were able to use the Duet 3 without installing any additional software. The software simply keeps your device updated while giving you some extra control. A few people reported some driver issues or random audio dropouts on their computer. We think that most of these issues are possibly windows system related, so it shouldn’t be a cause for concern since you’re running Mac OS.
The only complaint we have is about the breakout cable, which can certainly be a bit irritating. However, you can go for the optional dock to circumvent the need for one. While the Duet 3’s one-knob design is cool, having to click the same knob several times to cycle through options may be annoying for some people. It’s certainly a matter of preference and since it’s impossible for the manufacturer to please everyone, we don’t think it’s anything major.
When compared to its predecessor, the Duet 3 is a total different animal! It is a huge step up from the Duet 2, as it should be, the previous version was released about 10 years ago. The converters and preamps on the Duet 3 outperform the Duet 2, that too, by a large margin. The input output expansion of two ¼ inch and two XLR inputs is also an added benefit since the Duet 2 originally offered two ¼ monitor outputs along with two combo jacks. The onboard DSP is a much welcomed improvement as well! As far as the actual physical features go, the Duet 3 is a lot slimmer with a 1/8 inch headphone output replacing the ¼ inch on the Duet 2. The new interface overall feels a lot more slick, Apogee has really put in the work into this premium offering.
In all, the Duet 3 is of superb quality. It has Great preamps, digital to audio conversion and vice versa, and a decent DSP to monitor your vocals with a reverb option as well. The unit provides impeccable sound quality, terrific sound monitoring capability via speakers, and a high-quality mic preamp with a DSP channel.
Apogee Duet 3 Benefits
The compact design makes the Duet 3 great for on the go use
Remarkable sound monitoring capability through speakers and headphones
Ability to record through Apogee FX with zero latency
Industry-leading preamps that filter out any noise, clicks, or pops. In addition to very smooth transient responses with extraordinarily clear highs and lows.
Apogee Duet 3 Drawbacks
You might face some driver issues along with random audio drops outs and weird pops if you are on Windows.
The breakout cable is a tad bothersome, but you can still opt for the optional dock to avoid this issue.
The single knob design is a bit annoying especially since you’ll have to click it three times if you want to adjust the headphones while on input 1. But again, this is a matter of preference
All text and image links lead to Amazon unless stated otherwise. All product scores are based on ProRec’s in-house scoring model
The Scarlett 2i2 is a budget USB audio interface that features 2 inputs and 2 outputs. It has a maximum sampling rate of 192 kHZ and a 24-bit depth. On its main panel, you’ll find a ¼’’ headphone jack along with 2 XLR-TRS combo inputs. Both inputs also feature Air mode, 48V phantom power, and a line switch.
On the rightmost part of the front panel, you’ll find a monitoring knob for headphones, a master volume knob, and a direct monitoring switch. The back panel is pretty minimal, you’ll only find a Type-C and TRS output sockets there.
For the price, the Scarlett 2i2 is an absolute beast! It outputs great audio! We’ve tested the 2i2 along with some other scarlet models over the span of a couple of weeks. Never once did it drop audio or disconnect, it just does its job consistently. We often face driver issues or random errors when setting up audio interfaces, but there were none setting up this one. You’ll be amazed by what the 2i2 can do, especially considering it’s cost-efficiency and small size.
We think the best part about the Scarlett 2i2 is the easy and simple setup. You can set this up in a few minutes. It’s a straightforward plug and play device that does not need any special drivers. The comprehensive guide that comes with the package also remarkably facilitates the process, plus it gives you an idea about the potential of this interface.
For testing we tried recording several instruments, Garageband guitar emulations, and some vocals through the Scarlett 2i2. We can confidently say that the interface does a great job. While not “the finest”, the sounds produced from mics and instruments through the interface are decent. You get a lot more than what you pay for. The interface requires little effort to set up, produces little noise, and generates clear sounds. You also have an Air setting option that works great with vocals (especially If you want to add some presence).
While there are several interfaces in the market that have higher frequency responses, lower distortion rates, and lower noise ratios, they are generally much more expensive. If you want to compare the Scarlett 2i2 to the bunch, the difference in frequency modulation and critical sound is very insignificant to the ear. So, you might as well mark the Scarlett 2i2 as a potential candidate!
In comparison to the 2nd generation model, the third generation model has improved mic preamps, even though the 2nd generation ones were decent. We were able to notice a difference when using dynamic mics. In the first gen 2i2s, mics would commonly not be recognized or would just randomly disconnect. It was an issue across several different models, and the only way around it was to do a reset. However, it was completely rectified and does not appear in the 3rd gen. Additionally, the third generation model has an “Air” feature which boosts the high frequency response by modeling the renowned Rupert Neve setups.
The Scarlett 2i2 does have some drawbacks. Even though there is a Type-C socket on the back of the interface, you won’t be receiving a Type-C to Type-C cable with your purchase. Instead, you’ll only get a standard C-to-A cable. This means that if you’re on a newer device with only USB-C sockets available, you might have to buy your own adapter or a C-to-C cable. Additionally, we noticed that our unit was poorly soldered. This could possibly affect the longevity of the unit and compromise the USB and headphone jacks in the future.
Overall, the Scarlett 2i2 is a very well-designed and easy-to-use interface with a solid construction. It has several useful features such as Air mode, line-level or instrument modes, configurable sampling rate, etc. It utilizes Type-C connections, which favors development. Compared to the high-end interfaces, its preamps aren’t the greatest and neither is its headphone amp. However, if you’re looking for a user-friendly budget interface that offers decent sound quality, bus power, and is rather compact, then you have your answer!
Focusrite Scarlett 2i2 3rd Gen Benefits
its undoubtedly the best performing audio interface in the market at its price range.
It’s incredibly reliable, you won’t have any random audio drops or disconnections.
It is extremely easy to use and set up. Just plug in and play without having to download any extra drivers.
It features a new “Air” mode which boosts the high frequencies by modeling the renowned Rupert Neve’s setups.
Focusrite Scarlett 2i2 3rd Gen Drawbacks
You definitely won’t get the best performing preamps compared to high-end interfaces, but you probably won’t notice any difference in frequency modulations and critical sound since they are not something that can be picked up by a human ear.
You won’t receive a Type-C-to-Type-C in your package even though the interface has a USB-C socket on the back. So, you ‘ll have to buy your own cable. .
The soldering on the unit is pretty weak, this could possibly compromise the headphone and USB jacks.
All text and image links lead to Amazon unless stated otherwise. All product scores are based on ProRec’s in-house scoring model
The Steinberg UR44C features 4 ¼’’ XLR combo inputs on its front panel. 2 of these inputs are mainly optimized for bass/guitar effects while the other 2 are tailored towards acoustic instruments or mics. Every input has its own gain control knob along with a “Peak” LED indicator. You will also find 2 phantom power(48V) toggles if you ever want to connect condenser mics. On the rightmost part of the front panel, you’ll find 2 ¼’’ headphone jacks, each with its own volume control and 1 overall output control. You can also run 2 separate monitor mixes simultaneously through the headphone outputs.
On the back panel, you’ll find 2 power sockets: a 12V power input along with a USB-C socket. There are 4 line-outs along with 2 ¼’’ monitor outputs on the right part of the back panel. Additionally, there are 2 ¼’’ line inputs to total an overall 6 inputs. Finally, you’ll find MIDI in and out connectors at the center of the back panel.
The unit is relatively easy to set up and use. We really found the individual volume control for each of the 4 ports useful. If you want to dive further into music, then we would recommend getting as much inputs as you could spare. If you don’t want to go all-in buying a drum machine, a synth, etc. then it’s really not that important.
With regards to sound quality, matching your 192kHz sample rate and 32 bit recording with D-Pre Mic preamps produces great sounds to begin with! The built-in Digital-to-Analog/Analog-to-Digital converters are great as well. They add a slight warmth to the sound which sounds extremely pleasant. Once we received our unit, we updated its firmware right away, then tested out a bunch of vocal mics and instruments. The results were amazing and we had to do very little tweaking.
The greatest thing about the preamps is how transparent, clean, and detailed their output is. Whatever you run through the preamps will come out exactly as it went in. If you are looking to add a bit of color, then you can opt for an external preamp like a Neve 1073 or download a plugin. Keep in mind that less color is often more effective. So, if you use color where fitting, you’ll produce much more pleasant tracks than if you went overboard by adding color everywhere.
The UR44C has its own built-in DSP. So, most of the processing is done within the interface and not the DAW. This takes some workload off your CPU. Plus, the DSP effects sound amazing on recordings! You also have the option to implement loopback on your unit, which means that you could turn your interface into a live streaming unit.
Compared to the earlier UR models, the UR44C has better drivers and improved hardware design. On windows, you can choose between 3 different driver modes: Standard, Stable, or Low Latency. We immediately noticed the improvement in low latency stability in comparison to the Steinberg UR22MK2 (The UR44C precursor). With the UR22MK2, you would often run into random audio dropouts even if you were just using it for audio playback. However, the UR44C has no such issues and is very stable. The Low Latency option does require a bit more CPU power, but this isn’t an issue on modern computers with better configurations.
The sound quality of the UR44C, in our opinion, did improve vastly and so did the output to the headphones and speakers. We would’ve preferred if the DSP had a few more options and had a wider range of effects like the Portico RND. The mic pres sound real nice and have a good level of granularity, but if you’re going to drive them to their max, you should expect a fair amount of noise. This is a common issue with interfaces in this price range. However, it really isn’t a cause for concern since you probably would never have to go overboard with the mic preamps anyway.
The unit’s chassis is pretty heavy and solid, this is in part due to its hefty metal enclosure. All of its buttons, jacks, knobs, and switches have a pretty solid ‘feel’ to them. They, by no means, feel cheap or fragile. For its price tag, the UR44C is a great piece of hardware!
If you want to weigh how the unit fairs performance-wise, then you’ll hardly find any major issues. It’s extremely affordable, compact, and very easy to use. Additionally, the effort Steinberg put into decreasing the recording latency is a huge advantage especially if you are looking to dabble in music production.
Steinberg UR44C Benefits
You can play 2 separate mixes simultaneously through the different headphone outputs.
The unit has a dual power option (12V power supply and Type-C connection). Additionally, it is very easy to use and set up.
The unit’s preamps are extremely transparent, clean, and detailed. What comes out is exactly what went in. Plus, you could still opt for an external preamp or a plugin if you want some color.
The unit boasts a very low recording latency which is, hands down, its most important feature.
The unit has its own built-in DSP, which is great for adding effects to your recordings!
It has a nice sturdiness to it. It doesn’t feel cheap at all!
Steinberg UR44C Drawbacks
You don’t have a wide variety of effects to choose from with your DSP.
While the mic pres sound great, they’ll produce a fair amount of noise if you push them too hard
Verdict
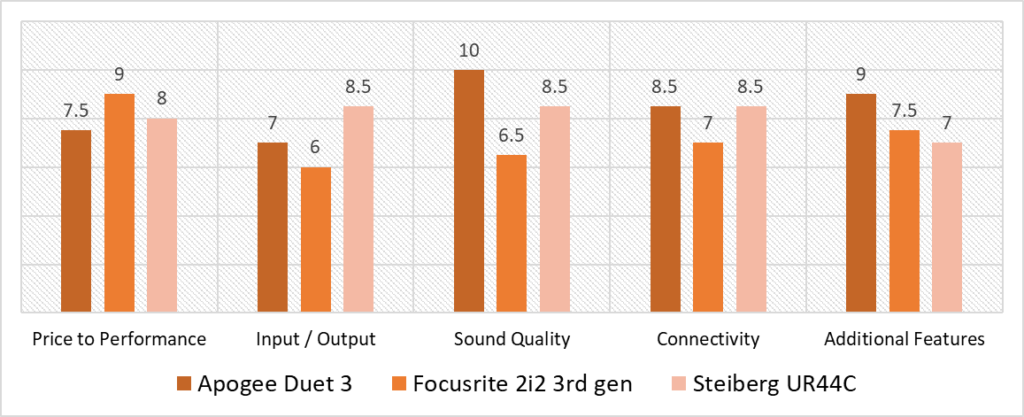
Based on our scoring model, you can see that highest variances are in the Sound quality and Input/Output categories. You’ll see that the Apogee Duet 3 outperforms both the 2i2 and the UR44C in the sound quality category beating both units by a score difference of 3.5 and 1.5 respectively. However, the UR44C takes the lead when it comes to Input/Output capability because it has 2 additional input channels compared to Duet 3 and 4 extra I/O channels compared to the 2i2.
Nevertheless, the Apogee Duet 3 appears to score the highest in both the sound quality and additional features categories which are what most sought after aspects. As you can see, the Duet 3 aces the sound quality category because of its awfully powerful converters and preamps. Additionally, it has a great deal of extra features which include a phase inverter, a soft limiter, a built-in DSP, etc. It does, however, score the lowest in the price to performance category, but that’s simply because premium interfaces are always a bit pricier.
We should however note that the Steinberg UR44C remains stable throughout never falling below a 7 in any given category. The highest amount of variance among its own categories doesn’t exceed 1.5 between 2 separate categories. As such, the UR44C can certainly rival the Duet 3 especially since the variance between both unit’s scores is only 0.3 which isn’t much. Most importantly, it has the highest number of I/O channels compared to the other 3 units which can be extremely valuable if you’re planning to use more than 2 inputs.
However, based on our scoring model, the Apogee Duet 3 emerges as the best overall audio interface for Garageband. Leading with an overall score of 8.4, the Duet 3 is the most multifarious in this line up. It’s an extremely well-designed compact unit that has amazing specifications. From its incredibly quiet preamps to its almost nonexistent latency, the Duet 3 offers the best performance of the bunch.
It also comes with the renowned ECS channel strip which provides you with essential tools like Compression, and EQ saturation. With the Duet 3, you’ll have a seamless experience using it with your Garageband DAW because of how responsive and fast it is. That’s why we recommend the Duet 3 if you’re planning to use Garageband and are looking for a powerful interface to use as your main recording hub.
Frequently Asked Questions
Do I need an Audio Interface for Garageband?
While Garageband is an extremely powerful DAW,if you want to record external sounds or instruments, then there really is no way around an audio interface. A decent audio interface is essential for musicians, audio engineers, and music producers. Simply put, your computer’s soundcard has very limited capabilities. You can definitely mix tracks in GarageBand without the need for an interface, however, you won’t be able to record your own audio.
What Audio driver should I use for Garageband with an Audio Interface?
There are several audio interfaces on the market that are class-compliant, which means that you won’t have to download any extra drivers. Yet, certain audio interfaces require that you download the compatible drivers. So, make sure to go over compatibility prior to installing any drivers.
Can I use an Audio Interface with Garageband on an iPad or an iPhone?
You must either have a 30-pin cable or a USB lightning cable to connect your audio interface. First, plug in the power cord to your interface then plug your lightning/30-pin cable to your audio interface.
Open Garageband then click on ‘’Record’’ (Command +R for hotkey). Just make sure that your volume bar is at least midway. You can control this in the System Preferences.
If you haven’t opened one already, click on “File” and then select “New Podcast Episode” then choose what directory you want to save the episode in, then click “Create”.
After your track appears in the library tab in Track View, pull it to the Arrange area if you want to edit it. After that, bring up the Input menu ( Command+I/O/~).
In order to allow Garageband to recognize inputs from external devices like guitars or mics, you should toggle the input option. To do so, head on to “System Preferences”>” Sounds”>” Outputs tab”. Make sure that your external device is assigned as an input by using ( Command+I/O/~) again or by pressing” Input” on the window bar.
What version of Garageband should I use with an Audio Interface?
This has nothing to do with the audio interface, it depends on the type of device you own. You can’t download Garageband on older version of macs from the app store due to compatibility issues. You don’t have the option to update your Mac OS as well. In this case, you’ll have to settle for an older version of Garageband. Else, definitely download the latest version of Garageband if you want to be up to date on its latest features.
How do I get help setting up my Audio Interface with Garageband?
You can always find the answer to any questions you have on a DAW on its official product website or forums. If you want some help setting up your audio interface with Garageband, then you could take a look at this Step-by-step guide:
https://images.apple.com/ca/education/docs/teachers/Apple-GarageBandQuickStart.pdf
![Best Audio Interface with (Balanced) XLR Output [2024 Compared]](https://ProRec.com/wp-content/uploads/2023/08/audio-interface-1-180x180.jpg "Best Audio Interface with (Balanced) XLR Output [2024 Compared]")
![Best 2 Channel Audio Interface [2023 Reviewed]](https://ProRec.com/wp-content/uploads/2022/07/2-channel-interface-180x180.png "Best 2 Channel Audio Interface [2023 Reviewed]")
![Best CHEAP Budget Audio Interface [2023 Reviewed]](https://ProRec.com/wp-content/uploads/2022/06/budget-180x180.jpg "Best CHEAP Budget Audio Interface [2023 Reviewed]")
![Best Audio Interface for Pro Tools [2024 Reviewed]](https://ProRec.com/wp-content/uploads/2022/06/Pro-Tools-180x180.png "Best Audio Interface for Pro Tools [2024 Reviewed]")