As an Amazon Associate ProRec.com earns from qualifying purchases. Any links that take you to products are affiliate links, and we may earn a commission if you make a purchase. We appreciate your support.
All text and image links lead to Amazon unless stated otherwise. All product scores are based on ProRec’s in-house scoring model
| Thumbnail | DJing Interfaces | ProRec Score | Price |
|---|---|---|---|
 | 8.5 | Check Price on Amazon | |
 | 9 | Check Price on Amazon | |
 | 8.8 | Check Price on Amazon |
Introduction
When you’re DJing, you’re doing multiple things. You’re getting out there and performing at clubs and parties, often producing and recording music, and sometimes even livestreaming. When you have so much going on, you want to focus more on your sound and to that end you are going to need an audio interface.
A lot of DJ controllers come with built in interfaces, however, they are almost never high quality. With how budget friendly audio interfaces have become in the last decade, it’s a good idea to invest in one and upgrade the way your rig sounds. Interfaces come with high quality preamps and converters that will help elevate your sound and take it to the next level.
When choosing an audio interface for DJing, you want to make sure that your interface aligns with all your needs. Account for as many inputs as you have speakers/monitors, mixers etc hooked up to your laptop. The I/O configuration is one of the most important things you must consider when purchasing an interface. The general rule is to get as many inputs and outputs as you can afford, since there will always be additional equipment that you want to connect to your interface later down the road.
Secondly, with an interface you have the option to use condenser mics which require Phantom Power. However, not all inputs on an interface will have that feature. Depending on how many mics your setup includes, look for as many inputs on the interface with the 48v Phantom Power functionality.
Always go for an interface by a manufacturer that has a good reputation for drivers. First make sure that the available drivers are compatible with your operating system, and then make sure that the manufacturer is known for offering good support. Most interfaces are natively supported if you have a MacBook, with Windows, things can sometimes become a bit tricky, but as long as the drivers are available you should be fine.
Finally, port selection is a huge aspect. Interfaces usually come with a USB or Thunderbolt port, and most budget laptops only offer USB ports. So make sure that your laptop/computer has the right ports to hook up the interface.
Best Audio Interface for DJing Reviews
All text and image links lead to Amazon unless stated otherwise. All product scores are based on ProRec’s in-house scoring model
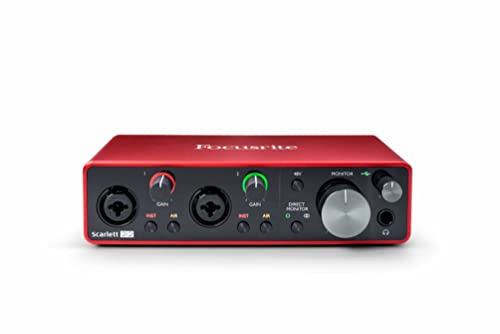
The Focusrite Scarlett 2i2 is a 2-input/2-output USB-C 2.0 audio interface, popular as being one the most budget friendly offerings with reliable performance. The unit features 24-bit depth at a 192kHz resolution, and a decent dynamic range of 111 dB. It comes with just a USB Type-A to Type-C cable.
On the front left, you’ll find two input sockets that take in both XLR and ¼” inputs for instruments, mics, and line level signals. Each input has a dedicated tri-LED coded halo gain knob (for preamp control up to 56dB), and an INST toggle as well as an AIR switch beneath it. To the right, you’ll see a 48V Phantom power switch for both inputs, a monitor knob, along with the headphone input and its control knob. There’s also a direct monitoring switch with both Mono and Stereo settings sandwiched in between.
The back panel houses a Kensington lock, a USB-C connector on the left, and line level outputs on the right through ¼” TRS jack sockets.
The construction on the Scarlett 2i2 feels solid, and the controls and ports are clean with a smooth feel. Overall, the unit has a portable form-factor and is easy to set up.
We began testing by hooking up the interface to our MacBook, which took less than 5 minutes since Focusrite audio interfaces are plug-and-play on macOS, and don’t require installation. For our input/output setup, we selected a Scarlett USB along with a Shure SM58 to record a Taylor acoustic with a pair of Sennheiser HD650 headphones for monitoring.
The tri-color green-yellow-red warnings on the gain control make it easy to set the gain properly, which was more than enough for our non-Phantom powered Shure SM58 microphone. We set the input to AIR and the headphone monitor output to Mono. The 2i2’s preamps are amazing and work perfectly with the Mac Core Audio driver. The sound is clear with clean zero noise, and preserves the real character of the guitar in the raw Quick n’ Dirty test. While the AIR button gives the sound a bit more presence.
Listening through the headphone monitor, we had latency under 43ms, though we wouldn’t be surprised if you could lower it further. Using Room EQ Wizard, the self-noise remained below -90dB at 48kHz and the frequency response stayed near dead flat from 20Hz to 20kHz. However, with the AIR button engaged, the response curve showed a gentle shelf-boost of higher frequencies along with some subtle harmonic distortion as well.
Naturally, we took the Scarlett out to a DJ at a local Swing & Ballroom group. We connected the 2 line outs from the back of the interface to the venue’s power amp, plugged in headphones on the front, and we were good to go. Unless the venue you play at has a more elaborate setup, it’s as easy as that. The sound quality from our recordings was top-notch, and turned quite a few heads. Unfortunately, since the 2i2 only has one set of stereo outputs, using controllers such as the DDJ-200 and previewing tracks separately from the main out are out of the question without a splitter.
The 3rd gen Scarlett 2i2 is a step up from the 2nd gen, especially on the preamp, with a higher overall gain range at 56dB compared to the 50dB on the older unit, though the predecessor does pretty well on recording regardless. The biggest changes however, are the addition of a USB-C port for broader compatibility with newer systems, AIR mode for brightness and clarity, and Stereo direct monitoring, which is an upgrade from the predecessor’s Mono input monitoring. The rest of the hardware changes lie mainly in the design and chipsets.
On the software side of things, the newer Scarlett also has improved drivers, and support for Focusrite Control for hardware level changes through the UI. Regrettably, the newer model doesn’t get the bundled codes for DAWs and sample libraries like its predecessor, but the increased functionality more than makes up for it.
While we are happy with the product, it isn’t perfect. One reason being that it’s a bit light on gain and you would have to tack on CloudLifter if you wanted to drive a gain hungry mic such as an SM7B. This could have been better, although most mics worked just fine, and the gain can be rectified post-production as well. The Scarlett would also offer a better experience if we could adjust our self-monitor independently from playback – as it is, everything else moves with the volume knob, which takes some getting used to.
Additionally – the gain indicator would work better as a meter instead of a flashing ring when adjusting, and the monitoring and headphone dials feel somewhat cluttered since they’re virtually on top of each other. Speaking of tight fits, the USB cable is a bit shorter than we’d like, which can be restrictive at times.
Overall, the 3rd gen Scarlett 2i2 is an all-round great little interface that does well to provide depth to your recordings and shape your sounds. The functional design, sound quality, and simplicity make it a reliable DJing companion for the price!
Focusrite Scarlett 2i2 3rd Gen Benefits
The setup is easy with no extra legwork for drivers and installation.
The noise floor is fairly low, registering -90dB at 48kHz, delivering clear sound.
The Focusrite Control application comes in handy for making hardware level changes on the computer.
Focusrite Scarlett 2i2 3rd Gen Drawbacks
The preamps could be easier to tune with a meter instead of a halo light on the gain dial.
The monitoring and headphone dials are too close together and can get in the way.
The preamps aren’t the best in terms of gain, causing issues with some mics without CloudLifter.
All text and image links lead to Amazon unless stated otherwise. All product scores are based on ProRec’s in-house scoring model
The UA Volt 476P is a 4-in/4-out USB 2.0 Type-C audio interface known for its traditional analog circuits and compression presets. The unit features 24-bit/192kHz conversion with a modest 110 dB dynamic output range. It comes with a power adapter, a USB-C to USB-A cable, as well as a suite of essential audio and music software, including Ableton, Marshall, Melodyne, and more.
On the front panel, you’ll see four balanced XLR/TRS combo inputs with support for ¼” plugs on the left with their corresponding instrument buttons (INST) above them for Hi-Z inputs, along with a 48V Phantom power button for XLR microphones. On the right, there are two headphone volume knobs that control independently from the monitor volume, with their ¼” TRS headphone outputs below.
On the top panel towards the left, you’ll find the four gain knobs for adjusting the preamp gain for both inputs, along with Vintage and 76 Compressor buttons for each above. Each compressor toggle also has a set of three 76 Compressor preset indicators on top to identify enabled presets. On the right, we have monitor source buttons along with a knob to adjust the volume from the monitor outputs. In the middle, there is a single Mono button to route the monitor source from Stereo to Mono. Towards the top-right, you’ll see meters indicating Input and Output signals, along with a Host indicator which lights up when the interface is recognized by your device.
On the left side of the rear panel, you have a Kensington security lock, a power switch, a 5VDC port for bus power, and a USB-C port to connect to your computer. On the right, you’ll find ¼” line outputs for monitoring unattenuated audio from software, 1/L and 2/R monitor outputs to connect stereo speakers through TS/TRS cables, as well as MIDI I/O to connect MIDI devices through standard 5-pin MIDI DIN connectors.
The UA Volt 476P has a very solid build with well-thought-out controls, and the design looks really well made with great packaging using a combination of aluminum and wood.
We plugged in our MacBook into the interface through the provided cable and connected an SM7B mic for recording, along with a Gibson Hummingbird acoustic guitar. The sound quality is easily the best you can get for any interface in this price range, and the pre-amped analog inputs are absolutely fantastic! The Volt 476 captured all the nuances of the acoustic guitar and was even very accurate in the full spectrum. We only used the compressor on one recording, but we did use the Vintage button that modeled UA’s recording console strip, and the Vintage pre-amp on each input channel sounds so good. It really made our Gibson acoustic guitar come to life on its own in a way that we doubt you’ll ever bother searching for a plugin that can do better.
Additionally, the 76 compressor and vintage mode buttons save you a lot of time and energy by getting you closer to “that sound” right out of the gate. We got rid of a rack preamp and compressor for this, and it blows them away! The compressors are not only great, but also useful for smoothing out the creative process with simple buttons, and we’re very excited to play around with the different 76 compressor presets. The vintage mode definitely gives our recordings more of a “console feeling”.
When mixing, the choices for monitoring are a game changer for us. We don’t usually check our mixes in Stereo, so we love that there’s also a Mono button. While we don’t use preamps and compressors on every track, they’re a nice addition nonetheless. We are very happy with the results, – the Volt 576P is a stellar interface and it always runs Ableton 11 on our MacBook flawlessly without any disconnects or artificial tones. You also get dozens of plugins that are a solid bedrock for anyone getting into that world for the first time.
Our live performance setup only took a few inputs, one for our Pioneer DJ DDJ-1000, one for one of our mics (we keep a dynamic and condenser mic each), and another for a 10-channel mixer for connecting a dozen devices that all ran flawlessly. With the inputs left over, it’s nice to have the option of adding something later on, especially if you want to add instruments through the MIDI I/O.
Compared to the similar UA Volt 476, the Volt 476P has essentially the same interface, with the addition of two mic preamps instead of line inputs 3 and 4 on the 476, adding up to a total of four analog preamps with Phantom and Vintage power. However, it doesn’t get the same onboard UAD Core Processing for internal signal processing like the Apollo Twin X, this also means that you don’t get support for DSP plugins on the Volt 476P either.
The Volt 476P also doesn’t offer the same quality preamps (+65 dB gain vs 55 dB) and conversion. However, the Apollo Twin X doesn’t have a Vintage mode toggle like the Volt, which allows you to emulate a preamp with tube circuitry for a more open and transparent feel.
While the interface is solid, there are a couple of things that we would have liked to see. For one, mic inputs on the rear instead of everything on the front. Line inputs on the front work great for instruments, but for mic cables that will most likely stay plugged, it’s useless. A couple of inputs on the rear would have been nice. One other thing here is that the interface offers direct monitoring, but lacks a knob to control the balance of the playback and monitoring, which is a feature even some budget interfaces have. Moreover, we found that the USB jack on the jack is a bit wiggly, which doesn’t inspire a lot of confidence.
All-in-all, the Volt offers some of the best audio quality for the price with plenty of inputs and outputs to connect to, and the addition of the 76 Compressor presets and Vintage mode make it an amazing buy!
UA Volt 476P Benefits
The 76 Compressor presets and Vintage modes give the interface a lot of versatility.
A dedicated Mono button is a welcome addition if you don’t monitor mixes with Stereo.
The pre-amped analog inputs are fantastic, and do well to preserve our guitar’s nuances.
UA Volt 476P Drawbacks
The USB jack has some wiggle to it, which could have been made sturdier.
The interface offers direct monitoring but no dedicated dial for controlling balance of monitoring and playback.
The Volt lacks microphone inputs on the rear, opting to put everything in the front.
All text and image links lead to Amazon unless stated otherwise. All product scores are based on ProRec’s in-house scoring model
The MOTU M6 is a 6-in/4-out USB-C 2.0 audio interface most known for its live monitoring capabilities. The unit features 24-bit/192kHz conversion along with an impressive dynamic output range of 120dB. The interface comes with a USB-C to USB-A cable, along with a DC power adapter.
On the left side of the front panel, you’ll see four gain knobs for up to 60dB of input signal boost for each microphone input. Each dial has both its own 48V button for Phantom power below it, as well as a MON (monitor) button. Towards the middle, you’ll find the Input Monitor Mix to control balance between computer output and live inputs, along with a full-color hi-res LCD that shows meters for I/O. On the right side, you’ll see a volume control knob for the MONITOR outputs on the back panel as well as two headphone outputs, and their respective volume control knobs above them. The left dial also has a 3-4 switch to monitor Line Out 3-4 instead of the headphone output.
On the back panel, you’ll find the power switch towards the left side, along with MIDI I/O for your gear, a 15V DC power slot, a USB-C port for the host computer, and a Kensington lock. In the middle, you’ll see two sets of balanced DC-coupled ¼” outputs for primary and secondary speakers (or other audio destinations), as well as Line Inputs for balanced/unbalanced line-level audio sources. Towards the right, there are four XLR/TRS combo jacks that accept both mic and ¼” cables.
The M6 has a really solid build with good controls and monitoring. The volume knobs aren’t scratchy when rotated, and though some front buttons and casings feel a tiny bit different in usage, it’s not noticeable unless you’re looking for perfection.
Right off the bat, with its solid build, along with the smooth knobs and controls, we were recording in minutes. Apart from being well-built, the interface is also functionally intuitive. Arguably, the M6 covers a lot of ground depending on what you’re looking for, while also being reasonably priced compared to more expensive interfaces with fewer features.
The unit wasn’t completely plug-and-play with our M2 Pro Mac Mini; we had to download a driver to use it with Logic Pro. Once connected, we set up our Gibson J-45 and a Shure SM-57 microphone. The switchable 48V Phantom power works flawless, and the preamps sound a bit warmer as well. The unit is easy to set up, and the sound is great – very clean and open, fast, with lots of clean gain on the preamps. The M6 has the best-in-class converters, and with the fantastic MOTU drivers, latency is no longer an issue! We even almost got it down to the 2.5ms advertised with 96k at a buffer of 32. Not only that, but the more complex configurations in Guitar Rig for example, are barely noticeable. We also didn’t feel a difference between monitor and direct path.
The loopback function is pretty interesting for streamers, where the PC sound can be mixed together with the live sound. The problem where programs fight over the ASIO driver doesn’t exist here.
For our live performance setup, we set up our Numark Mixtrack Pro 2 and ran the output audio on Ableton through the MOTU M6 and the improvement in sound quality was huge. This was expected since cheap DJ controllers don’t have much better interfaces than laptops, especially with balanced XLR cables compared to RCA outputs on many older controllers. Nonetheless, the interface routes the output out of the controller just fine.
Compared to other MOTU M-series products, the M6 most notably offers more I/O than both the M2 and M4. More interestingly, where the M6 has all its inputs on the back panel, the other two devices house them on the front like most compact interfaces. The M6 also comes with a monitor mix knob for balancing live inputs, as well as an A/B switch for comparing a mix on two different monitors, whereas the MOTU M2 has neither. Conversely, the M2 has two mirrored unbalanced RCA analog-out ports where the M6 has none. You’ll also find one additional ESS-driven headphone out and volume control on the MOTU M6 than both the M4 and M2. Like the M4, the M6 also has balanced ¼” line inputs, which the M2 lacks.
Our only minor quibble with the MOTU M6 is that since the inputs are at the back, frequent plugging/unplugging gets somewhat awkward, though we understand this compromise was necessary to keep the unit compact and affordable. Additionally, we noticed that the gain knobs are ridiculously free-moving, rotating at the slightest bump. This makes it very different from the set-and-forget rotary encoders on the Mk3, and can be a dicey proposition when performing live on stage.
That being said, the unit not only offers great converters, but also warm, low-noise preamps which are impressive for the price. With low latency, amazing drivers, solid construction, and a decent amount of I/O, the MOTU M6 doesn’t disappoint.
MOTU M6 Benefits
The converters are best-in-class, and the MOTU drivers are phenomenal with low latency.
The sound is great, and there’s lots of clean gain on the preamps.
Our live music saw substantial improvement in sound quality when routed through M6 instead of the Numark controller.
MOTU M6 Drawbacks
All the inputs are at the back, so plugging and unplugging can get tedious.
The gain knobs are free-moving, and can rotate at the slightest bump.
Verdict
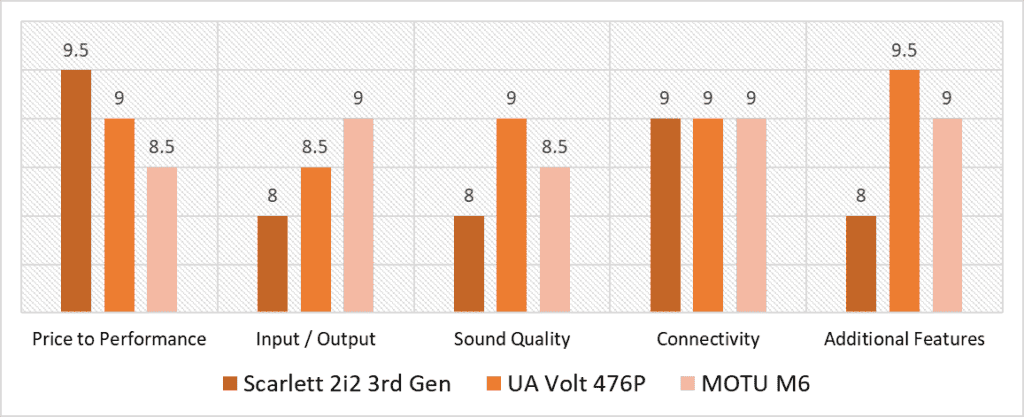
Based on our scoring model, there are three categories that see the most variance – Additional Features, Input/Output, and Price to Performance. In the first, the Volt has the most to offer with a narrow margin, with features such as Vintage mode and a 76 Compressor with different presets. For the I/O, the M6 offers roughly the same ports as the Volt, however, the addition of two extra inputs gives it the edge. Finally, in Price to Performance, the Focusrite Scarlett costs half the price with little difference in sound quality.
The Volt does remarkably well throughout, with solid preamps, decent converters and better sound quality than both the M6 and the Scarlett, and has a lot more features to offer, including its Vintage circuitry. While it isn’t the value proposition that the Scarlett is, the Volt still manages to provide enough I/O and unique features to earn second place in that category. Connectivity between the M6, Volt, and Scarlett is the only real equalizer with all three offering USB-C support.
The MOTU M6 isn’t too far off, and offers the best-in-class converters for the second best audio quality. The biggest highlight here is the extensive I/O crammed into the compact box – which ends up being more than the more budget-friendly Scarlett and even the Volt. While the M6 doesn’t have the same gimmicks to play around with as the Volt, it does feature an A/B Input Monitor Mix and LCD meters for I/O, which are fairly functional. One area where both devices outshine the Scarlett is the option of DC power over just AC.
After careful consideration, the best audio interface for Djing comes out to be the UA Volt 476P with an average of 9.0 points. Not only are the clear pre-amped analogs and sound quality some of the best in the price range, but you also get a ton of I/O, as well as a great set of features, including the 76 Compressor and Vintage mode, which breathes life into any recording. While the MOTU M6 may have more I/O and similar performance, the Volt has a lot more going for it. While it isn’t the most bang-for-your buck, especially over the Scarlett, you still get substantial value. For what it costs, the UA Volt 476P is a must-buy!
Frequently Asked Questions
Do you need an audio interface for DJing?
Strictly speaking, you don’t need an audio interface for DJing, however, you won’t get high-quality sound from just a controller. Most controllers are not engineered for high-resolution sound conversion, and have a lot less I/O and therefore less flexibility than an audio interface. They also don’t have quality preamps that can make your music sound substantially better.
Can you plug a DJ controller into an audio interface?
Absolutely! When connected to a DJ controller, an interface acts as an intermediary between your computer and your controller, allowing you to process and record high-quality audio at a professional level.
How to record DJ mix with audio interface?
To record a DJ mix with an audio interface, all you need to do is feed an output from your controller into your audio interface via the provided cable, and then connect the interface into your laptop or phone via USB and Lightning/USB-C cables respectively. After that, you can simply record your tracks on Traktor, Ableton, or any other software.
Do you need both an audio interface and mixer?
If you’re not already using a DJ controller, then yes! An interface can do a great job recording from a couple of sources, however, for multiple sources, broadcasting, and live sound reinforcement, you need a mixer as well for adjusting the EQ, panning, and effects of each individual source through the faders.
![Best Audio Interface for FL Studio [2023 Reviewed]](https://ProRec.com/wp-content/uploads/2022/05/FL-Studio-180x180.png "Best Audio Interface for FL Studio [2023 Reviewed]")
![Best Audio Interface for Podcasting [2023 Reviewed]](https://ProRec.com/wp-content/uploads/2023/02/podcasting-180x180.png "Best Audio Interface for Podcasting [2023 Reviewed]")
![Best Audio Interface with FireWire [2024 Reviewed]](https://ProRec.com/wp-content/uploads/2023/07/FireWire-180x180.jpg "Best Audio Interface with FireWire [2024 Reviewed]")
![Best USB-C Audio Interface [2023 Reviewed]](https://ProRec.com/wp-content/uploads/2022/08/usb-c-port-180x180.png "Best USB-C Audio Interface [2023 Reviewed]")