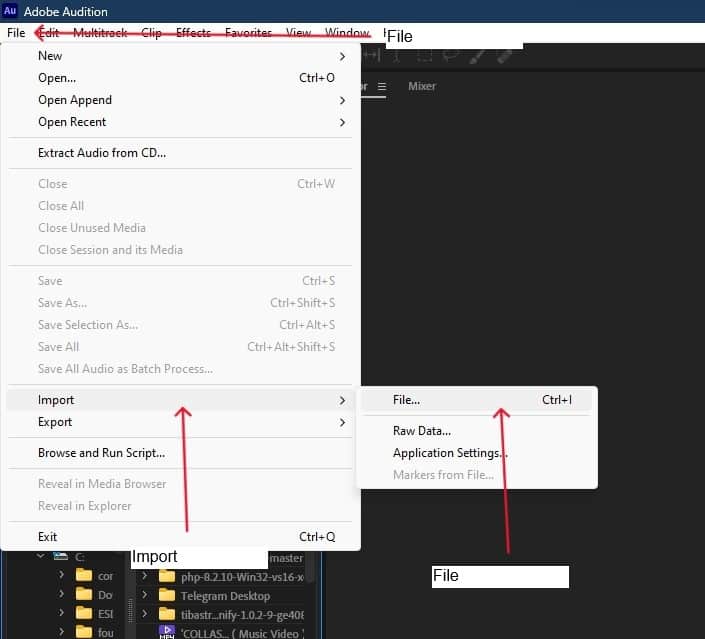
When recording outdoors, you’re likely to encounter wind noise, which you’ll hear as rumble in your audio. Happens quite a bit, and you can’t just clip out the part and delete it, cause that will ruin your recording. The idea is to reduce the wind distortion so that the source is as clear as it can get. So the question is, how do we go tackle wind noise in Adobe Audition? The first step is importing your audio to Audition.
EQ
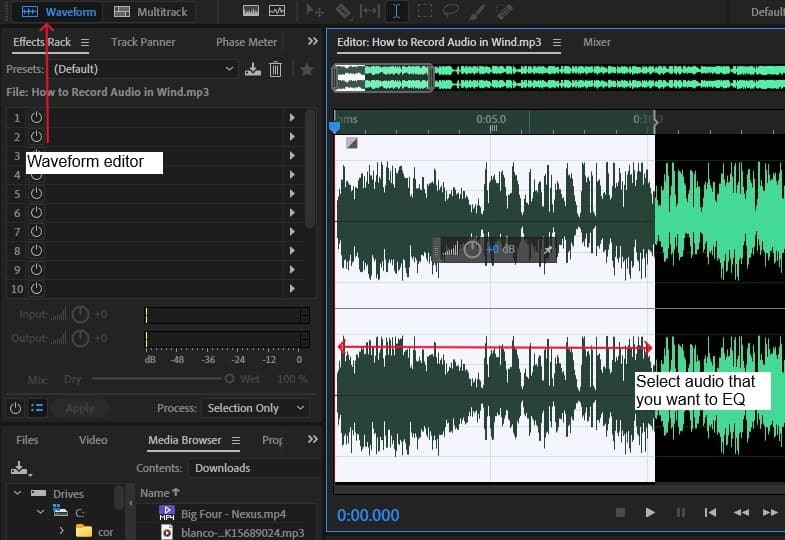
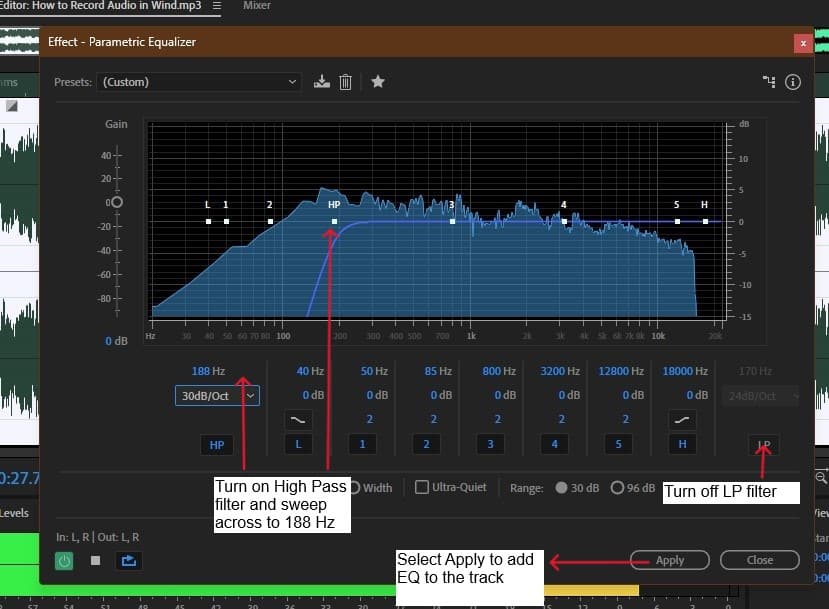
Wind rumble generally occurs between 40 Hz and 180 Hz, and an EQ or a High Pass Filter is the best option to turn down the bass frequencies in your audio. But first, you want to hear the noise to find the specific frequency that has the wind noise with sweepable EQ, using a Parametric Equalizer. Since we’re in waveform view, select the audio first before you add EQ.
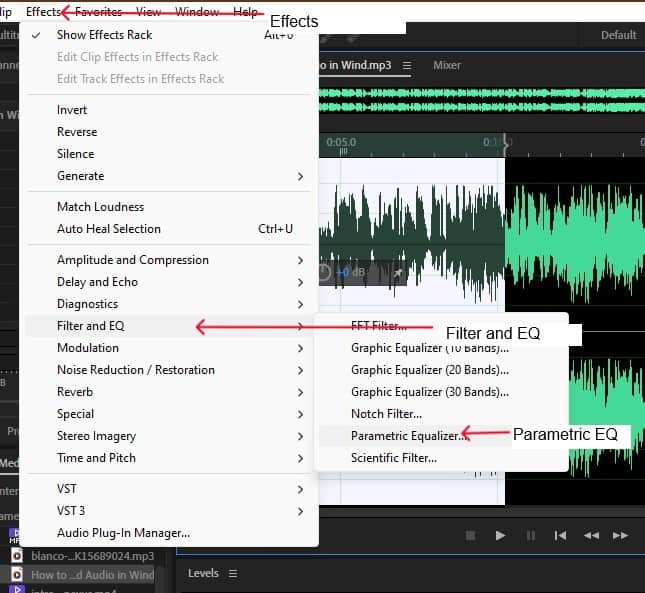
Head to the Effects menu then Filter and EQ and select parametric EQ.
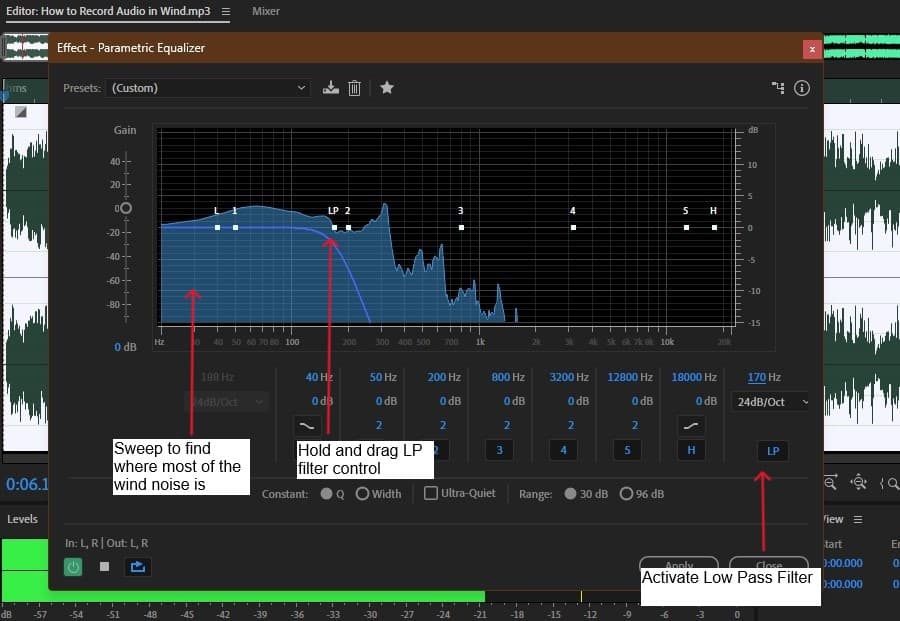
Turn on the low pass filter and sweep from the high end (18 kHz) by clicking the EQ control point, holding and dragging the mouse to the left until you get to the point with the most wind noise, usually around 180 Hz.
Disable the low pass filter, select the high pass filter and sweep right starting from 20 Hz (the low end) across the spectrum until you hit the frequency where you hear less and less wind rumble, then go ahead and apply EQ.
Your recording is probably going to have more noise in some parts and less in others. Applying a high pass filter to the entire audio will take the bass out of the sound even in the parts without much noise. The best way around this is to automate EQ, that is setting the EQ and high pass filter to kick in only where there’s more wind noise.
With automation you’ll avoid taking the low end out of the whole recording while maintaining bass frequencies in the rest of the parts that don’t have a lot of noise.
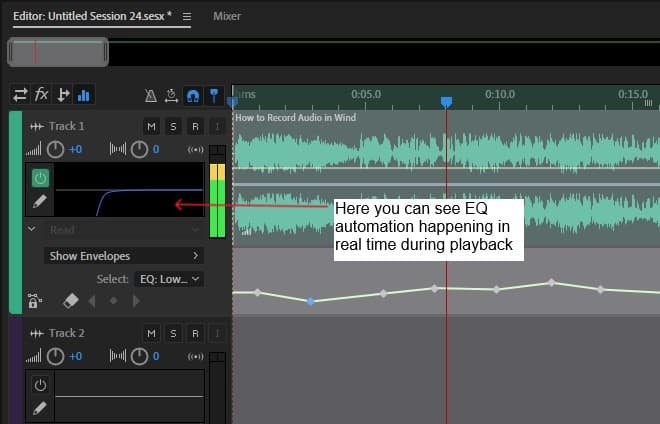
In your multitrack editor select the track you want to automate. On the track’s menu, change from Input/Output view to EQ, select the mode of automation and click on the dropdown menu to choose the type of EQ automation. We’ll go with Low Shelf Gain which lets you increase and decrease low end/bass levels.
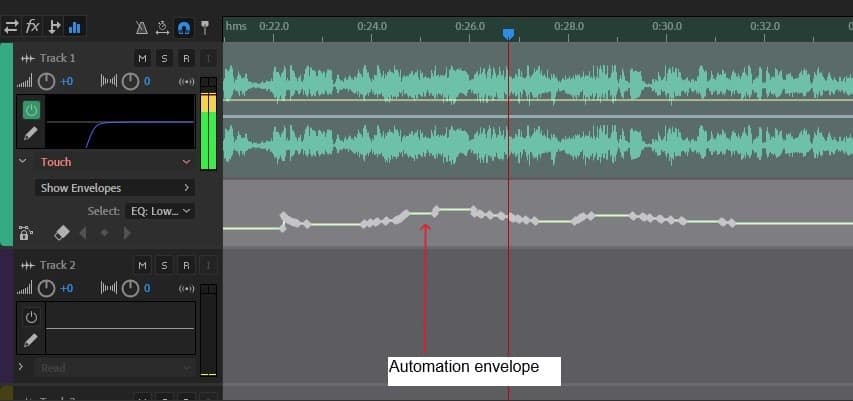
Read > Show Envelopes > Track EQ > Low Shelf Gain

For read automation, playback the track, look for any parts where there’s an increase in wind noise. Zoom in, select points with high wind noise, and turn down the gain on the automation envelope.

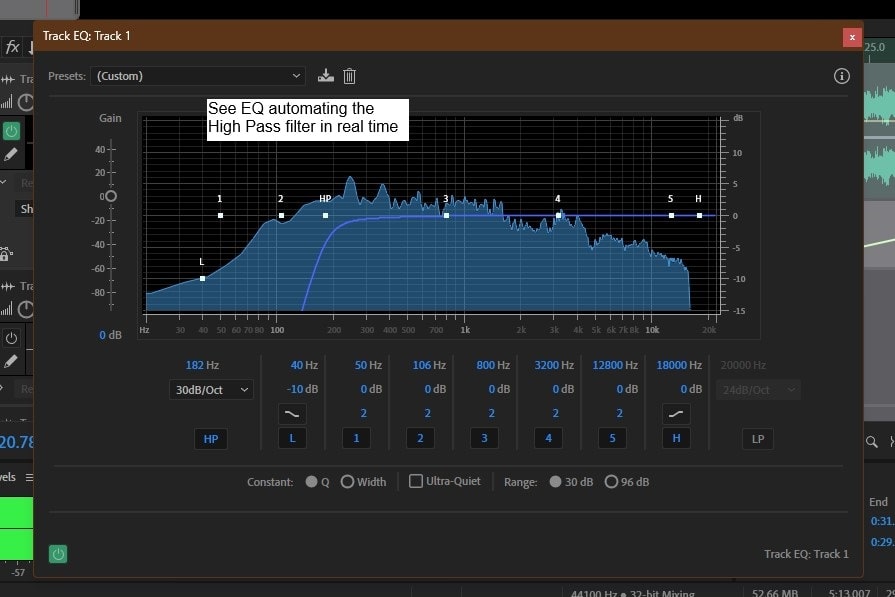
Open the EQ, set the high pass filter at a little less than 200 Hz and enable it. At this stage when you play the track you can see automation taking effect in real time on the EQ or in the small EQ box on the track’s menu.
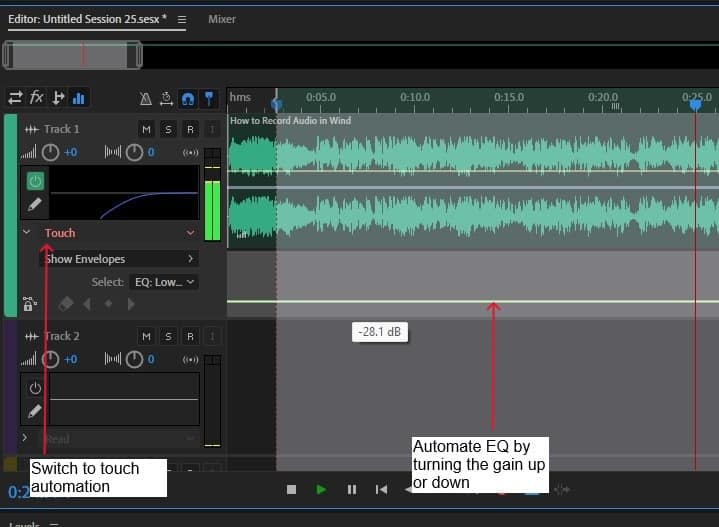
Touch > Show Envelopes > Track EQ > Low Shelf Gain
In touch automation mode, playback your track from the start with the automation gain at 0 dB, then just as the wind noise comes in, turn down the gain, and turn it back up to 0 dB when there’s little to no wind noise. The EQ automation envelope changes automatically when you stop the automation.
Spot Healing Brush Tool
Next, we’ll go into the spectral frequency view and bring some kind of heat map to the audio.
Zoom in (= key) to where the noises are, usually in the low end (bass frequencies), they’re mostly indicated by yellow patches.
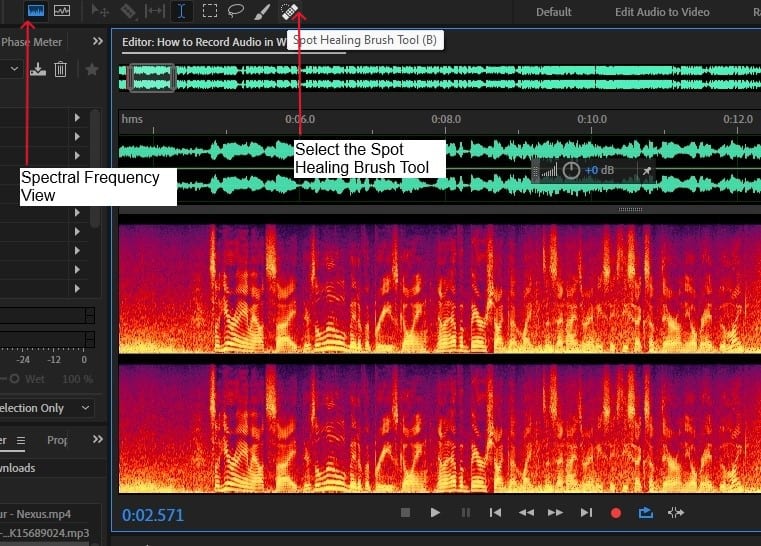
Switch to the waveform editor and grab the spot healing brush tool at the top of your Audition workspace. To make it bigger or smaller use the curly braces key ( “{“ and “}” ). If you want to get rid of the noise, select the spot healing brush tool and then hold and drag your mouse over the noise patch.
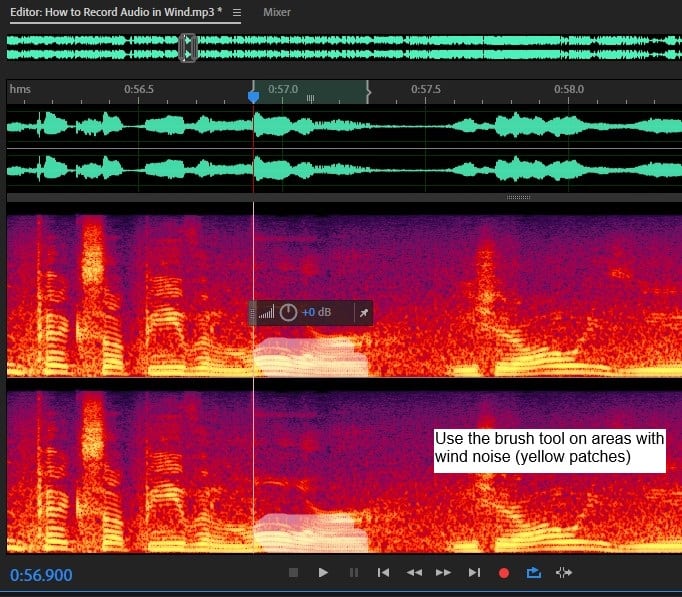
For more accuracy, hold the shift key on your keyboard, click and drag the brush down so you get a straight line. Find other parts of your audio with wind noise and paint around the noise. The brush tool makes it easy to spot and eliminate any noisy parts making your recording sound much better. If there’s a lot of noise, you may have to “paint” one or two more times to get the desired outcome.
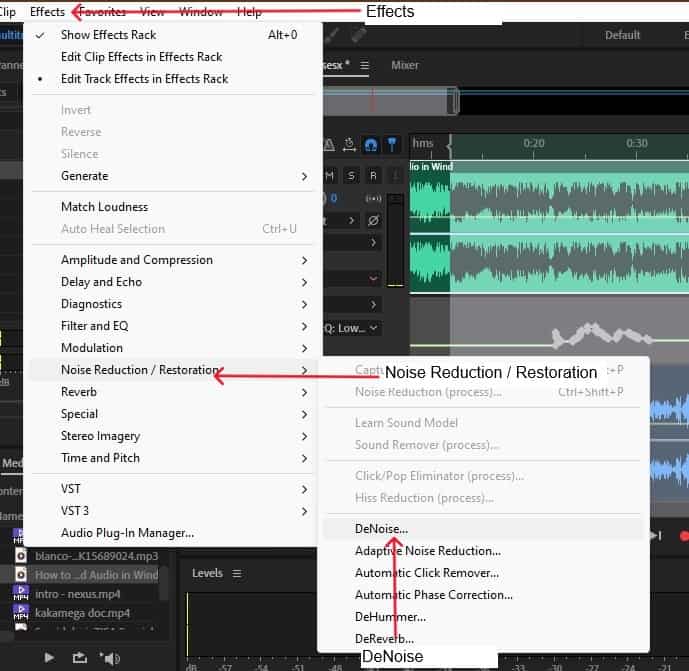
Noise Reduction
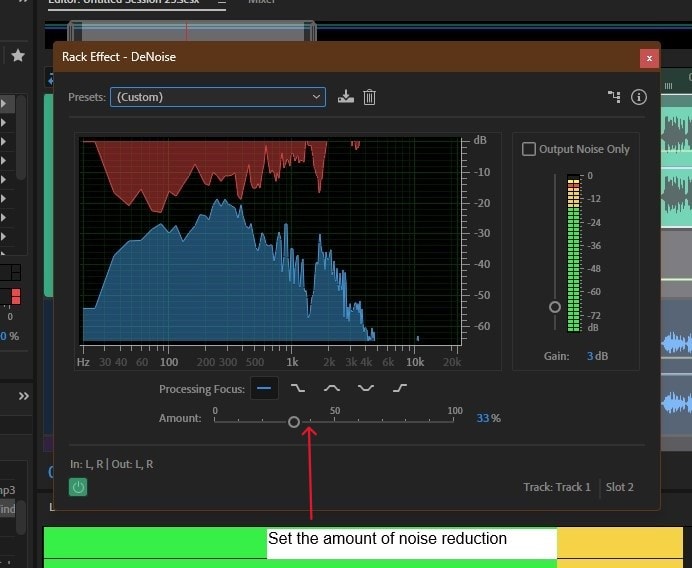
Audition comes with its own built-in noise reduction and restoration plug-ins. DeNoise and Noise Reduction are the most suitable when it comes to fixing wind noise.
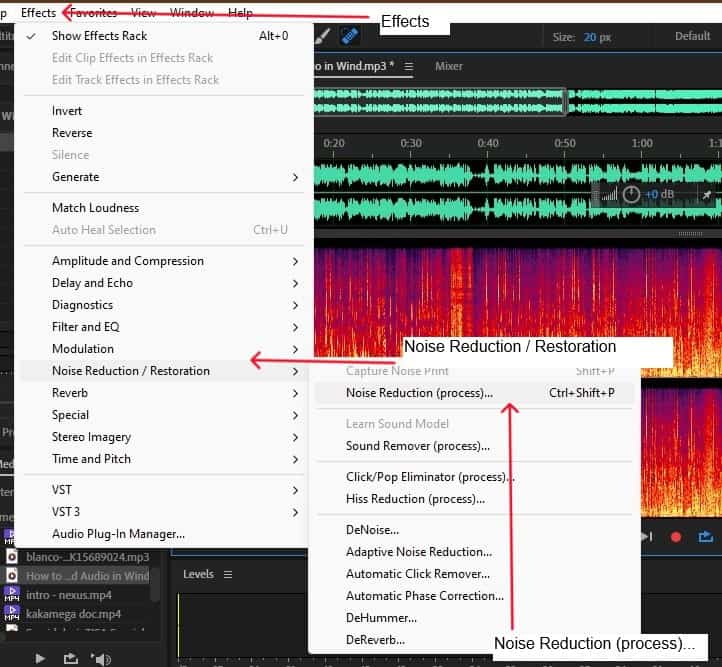
Effects > Noise Reduction / Restoration > DeNoise
For DeNoise, there’s a slider with a range between 0 and 100 that controls noise reduction. The further you push it up the more it degrades the speech and affects the quality of your sound so avoid going too high. A typical setting is around 30 – 40.
If there’s a lot of wind rumble in your audio, DeNoise won’t work well since you’ll end up affecting the sound that you intended to record. What you want is a clear perspective on only the noise in your audio, so you can isolate and eliminate it, rather than applying noise reduction on the actual sound you want to hear. In this situation we’ll go for Noise Reduction (process)…
Effects > Noise Reduction / Restoration > Noise Reduction (process)…
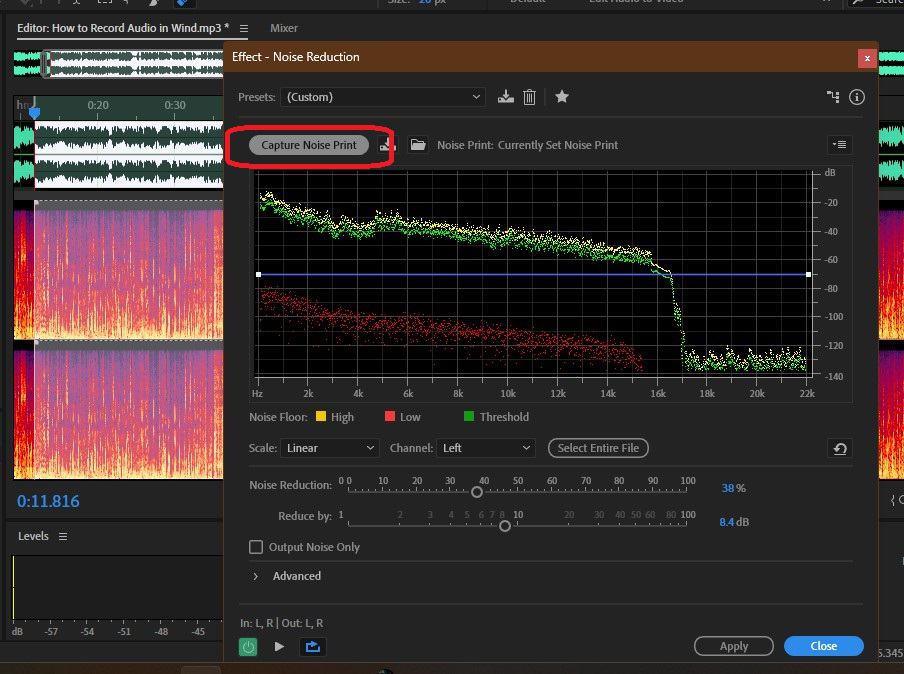
Select the part of your audio that needs noise reduction, open Noise Reduction and click on capture noise print.You get to capture a noise print of only the wind noise and not other sounds in your audio.
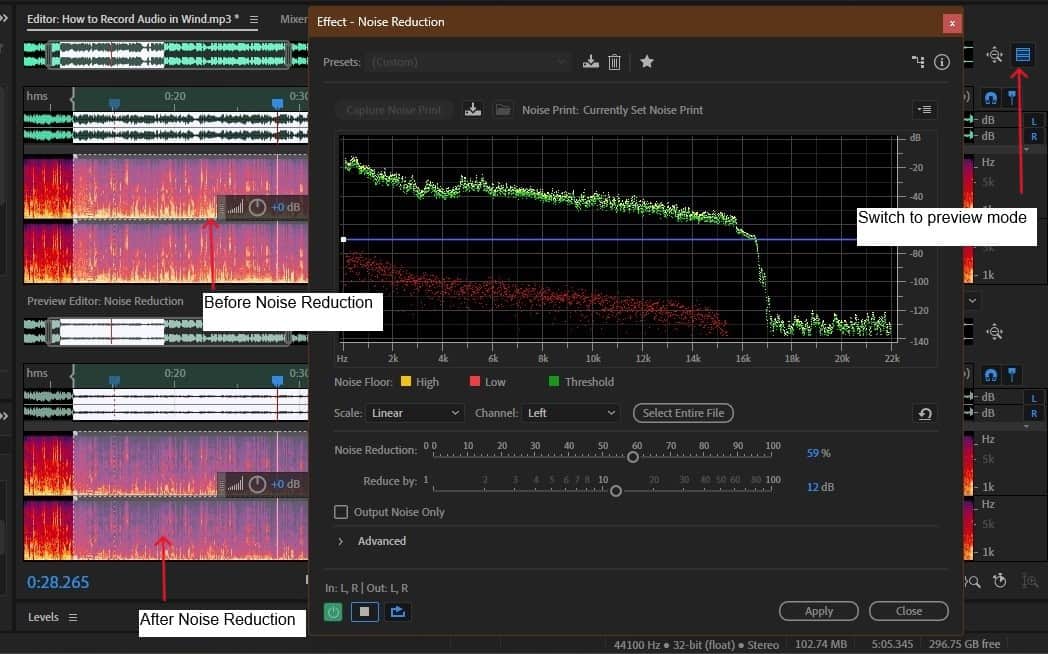
Enable preview mode to see the before and after effect of Noise Reduction. On a spectral display you’ll want more black spots where there’s no sound and less yellow spots where there’s noise. That way the wind noise doesn’t go through in between the sound you want to hear.
After getting a noise print, set the amount of noise reduction and the level by how much you want to turn down the wind noise by adjusting Noise Reduction (1 – 100) and Reduce By (1 – 100 dB) settings, and then apply.
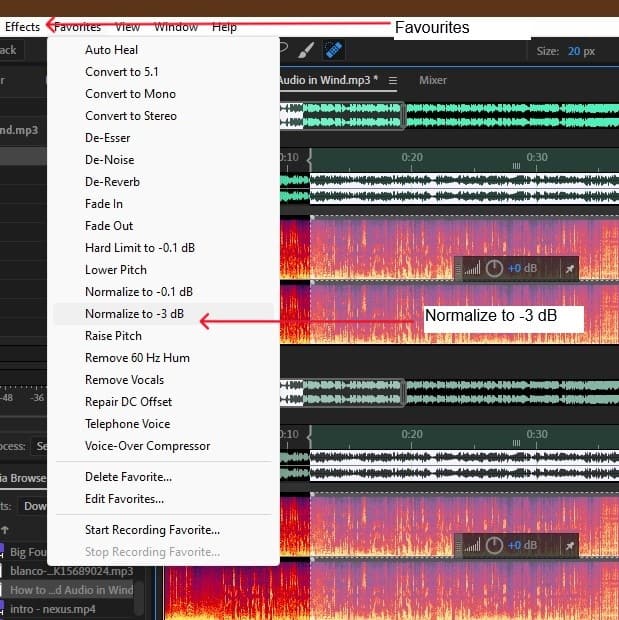
Next, to compensate for the noise reduction, even out the dynamic range in your audio, pump up your sound to give it more presence by adding a normalizing effect. Normalizing is quite similar to compression, that is, it makes quieter parts of the sound louder and the louder parts of the sound quieter. Normalize your audio from the Favourites menu by choosing Normalize to -3 dB.
Favorites > Normalize to -3 dB
Conclusion
The sound of wind when your recording brings interference and distortion to your audio making it hard to hear the direct/source sound. This blog post suggests a couple of ways to change that during mixdown in Adobe Audition. Make your sound more audible by rolling off excess low frequencies around 180 Hz with EQ and a high pass filter. Pinpoint wind noise in spectral frequency display and use a spot healing brush tool to turn it down. And apply Noise Reduction so that the sound you intended to record is clear and free of wind noise.
![Adobe Audition MME Device Internal Error [FIXED]](https://ProRec.com/wp-content/uploads/2022/09/image-112-180x180.png "Adobe Audition MME Device Internal Error [FIXED]")
![How To Use Adobe Audition For Podcasts [Complete Guide]](https://ProRec.com/wp-content/uploads/2022/07/image-156-180x180.png "How To Use Adobe Audition For Podcasts [Complete Guide]")

![Adobe Audition Only Recording Left Side [FIXED]](https://ProRec.com/wp-content/uploads/2022/08/image-17-180x180.png "Adobe Audition Only Recording Left Side [FIXED]")