Waves plug-ins have established themselves as a staple of many music producers and audio engineers’ mixing sessions. For this reason, they have been endorsed by many prominent audio engineers from both the music industry and the audio post production field. With their frequent sales, which have practically become a meme within the producer and audio-engineer community, and their various free plug-in options, Waves have established a loyal customer base. However, like with any type of plug-in software, there are inevitably going to be issues that hinder how effectively users can integrate Waves plug-ins into their workflow.
Please Read: Plug-in Formats, Installation, Rescanning, Management and Storage in Pro Tools
In this article we will look at common reasons why Waves plug-ins may not appear in Pro Tools and what users can do to solve these issues.
Using Pro Tools First
While Waves plugins are compatible with most Digital Audio Workstations, the same cannot be said of their compatibility with Avid’s free version of Pro Tools, Pro Tools First. This is not an issue that is unique to Waves plug-ins. Pro Tools First only accepts plug-ins acquired from Avid’s online store; which is to say, it only uses other Avid plug-ins. As such, if a user has any third-party plug-ins installed and activated on their device, they will not be available in their version of Pro Tools. The only real solution to this is to upgrade the version of Pro Tools they are using or to find an alternative from Avid that would help them accomplish their goals.
Computer Might Not Meet The Minimum System Requirements For The Plug-In
Another issue that might cause a plug-in to not show up in Pro Tools is if the computer on which the plug-in is installed does not meet the minimum system requirements to run that plug-in. The basic system features one needs to keep in mind when installing and attempting to run a plug-in are:
- CPU
- Memory- both in terms of RAM and available disk space.
- Operating System
- Screen Resolution
Luckily, the official Waves website provides the means to check the minimum and the recommended system requirements for all of their plug-ins. It generally a good idea to check these before committing to buying or downloading a plug-in.
Recommended Read: Pro Tools Stuck on Loading Plug-ins [FIXED]
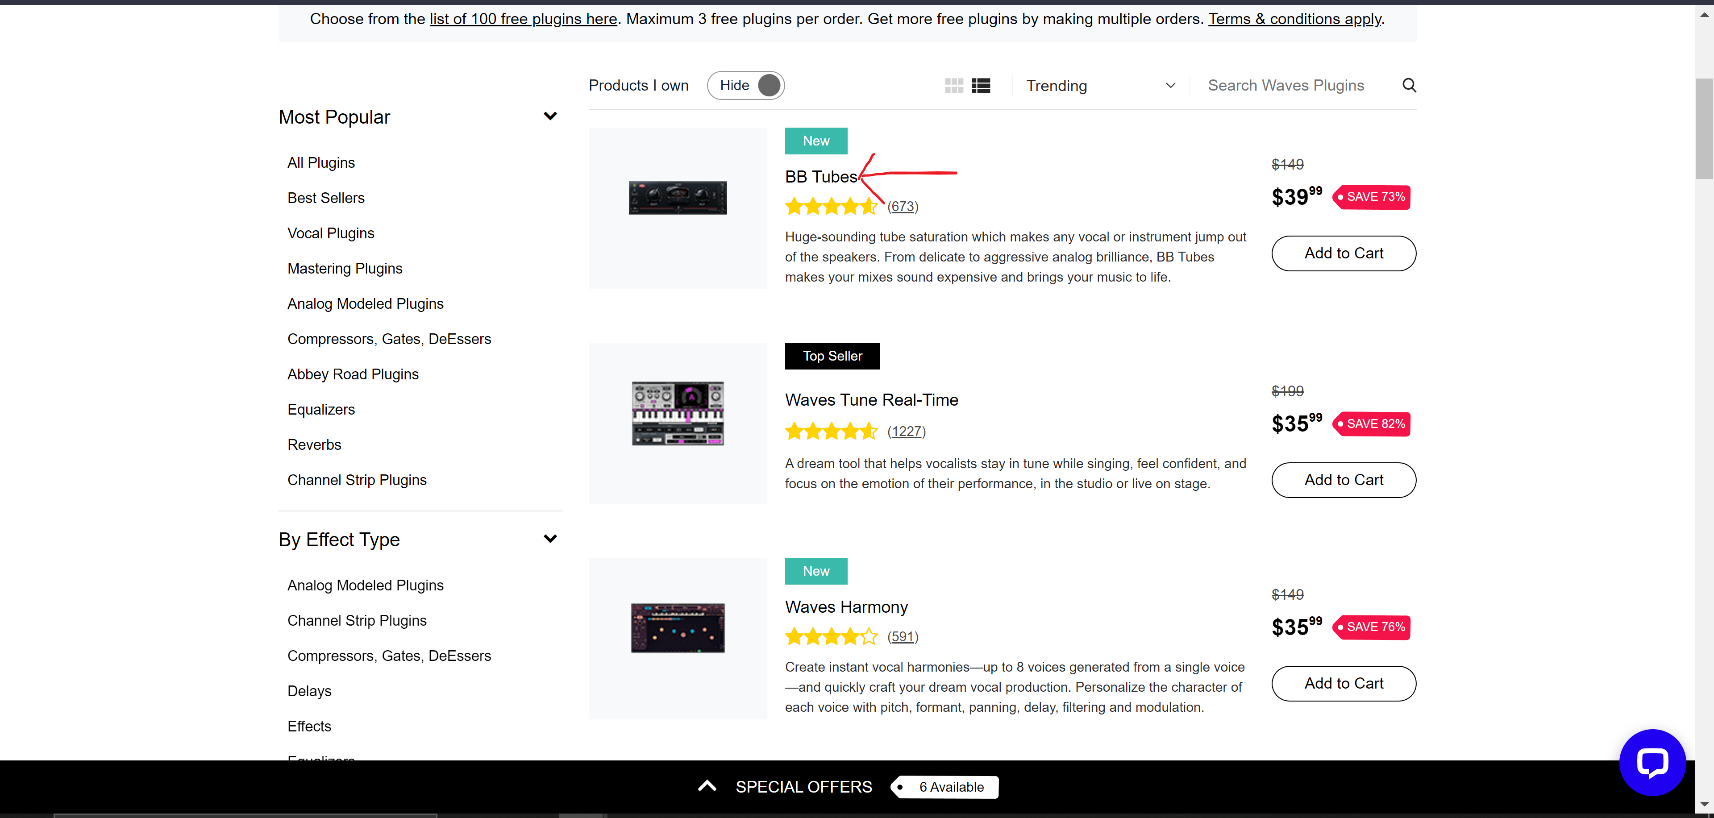
On the Waves website, clicking the name of any plug-in will allow users to read a description of that plug-in. This description will include what the plug-in does, its system requirements and even user reviews. Let us look at an example using Waves BB Tubes plug-in.
On clicking the name of the plug-in, we can see more information about it. Scrolling down on the page, we can see more in-depth information and reviews. Opening the Tech Specs tab, we can see the system requirements that computers need to meet in order to run this plug-in.
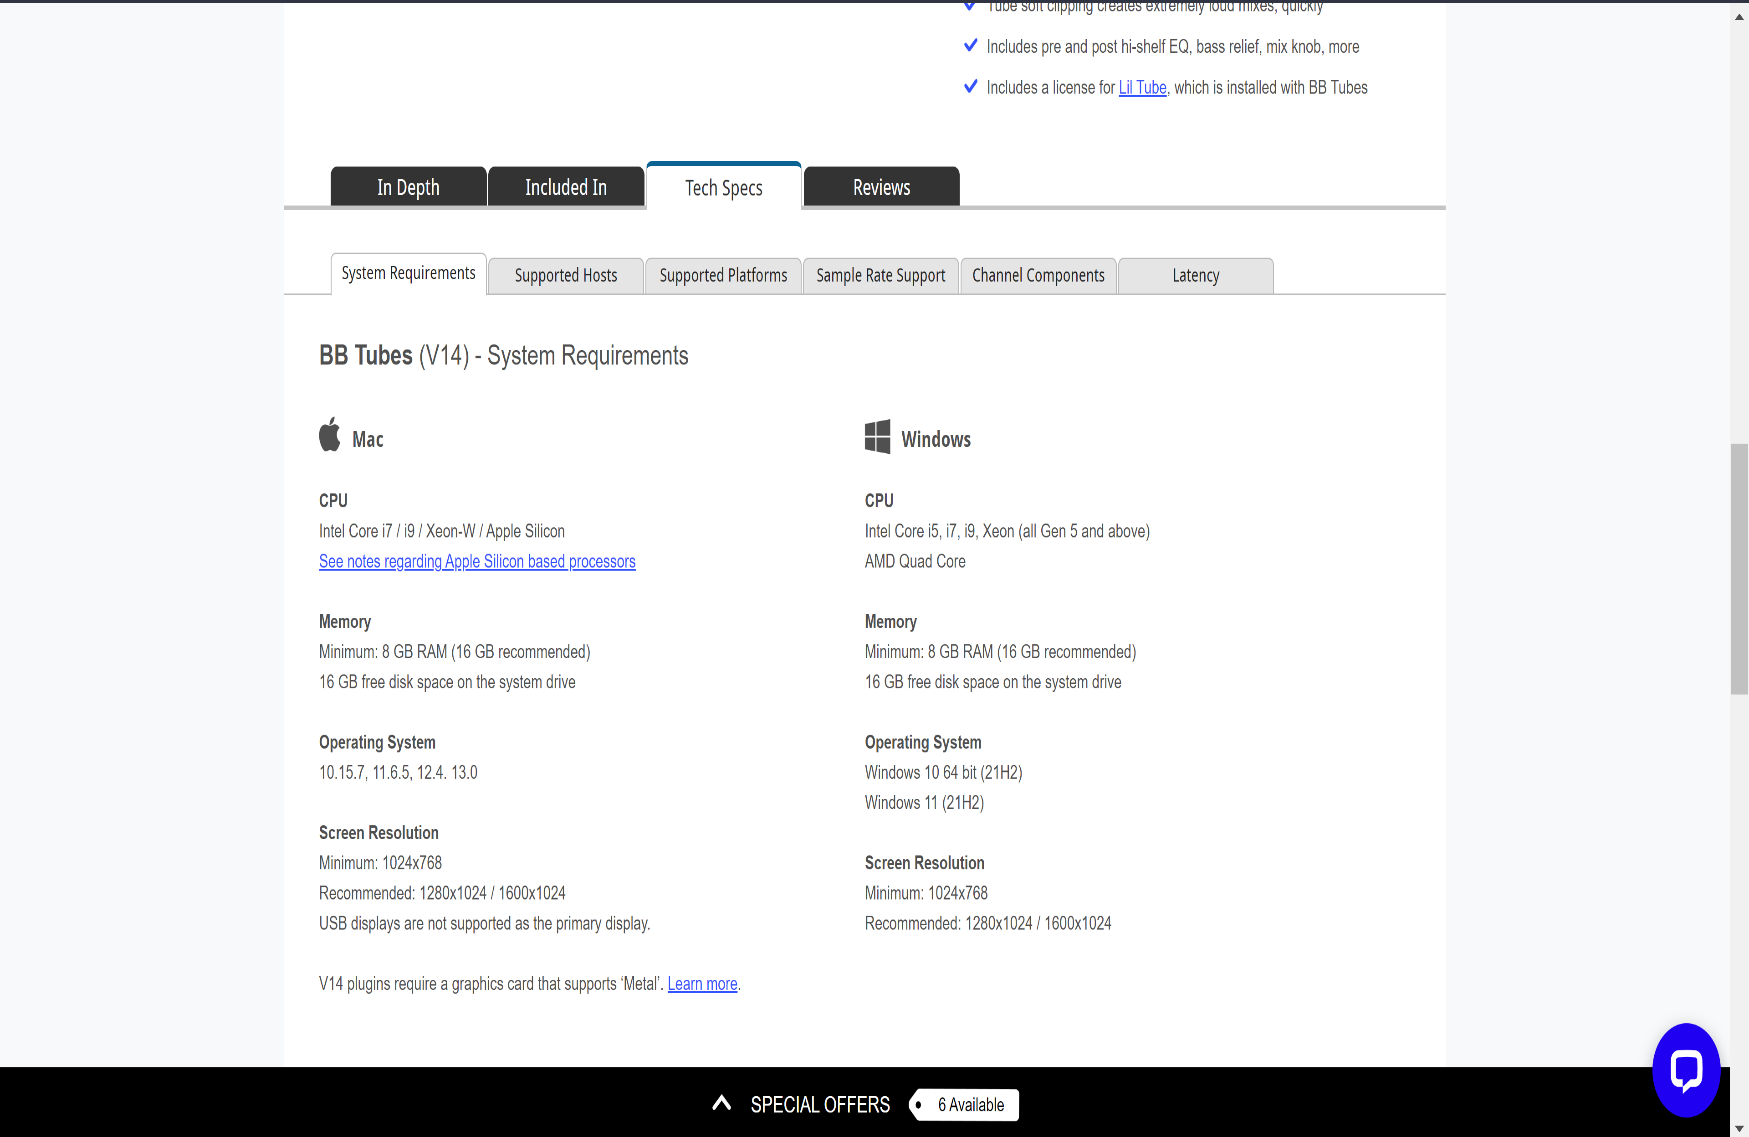
Comparing these specifications to what is available on one’s own device will help determine whether this plug-in will be a good fit for them. If a user’s device does not meet these minimum requirements then the plug-in may not show up in Pro Tools’ Audio Suite plug-in lists.
Possible solutions would be to upgrade the user’s device to meet the minimum system requirements or if that is not possible, one may try to find older versions of a plug-in that may be compatible with their system. The latter option is more pocket-friendly for most users.
Recommended Read: How to Add/Install Plug-ins in Pro Tools
Installation and Activation of Plug-ins
In addition to downloading a Waves Plug-in, the plug-ins need to be both installed and activated in order to work in Pro Tools or any Digital Audio Workstation. Luckily, both of these processes have been simplified by Waves through the use of the Waves Central application. Waves Central functions as a license manager for Waves Plug-ins. When attempting to download their first Waves plug-in, users will be prompted to first create an account with Waves and to download Waves Central. The application will show the download progress of any Waves plug-ins as well as their installation and activation status. It is important to note that Pro Tools needs to be closed during the installation and activation of a plug-in. This will prevent issues with scanning of the plug-ins by the Pro Tools application. To install a plug-in, select the plug-in from the list by clicking the circle next to the plug-ins name. Next, click the install button on the bottom right of the window.
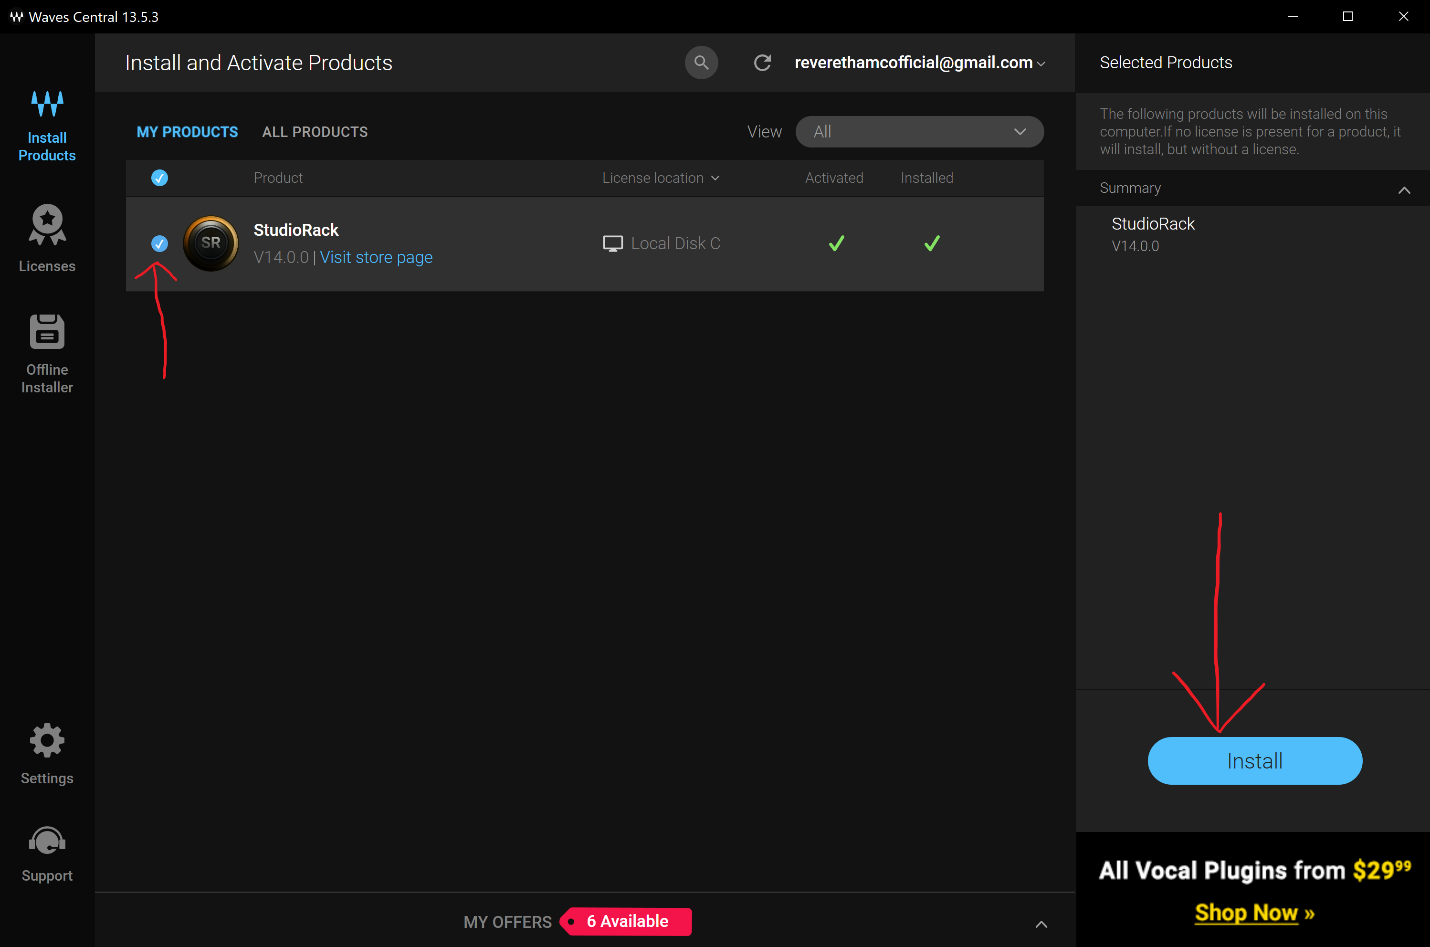
Once installed an activation button will be available. Clicking it will activate the license to the plug-in. The installation and activation status of the plug-in will be displayed as shown below
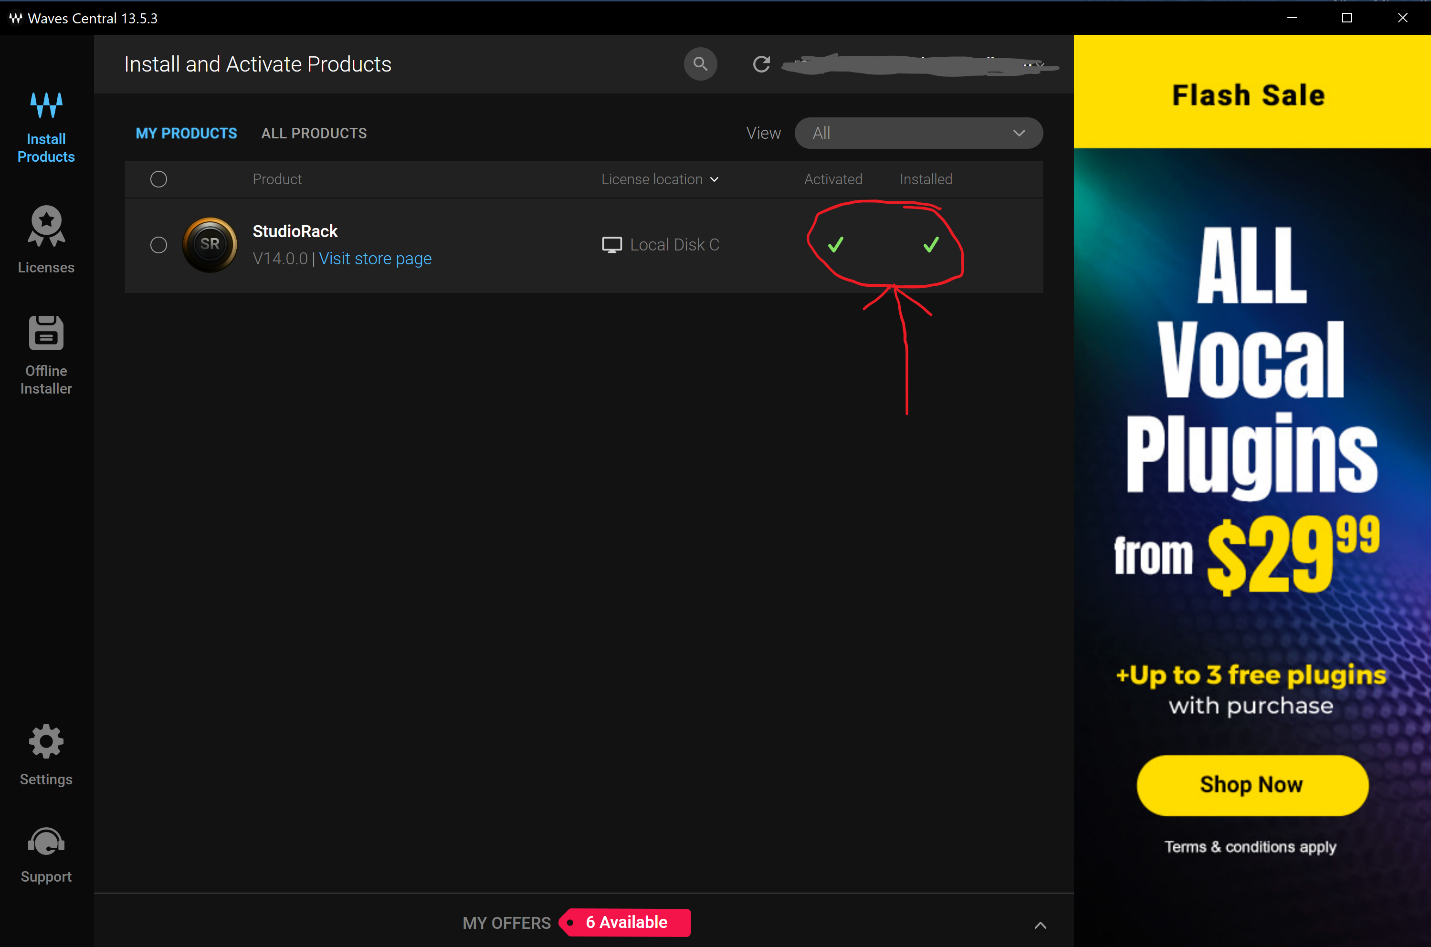
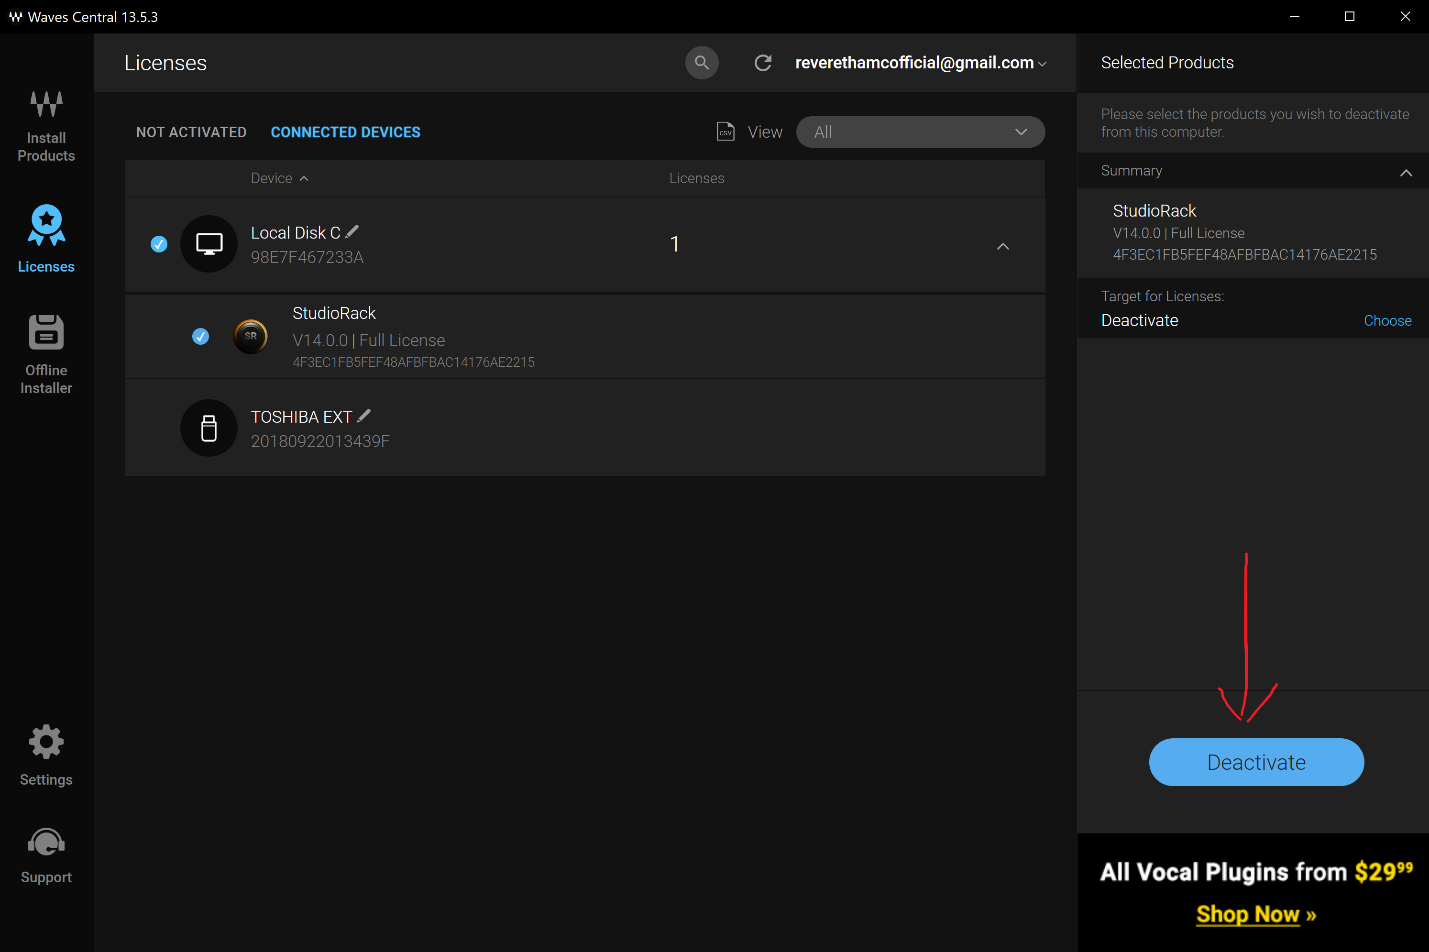
If a Waves plug-in is not showing up in Pro Tools, checking to ensure that it was both installed and activated is a good first step to resolving this issue. If the plug-in has been installed and activated, deactivating then reactivating the plug-in might help resolve the issue. Below is an example using the Studio Rack plug-in.
To deactivate and reactivate a plug-in
- Go to the Licenses tab by clicking “Licenses” on the left-hand side of the Waves Central Window. 2.
- Next, go to Connected Devices and select your hard drive from the list. This will show a list of all Waves plug-ins installed and activated on the selected drive.
- Click on Deactivate button located on the bottom right.
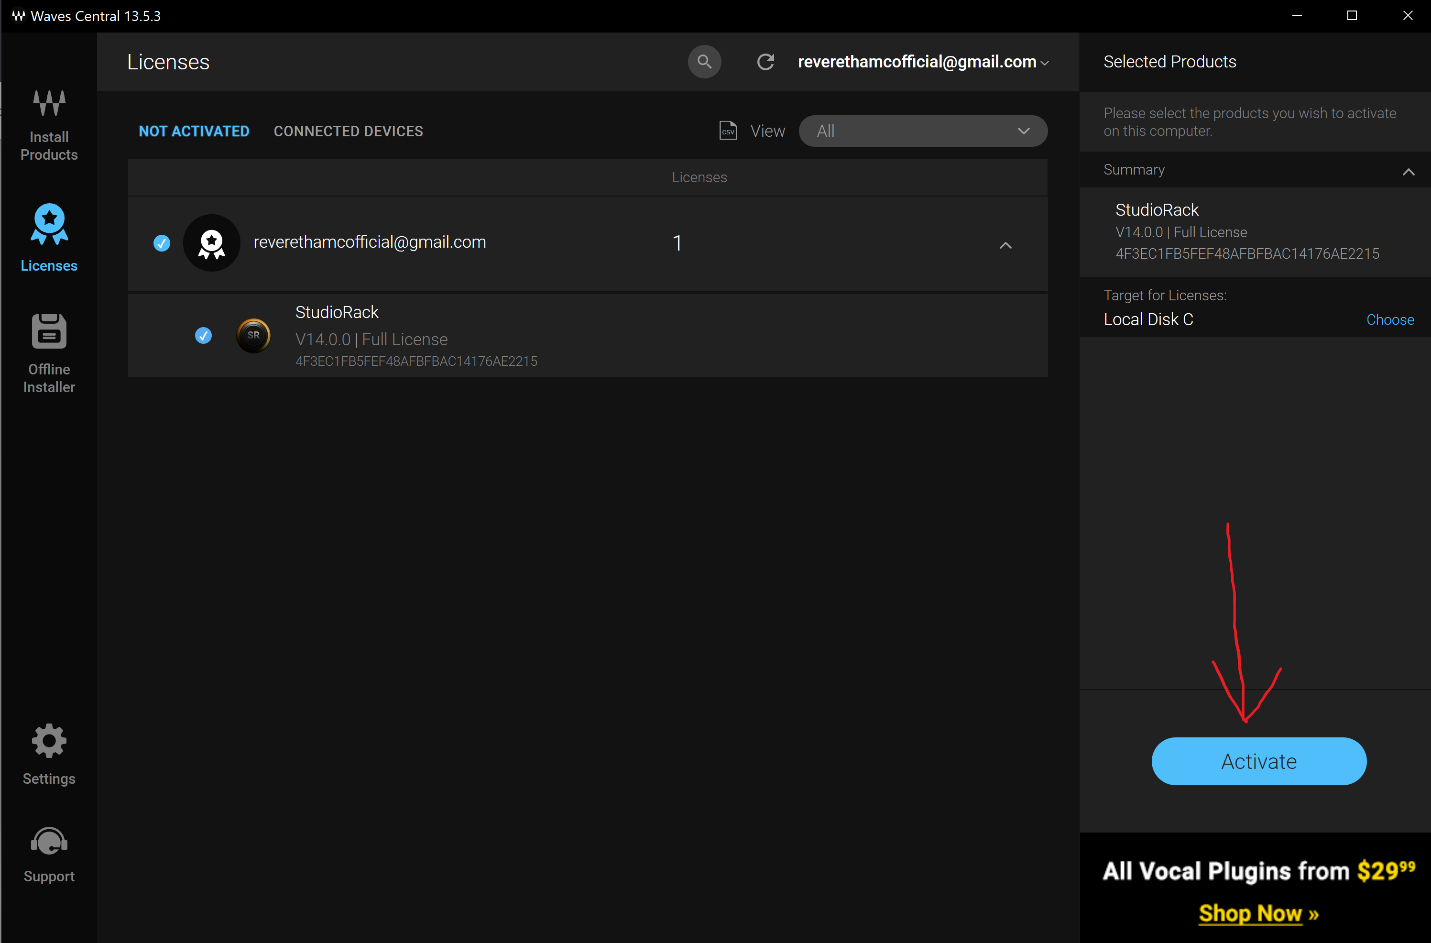
- Go to Not Activated and select the plug-in again.
- Click Activate on the bottom right and wait for the process to finish.
Forcing Pro Tools to Rescan the Plug-in
In the event that a Waves Plug-in has been installed and activated but it still does not show up in Pro Tools, the solution might be to have Pro Tools rescan the plug-ins installed on the computer’s hard drive. To accomplish this, users need to delete the Plug-in Preferences file from their computer which will force Pro Tools to create an updated version of the preferences file the next time the application is opened. To delete the plug-in preferences, the following steps need to be followed.
Recommended Read: How to Rescan Plugins in Pro Tools
Windows
To delete plug-in preferences on a Windows device, first ensure that both the Pro Tools and Waves Central applications are closed and proceed with these steps
- Open File Explorer.
- Click View and make sure that the check-box marked “Hidden Items” is checked.
- Go to the following folders:
C\:Users\Username\AppData\Roaming\Avid\Pro Tools
C\:Program Files (x86)\Common Files\Digidesign\DAE\DAE Prefs
- Make a backup for the folder and delete either the entire folder or just the file labelled “InstalledAAXPlugins”
- Open the Pro Tools application. The program will now scan for your plug-ins.
Mac OS
To delete plug-in preferences on a Mac device
- Close Pro Tools.
- Navigate to the folder
Macintosh HD/Users/* your username */Library/Preferences/Avid
- Delete the “Pro Tools” folder.
- Open Pro Tools and allow the program to scan for plug-ins.
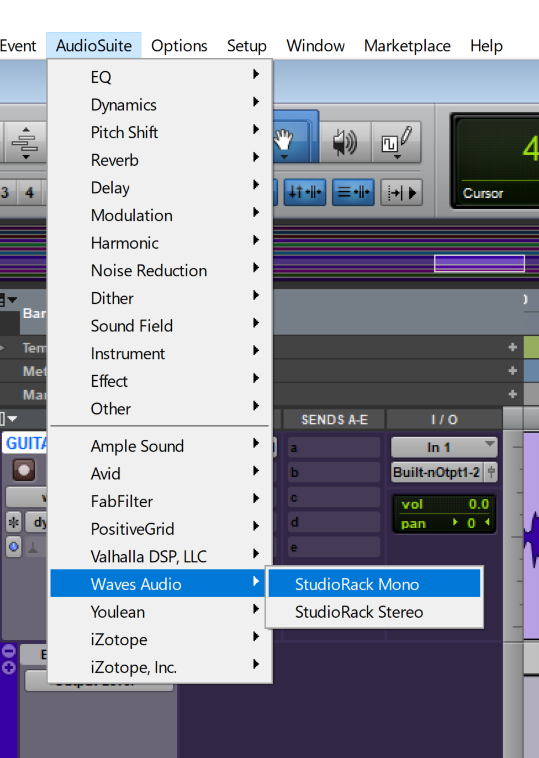
Having tried the above solutions, the Waves plug-in should appear in the Audio Suite menu either under “Waves Audio” or in the relevant plug-in category.
Conclusion
From the above, we see that most of the issues that would make Waves Plug-ins not show up in Pro Tools stem from compatibility issues or the installation and/or activation status of the plug-in in question. These issues are relatively easy to address through the methods above. If any of the above solutions do not fix the issue, consider reaching out to Waves customer support for assistance.

- Pro Tools Won’t Play [No Playback FIXED] - April 16, 2023
- No Sound in Pro Tools [FIXED] - April 16, 2023
- Pro Tools Not Recognizing Audio Interface [FIXED] - February 4, 2023
![Using Pro Tools Beat Detective [Full Tutorial]](https://ProRec.com/wp-content/uploads/2022/07/image-209-180x180.png "Using Pro Tools Beat Detective [Full Tutorial]")
")

