Why Should I Use Beat Detective?
As any music producer or mixing engineer can attest, timing is a very important part of a musical performance. This is especially true when it comes to drum parts. Sometimes, however, during the recording of these drum parts, a drummer might go slightly off tempo. This could be by either hitting a note too early or too late. Thankfully, through the wonders of modern technology, engineers and producers are able to fix these issues post-performance using various tools and techniques such as the use of Elastic Audio. One drawback of using time warping and stretching techniques on audio files can yield results that sound unnatural. To mitigate this, engineers can opt to use a feature in Pro Tools called Beat Detective.
Recommended Read: How to Nudge in Pro Tools
Navigating to Beat Detective inside Pro Tools
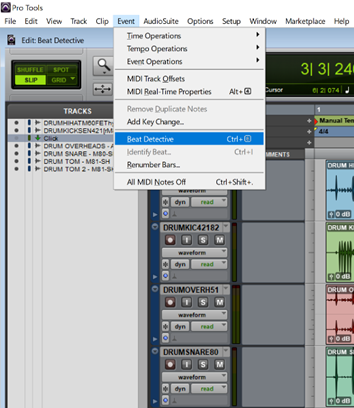
To open beat detective, go to the “Event” menu in Pro Tools or use the keyboard shortcut “Ctrl + Num 8” on Windows PC or “Command + Num 8” on Mac.
How Beat Detective Works
Basically, Beat Detective is used to slice audio into smaller clips and realign them relative to the grid for a more time-accurate result. Beat detective can be used with both audio and MIDI clips. It is however important to note that in the case of audio clips, it works best with audio that has sharp and clearly defined transients since their nature makes them easy to detect. While Beat detective does have very advanced algorithms that help it accurately detect transients, human input is necessary to achieve the best results.
Three Sections of the Beat Detective Interface
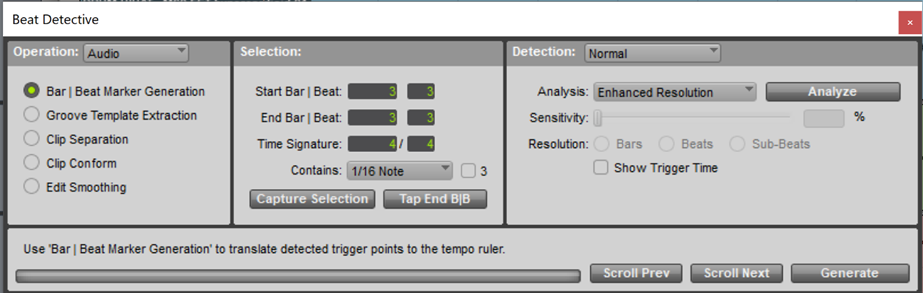
From the picture above we can see that the Beat Detective window is divided into three main sections.
Recommended Read: How to Normalize in Pro Tools
1. Operation
Here an engineer can select what “Mode” they want Beat Detective to operate in as well as what type of data they are working with, that is, whether they are working with audio or MIDI.
Bar/Beat Marker Generation- Working in this mode allows us to take audio that was recorded without a click track and conform Pro Tools grid to match the tempo of the clip being worked with, thus creating a “Tempo map”. It will also conform the grid to any variations in the tempo of the selected clip.
Groove Template Extraction- This mode allows us to analyze the groove information of the selected clip. It allows us to create groove templates that can then be applied to other clips so they can match the groove of the clip that had been analyzed.
Clip Separation- Since Beat detective works by analyzing transients, it can be used to separate a clip into several smaller clips in such a way that each transient becomes its own little clip that can then be conformed to the grid or a groove template.
Clip Conform- Having analyzed a clip and separated it into smaller “transient clips”, these clips can then be conformed to the tempo map of the session.
Edit Smoothing. This allows Beat Detective to fill out information between clips that had been chopped. It uses trimming and crossfading to achieve a smoother flowing sound so that there is no sound drop-off between clips. It is advisable to consolidate clips after edit smoothing.
2. The Selection Area
Before analyzing a clip using Beat Detective, it is important to define the start and end points of the clip. The time signature, smallest note division and whether or not the clip contains triplets should also be defined. If the Pro Tools session is set to the tempo of the selected section, clicking the “Capture Selection” button will automatically fill the start/end information as well as Time Signature.
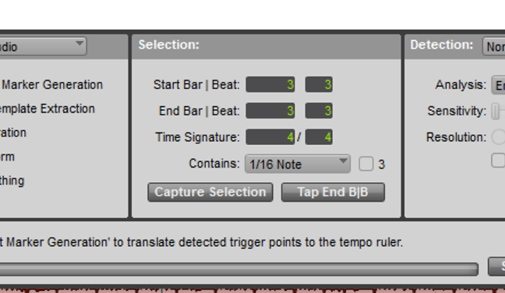
If the selected section does not match the session tempo, I would enter this information myself, having counted the bars and beats of the selected clip. Alternatively, I could set the session to the tempo of this section using Pro Tools Tap tempo feature.
“Contains” should be set to the smallest note division in the selected clip.
The checkbox with “3” next to it should be checked if the clip contains any triplets.
While there is no limit to how long a selection can be, it is advisable to work with small selections at a time (I prefer working with 8-16 bars at a time).
Recommended Read: How to Export Stems in Pro Tools
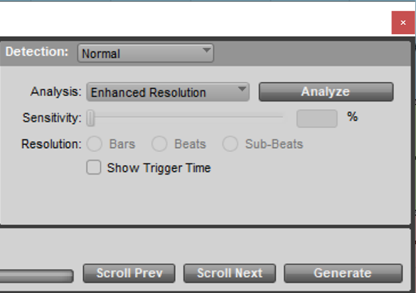
3. The Detection Area
This area is used to set parameters depending on the operation mode selected.
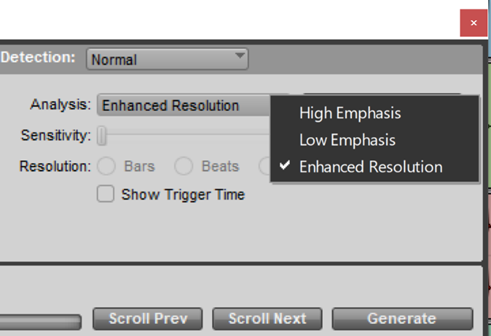
The Detection mode offers three analysis modes
High Emphasis- Focuses on non-harmonic high frequency content such as cymbals and Hi-hats
Low Emphasis- Is applied when working with inharmonic low frequency sounds such as kick drums.
Enhanced Resolution- Works with material of varied harmonic nature and can thus be applied to drum loops and even full mixes.
Once an analysis mode has been selected, clicking the Analyze button activates the “Sensitivity” slider.
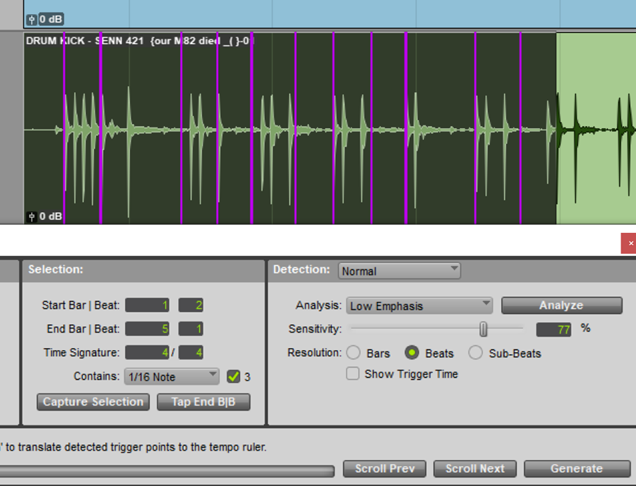
Higher sensitivity will result in more “beat trigger” markers (the purple lines) but can also result in false positives, that is, markers that are placed where there is no actual transient. Adjusting the slider appropriately can remedy this in real-time.
The number of triggers generated will also depend on what is selected under Resolution, “Bar” will only display beat triggers that are at the start of every bar, “Beat” will display triggers on every beat etc.
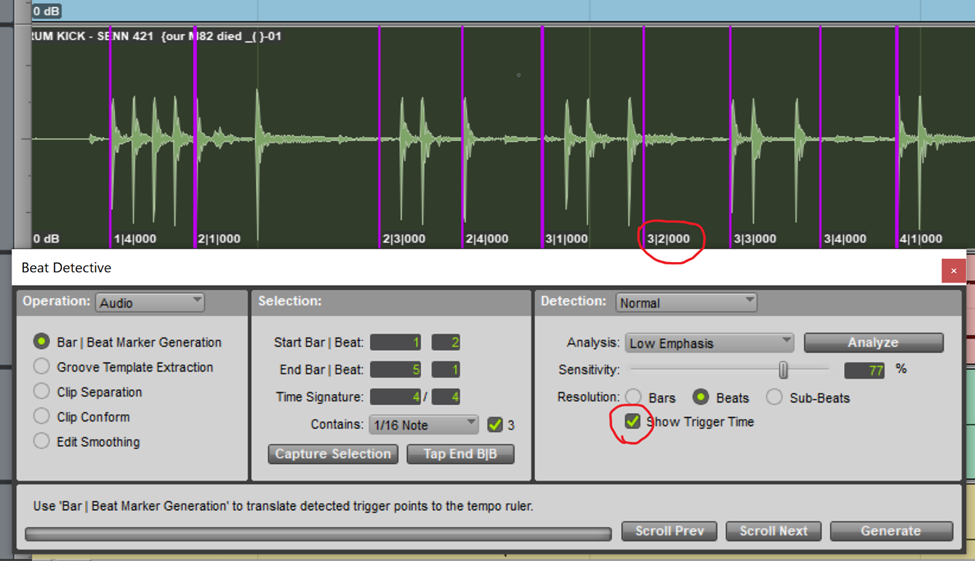
Activating “Show Trigger Time” will display timing information next to each marker.
It is possible to manipulate a trigger using the Grabber tool.
Grabber Tool + Clicking in the selection adds a trigger.
Grabber Tool + Click and drag to reposition a trigger.
Grabber Tool + Alt/Option+ Click to delete a trigger.
Grabber Tool + command/CTRL + click to “Promote” a trigger.
A promoted trigger will show at any sensitivity above “zero”
With the triggers placed, Clip Separation can now be used to chop the audio and Clip Conform used to realign the clips to their desired positions on the grid.
Clip Separation
When Clip Separation mode is activated, a Trigger Pad option becomes available in the Detection area. It is advisable to key in a figure here (5-15ms). This figure will determine how soon before the trigger point a slice will be made once the “Separate” button is clicked. This prevents a scenario where waveform information that slightly precedes the transient gets cut during separation.
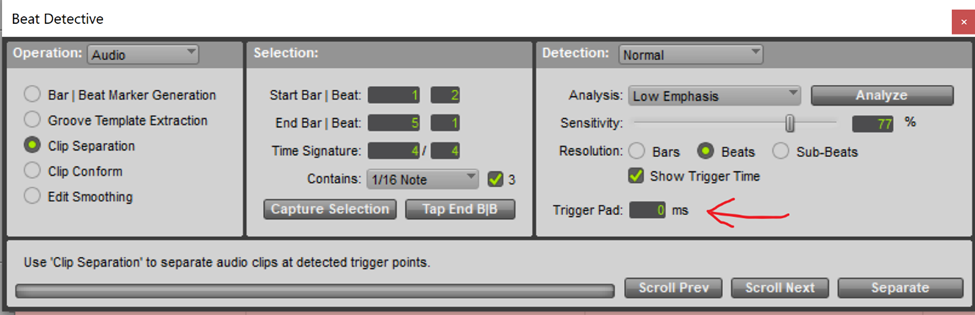
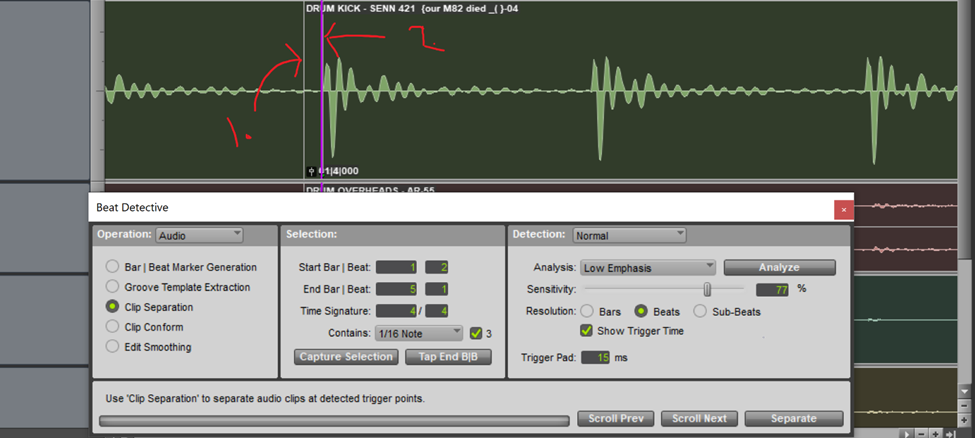
From the picture above we see that the slice point line “1” is before the purple trigger point “2.”
Now that the audio has been saparated into smaller clips, it is ready to be conformed to the tempo map.
Clip Conform
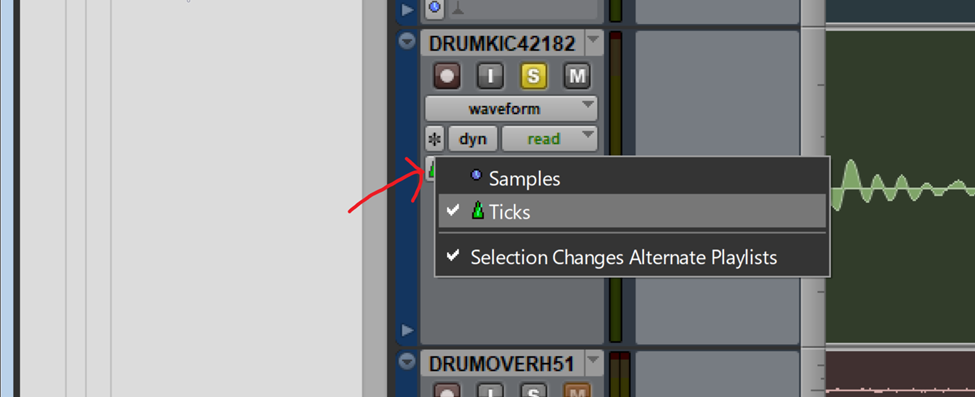
In order to conform clips to the grid, their timebase needs to be changed to “ticks” instead of samples. This will ensure that they stay in place relative to the bars and beats even when the tempo changes. To change a track’s timebase, click the icon indicated by the arrow in the image below. If a track had been set to “samples” the icon will be a small blue clock, if it was already set to “ticks”, it will be a green metronome
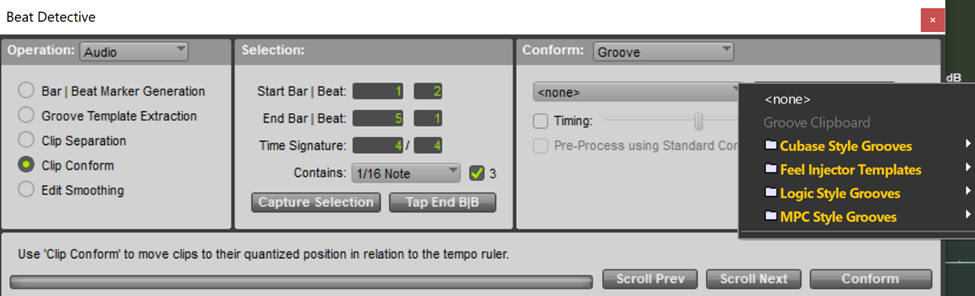
Pro Tools can quantize clips to the grid using default standard settings or using groove templates. To access these groove templates, Beat Detective needs to be in “Clip Conform” mode as shown below.
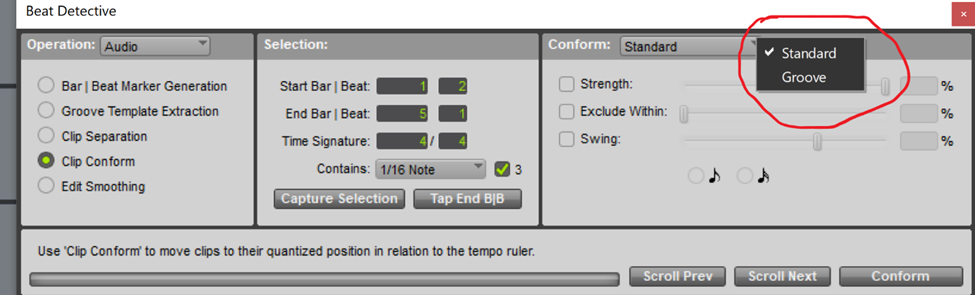
When the standard conform setting is selected, the following parameters can be adjusted.
Strength– Controls the strength of the quantization in that a value of 100% moves clips to be exactly on the grid. Having a value less than 100% helps retain the “humanity” of the clip since having everything perfectly on the grid can make the performance sound too “robotic”.
Exclude Within- Can be used to tell Pro Tools to ignore clips that fall within a certain percentage of the grid, that is, to ignore these clips as they do not need to be adjusted.
Swing- Used to give the clip more of a groove by using either a 1/8th or 1/16th note swing.
Pressing the “Conform” button will apply the processing based on the parameters chosen and result in the clips in the selection being moved to their designated positions on the grid.
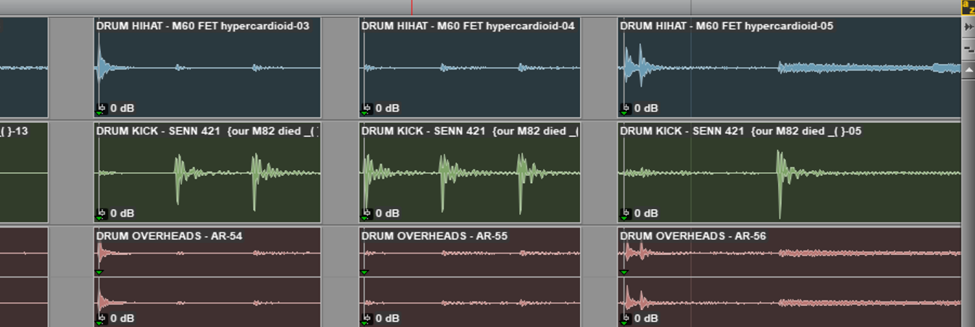
Often, the process of conforming clips will result in there being gaps in between clips that have been moved farther apart (as shown above). Upon pressing play, an audible sound drop-off can be heard in the gaps between the clips. This sound drop-off is what necessitates the process of “Edit Smoothing”
When the Groove setting is selected it allows us to conform the audio to pre-programmed groove templates
Edit Smoothing
With Beat Detective in Edit Smoothing mode, it is possible to fill the gaps mentioned above. Beat Detective uses a combination of trimming and Crossfading.
To perform these processes, Edit Smoothing mode must first be selected from the operation section.
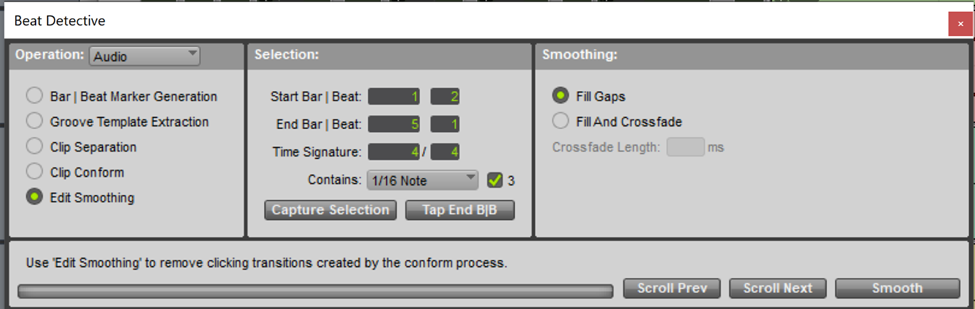
With Beat Detective in Edit smoothing mode and with all the relevant clips selected, It is now possible to
1.Use the Fill Gaps option to trim selected clips start and end points to remove any gaps or
2.Use the Fill and Crossfade to trim the start and end points and automatically add crossfades. Selecting this option activates the Crossfade length box which allows us to determine the length of the crossfades.
Having specified a crossfade length, clicking the smooth button will fill in the gaps between the clips and create crossfades
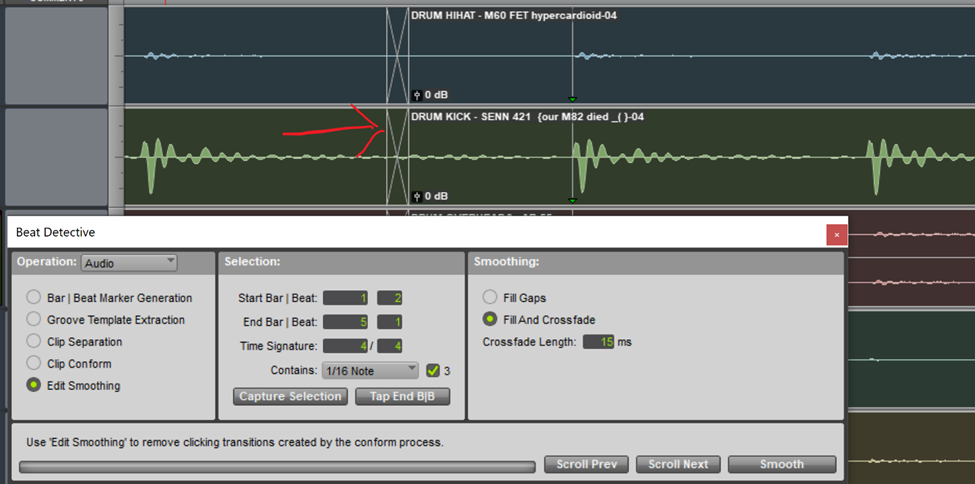
From the example above, we see that there are no more gaps between the clips.
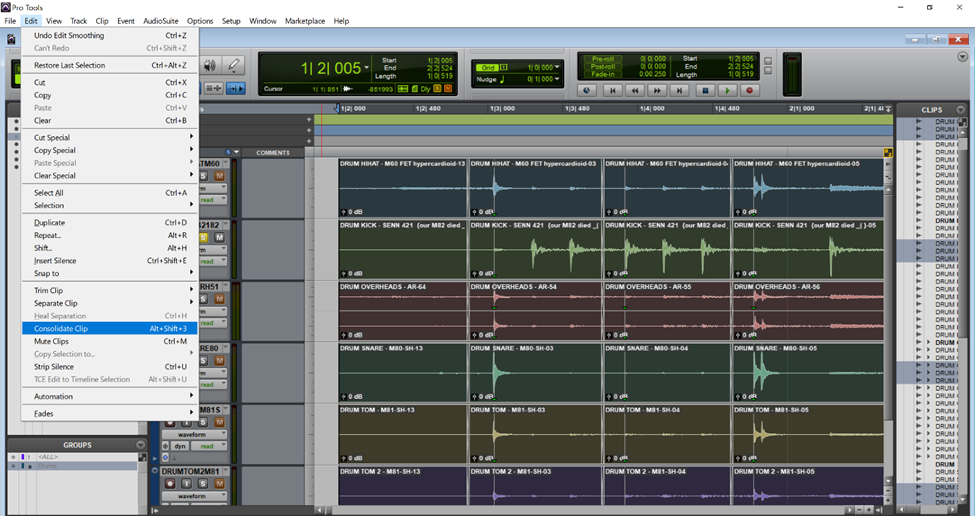
At this point, if the results are satisfactory, it is advisable to consolidate the many clips that are in the selection. This will reduce the load on the CPU since working with large sessions that contain multiple clips and crossfades will require the CPU to read them all individually.
Recommended Read: How to Consolidate Clips in Pro Tools
To consolidate clips:
- Select the clips you wish to consolidate in the edit window ensuring that the start and end points are clearly defined.
- Go to the Edit menu and select Consolidate clips or, with the tracks selected, use the keyboard shortcut Option+Shift+3 (Mac) or Alt+Shift+3 (Windows)
The process of conforming clips to the grid can get a little messy. It is advisable to save an unedited copy of the Pro Tools session and make use of the Save as function so that one can work on making these timing alterations without fear of irreparably messing up a session. It is also possible to create duplicates of the tracks you are working with so that there is always an unedited version of these tracks on hand if one needs to use them. Fortunately, Pro Tools allows for the making of duplicates of multiple tracks at a time when these tracks have been grouped.
Applying these processes to small chunks of audio (8-16 bars) as opposed to the entire drum track is also highly recommended. Sometimes I personally use even smaller sections if the drum pattern contains variations such as triplets. I usually work on these small varied segments separately.
Conclusion
In conclusion, Beat Detective, when used correctly, can be a powerful tool when it comes to correcting the timing of the elements within a song and maintaining or fine tuning the drums to play in time with the tempo and have a proper rhythm. It helps us create a tempo map of the session, which can be especially helpful when editing live performances where the songs vary in tempo. Finally, engineers can use this feature to create groove templates from their sessions or conform their audio to pre-programmed groove templates.

- Pro Tools Won’t Play [No Playback FIXED] - April 16, 2023
- No Sound in Pro Tools [FIXED] - April 16, 2023
- Pro Tools Not Recognizing Audio Interface [FIXED] - February 4, 2023
")


")