A bit of noise in your distorted guitar tracks, or some bleed on closely miked drums is a pretty common situation most audio engineers find themselves in. In most recording and live monitoring situations, there are always a few elements that end up getting captured with some noise. These elements then need to be isolated so they can be processed properly.
Noise Gate is the universal tool available across all DAWs that helps get rid of unwanted noise in your recordings. In REAPER, it is called the ReaGate. So let’s go ahead and explore what it is, how it works, and how you can use it to improve your recordings.
What is a Noise Gate?
Just like the compressor and the limiter, the noise gate belongs to the family of dynamics processors. It detects the audio input, and silences the part of your audio that has a low amplitude. If the audio goes above a certain level, the gate will let it pass as normal, but as soon as the level goes below the threshold again, the gate will close.
Noise gates, like other dynamics processors, have a response time that usually has to be dialed manually. The most basic controls are called Attack time and Release time. These time constants prevent artifacts caused by sudden changes in level, and as in a castle gate, they represent the time it takes for the gate to fully open and fully close respectively. Time constants are kind of tricky to get the hang of at first, but I’ll go through these concepts more in depth with the Noise Gate that comes with REAPER.
Using ReaGate in REAPER
The stock Noise Gate that comes with REAPER is called ReaGate, and like most of the REAPER stock plug-ins, it’s amazingly powerful. Let me show you how it works!
The first step is loading ReaGate into the audio source that you need. To do this, click the FX button on the track and search ‘ReaGate’ in the FX manager.
You can drag it to the track or double click and add it to the track. If you want to add the plug-in to multiple tracks at the same time, then select all the tracks, right click ReaGate on the FX manager and select the option ‘Add to selected tracks’.

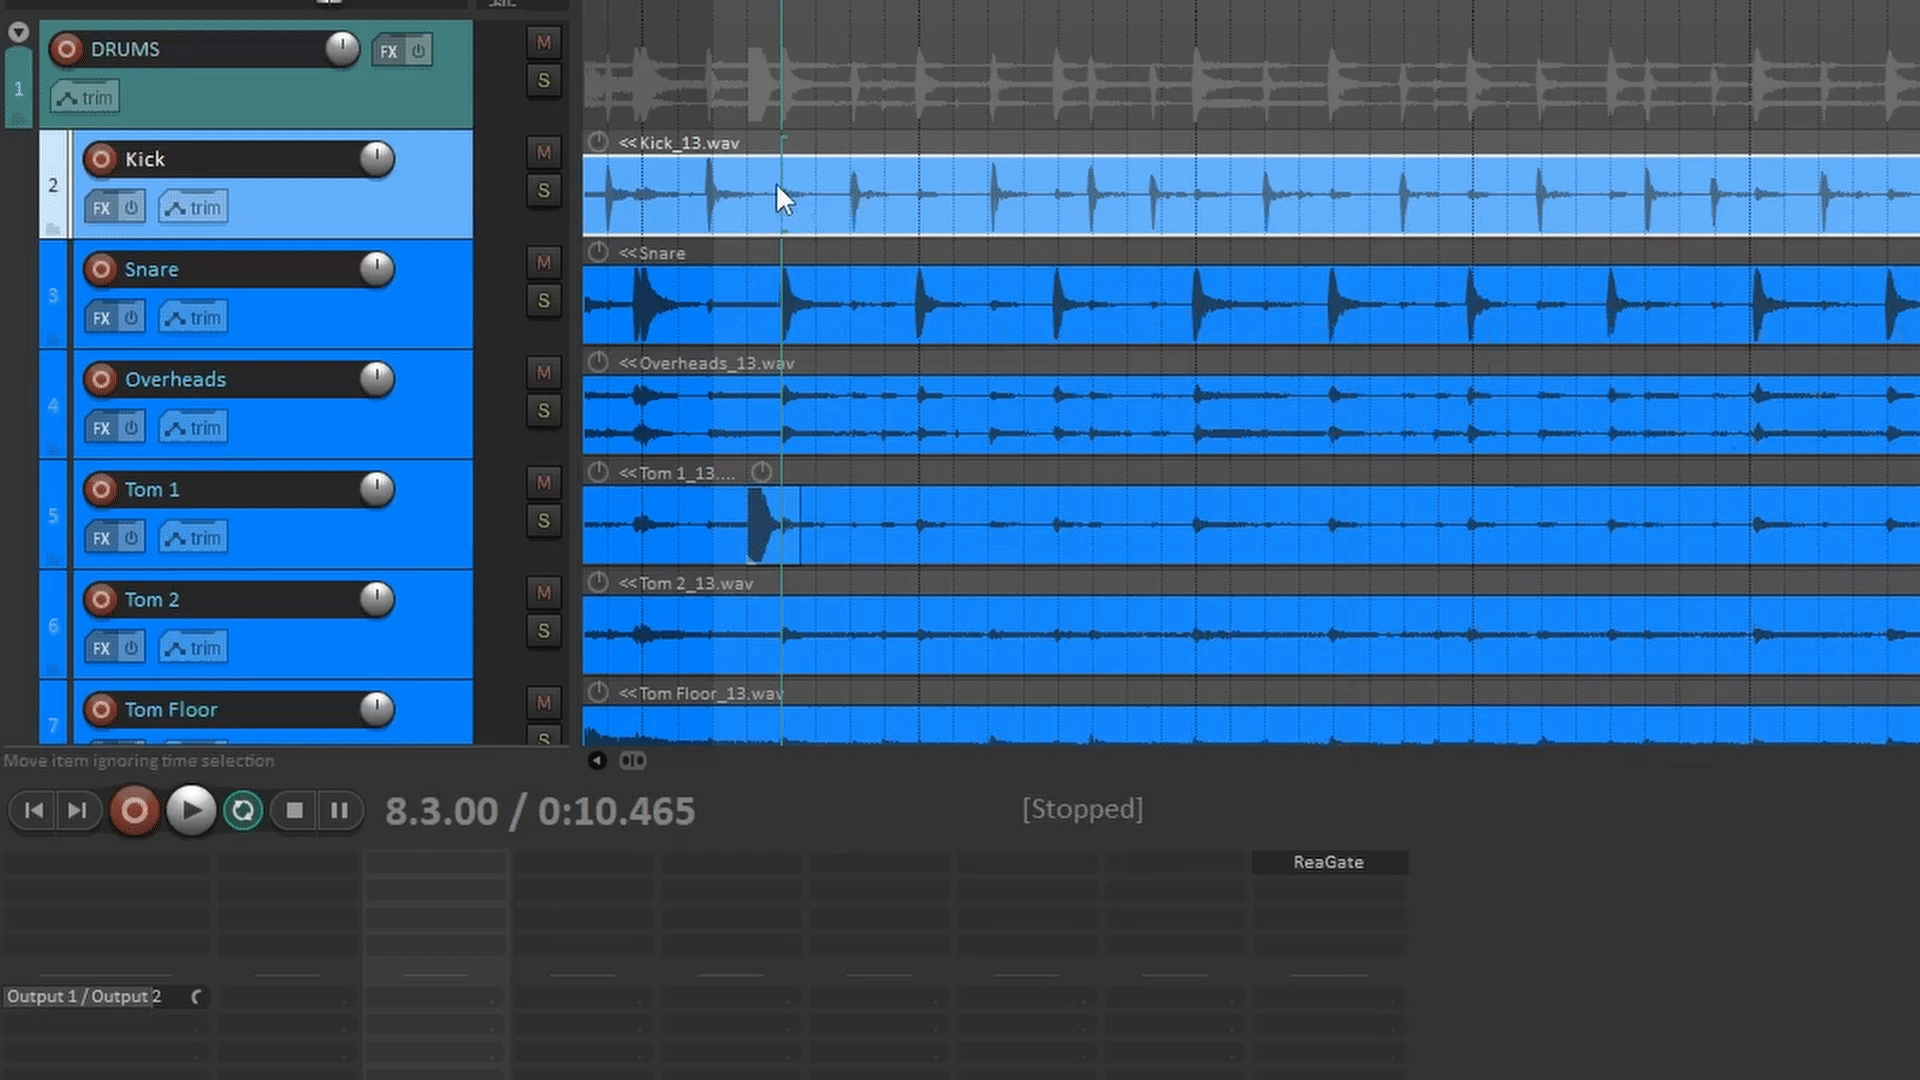
I have found that a Noise Gate is more useful when loaded into tracks that have audio in them, but you can also load it into folders and it will affect all of the tracks if it suits your workflow better.
Setting up the Threshold and Hysteresis
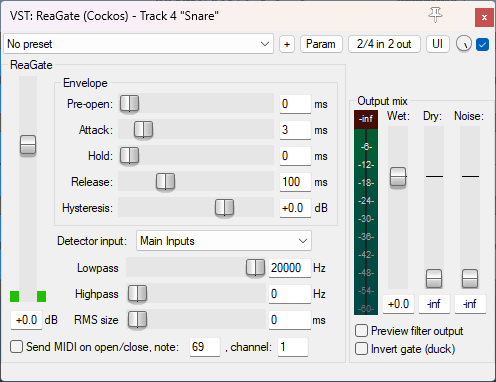
The Threshold is the most important part of signal detection. It determines the minimum signal level the audio must reach so that the gate lets it pass through. In ReaGate, it’s the biggest vertical slider. It also has peak meters on each side that make it easier to set up properly.
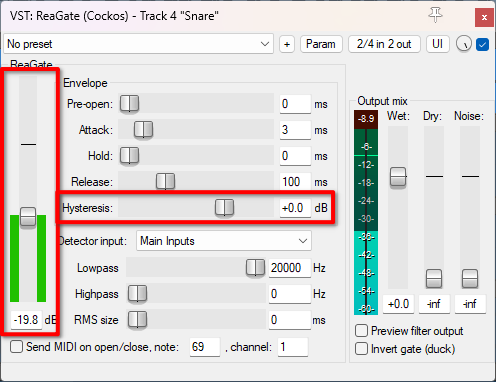
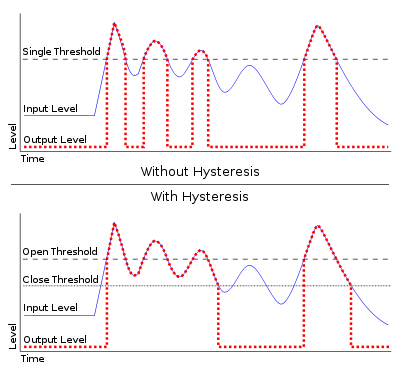
Hysteresis works in conjunction with the Threshold so that the gate doesn’t stutter as much when closing, it basically functions as a closing threshold be it X dB higher or lower than the main Threshold.
Setting up the Time Constants
Noise gates tend to have a few more time constants than a regular compressor because gates need to be more precise.
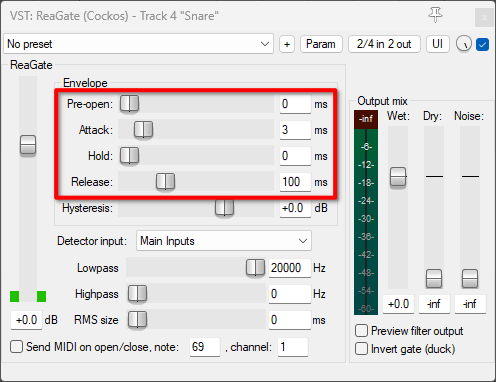
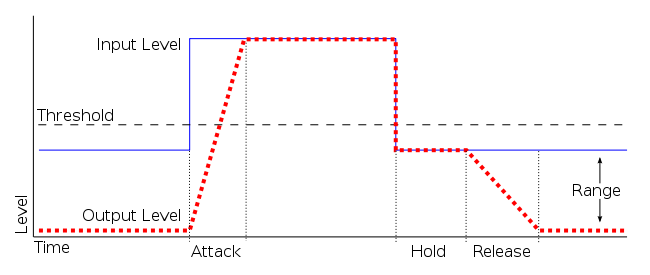
Attack: is the time that the gate takes to fully open once the signal crosses the threshold
Release: it the time that takes for the gate to fully close once the signal is below the threshold
Hold: allows the gate to be fully opened for a small window of time before starting to close.
Pre-open: forces the gate to analyze the audio prematurely so that it can open before the sound gets to the gate. This feature can only be applied to pre-recorded audio, and trying to use it live can lead to latency problems. Check this article if you want to know more about the latency it can add to a live signal chain.
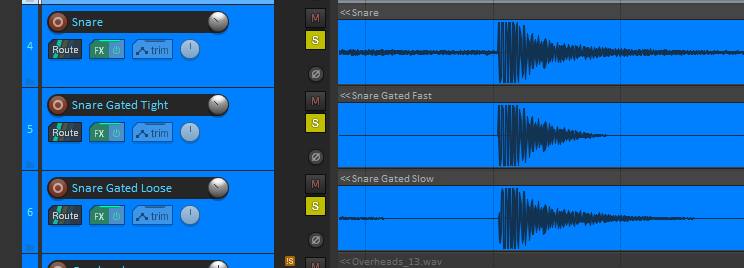
For most applications I like to use a really fast Attack, between 1 and 3 ms, as it preserves the transients without introducing latency or compensation. But if it’s absolutely needed for the job, a few milliseconds in the Pre-open slider can work wonders to have a cleaner sound.
I tend to prefer using the Hold and Release parameters in conjunction. A Hold of around 40 ms and Release of around 100 ms have worked fine for most applications in my experience
Signal detection and Side-chain
Like all dynamics processors, gates have a side-chain signal path that is responsible for detection. ReaGate comes with Side-chain Highpass and Lowpass filters that ease the detection of certain elements in noisy recordings.
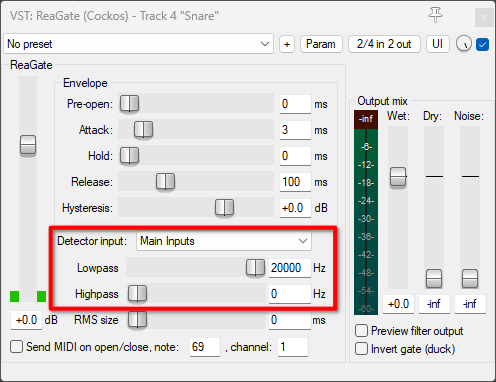
You can also use an External side-chain to trigger the gate by changing the Detector input to Auxiliary inputs.
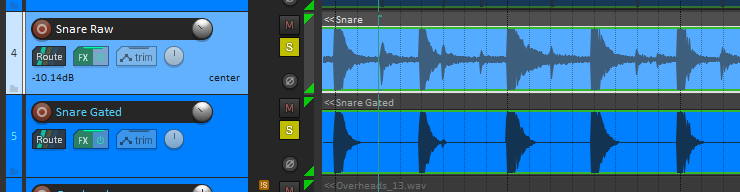
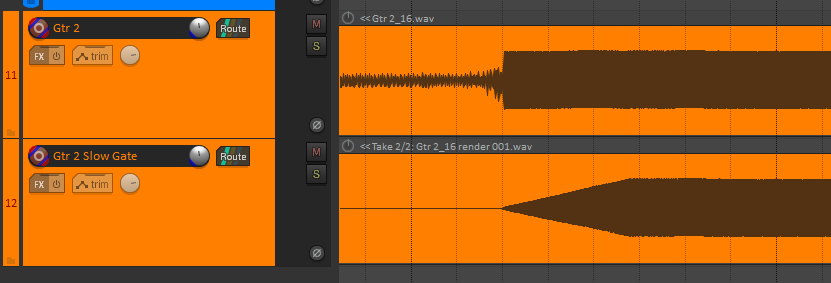
I have found it very useful to gate the Snare top mic with the Snare bottom for gating, as it usually is a cleaner signal that doesn’t have as much cymbal bleed in it, and the kick bleed can be easily avoided by using the Side-chain Highpass filter.
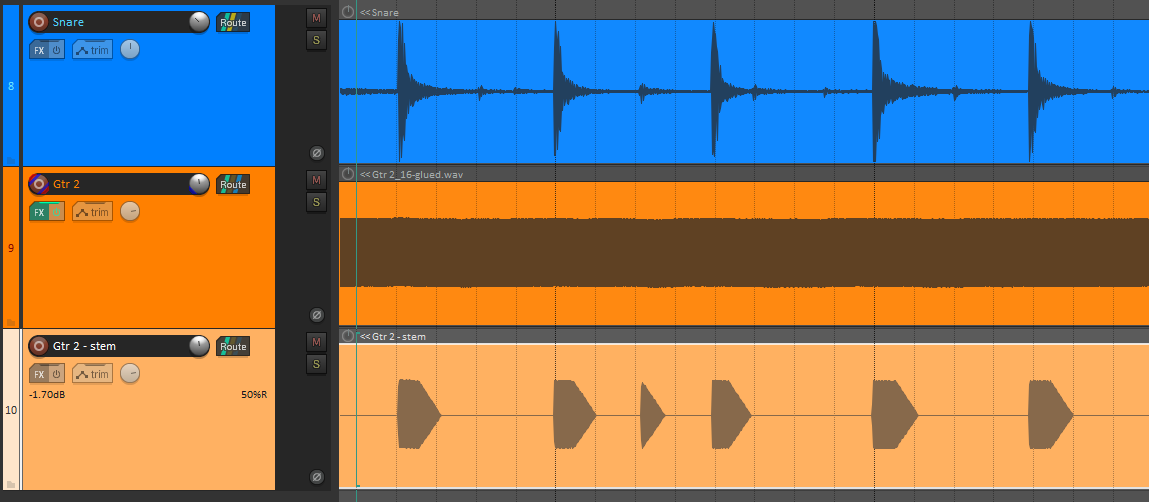
In this example I use the Snare as an external side-chain to gate the guitar, leaving only a few guitar blobs when the snare hits instead of a continuous sound. If you want to go more in depth on the concept of Side-chain, detection, processes and how it’s done on REAPER, check this article out.

The RMS size can determine if the Noise Gate will respond more to the peaks of the signal or the RMS level. I don’t recommend increasing it as it will make the peak detection harder.
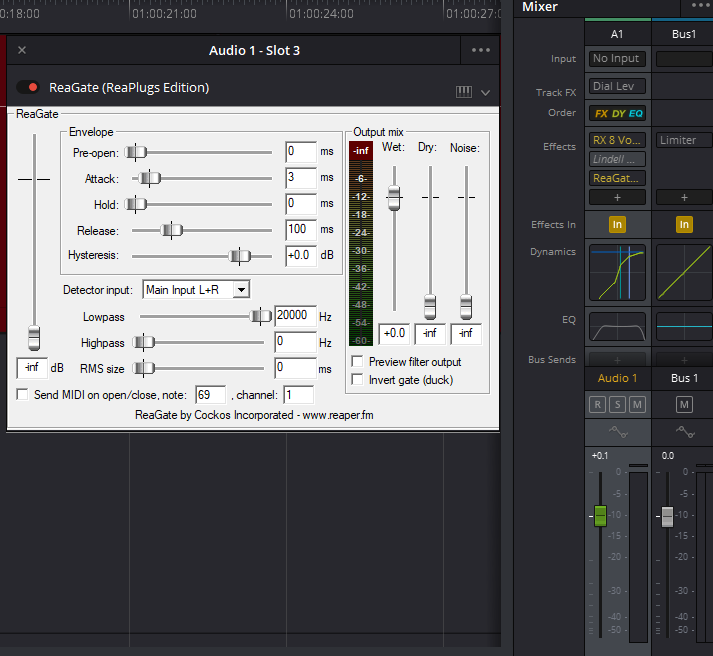
Output and Dry Signal Mixing
On the output section you can find a Peak meter and a few vertical sliders.
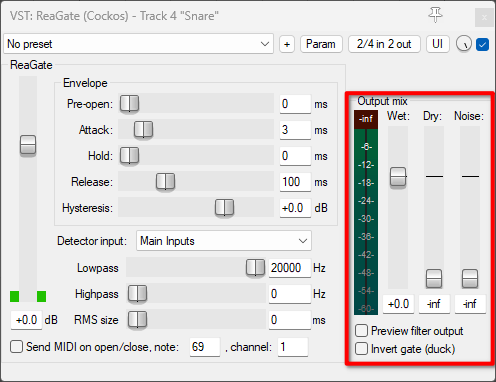
The Wet slider is the level of the gated signal.
Dry allows you to blend in a little bit of the unprocessed signal. This can mask some of the artifacts and the unnatural feeling that a gate can produce, but if you set it too high, it will defeat the purpose of using the gate in the first place.
The Noise slider introduces white noise that responds to the gated signal. This can help mask the gating artifacts as well and works really well to give some weight to gated percussive elements such as snares.
Preview filter output lets you listen to what the side-chain detector is using to apply the Noise gate.
Invert gate (duck) inverts the action of the gate, whatever is below the threshold will go through the gate, and what audio level goes above it will not
MIDI Output
ReaGate has a checkbox that sends a MIDI note when the gate opens and a note-off when it closes. This feature is not very common on other gates as far as I know, but it comes really handy if you need to augment or replace your drum recordings with samples.
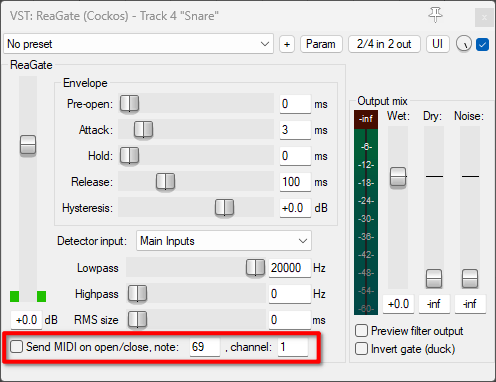
You can send the MIDI note to a parallel track that has a ReaSamplOmatic5000 loaded with a nice kick or snare sound for example.
Using ReaGate in other DAWs
One of my favorite parts of the REAPER stock plug-ins is that you can use them in other VST hosts.
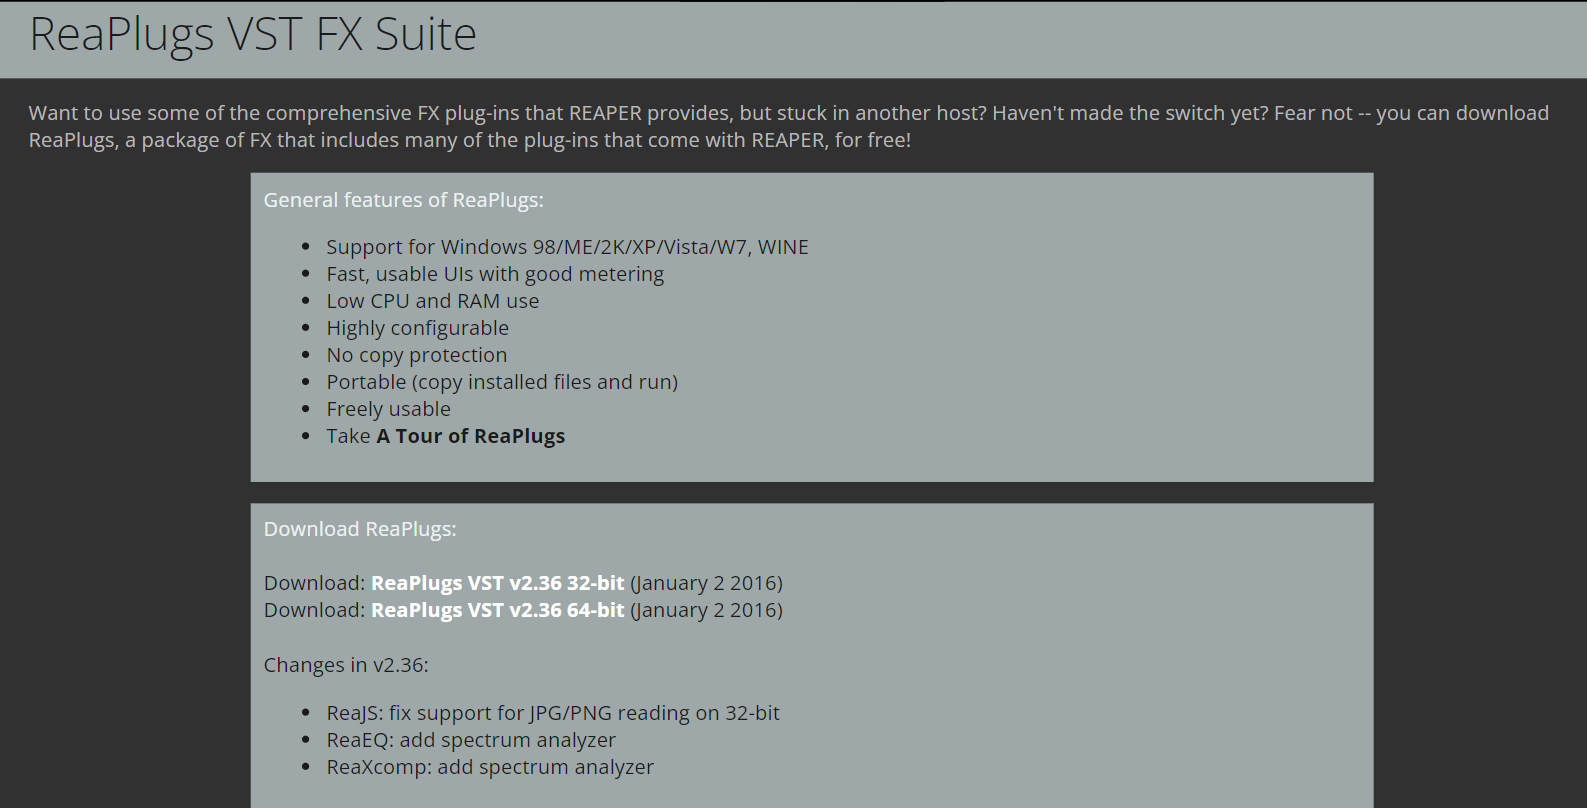
You can search for ‘ReaPlugs – REAPER’ or go to this site directly, download them and install them.
Ableton Live, Adobe Audition, Davinci Resolve, you name it. As long as the host can read VST2 plug-ins, you’re all set.
Final Words
ReaGate is one of the most comprehensive, powerful and light-weight audio gates that exist out there. It is ideal for professional projects and allows you to upgrade other parts of your production before considering third party Noise gates. I dare you to give it a go before reaching other noise reduction solutions, and if it’s not enough stay tuned for the hidden noise reduction tool that comes with REAPER. I hope this article was useful to you and happy producing!

- Mixing in REAPER [ULTIMATE Guide!] - September 18, 2023
- How to Record in REAPER (Guitar & Vocals) - August 2, 2023
- Writing MIDI Drums in REAPER - July 3, 2023

")
 in REAPER)