Sidechaining is common when you are mixing and mastering electronic music such as trance, house and techno. It is an essential technique if you are looking to achieve a clean and modern mix. When implemented correctly, sidechaining can add dynamic and rhythm to your mix. It works by using the volume of one signal to control a parameter on another signal. However, it is not one solution that fits all. If you try to apply it everywhere, it may do more harm than good.
Understanding Compression in FL Studio
To understand sidechaining, we must first understand compression. Compression is a processing tool that keeps your signal in the same dynamic range. It typically reduces the difference between the loudest and softest parts of your signal. A compressor has parameters that you can adjust to precisely regulate its behavior:
Recommended Read: What Does an Audio Compressor do?
Threshold – the compressor works by reducing the volume of a signal once it passes a specified level. This level is called the threshold. You set it using a gain knob.
Ratio – this determines how much a compressor reduces a signal once it’s past the threshold. A compressor set with a ratio of 4:1 means that the amplitude of the signal will be reduced by 4db for every 1db that passes the threshold.
Attack – this determines how quickly the compression acts once the threshold is passed. A fast attack is great for handling sharp transients. A slow track will let some transients through; this especially works great with drums.
Release – this defines how quickly the compression lets go after it acts on the signal
Knee – the knee determines how fast the compressor acts on a signal. A soft knee applies the compression gradually until the compression ratio is reached. A hard knee applies the compression only when the signal passes the threshold.
Scenarios for Applying Sidechain Compression in FL Studio
I use sidechain compression in a few scenarios
To separate the Kick and bass
Often, the kick and bass clash in the same frequencies. To make sure they don’t fight and cancel each other out, I use sidechain compression to make the kick cut through the mix.
To balance lead vocal and synths
I always want my vocals to pop in the mix. I use a little sidechain compression to make sure that the lead vocal gets a little more presence in the mix.
To create special FX
I use sidechain compression to add dynamics and movement to delays and reverbs by only activating the effects when the lead signal is not playing.
How to Sidechain in FL Studio (4 Different Ways)
In FL studio there are four ways to implement sidechaining
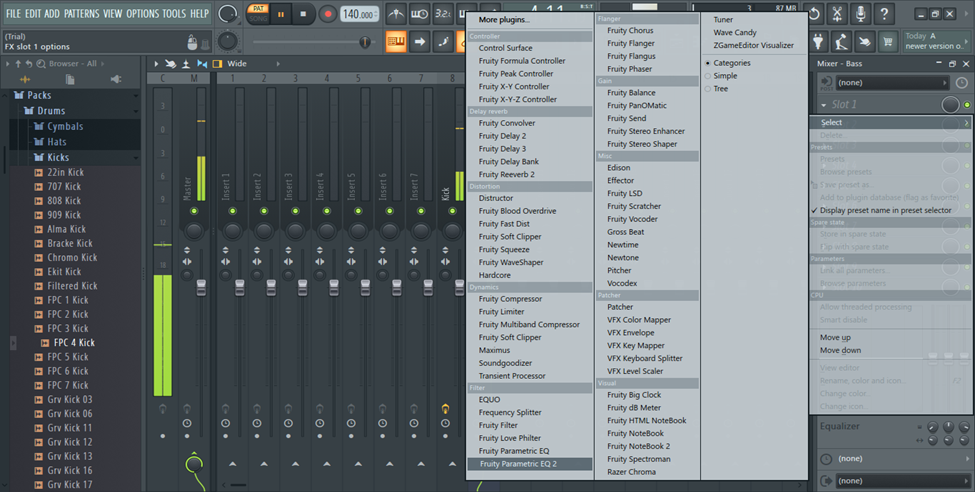
- Sidechaining using Fruity Limiter.
- Sidechaining using Fruity Peak Controller.
- Sidechaining using automation.
- Sidechaining using Gross beat.
Sidechain using Fruity Limiter
It is important to remember that sidechaining works by reducing the volume of one signal relative to another, in this case we will sidechain a kick to the bassline. When you’re doing sidechain compression using the limiter, add the fruity limiter plugin to the signal you want to duck.
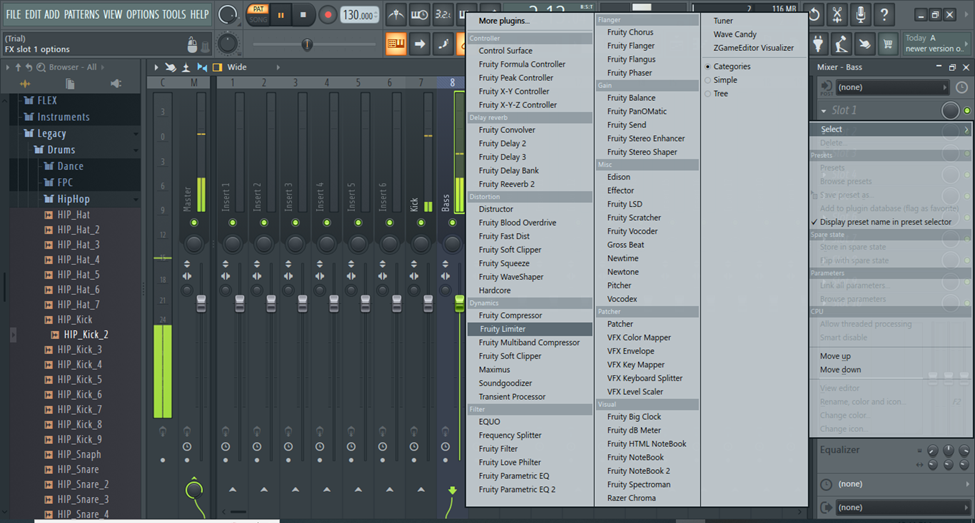
- Start by adding Fruity Limiter to an effect slot in the Bass insert.
- Now I link the kick insert to the bass insert. I do this by selecting the kick insert, and right clicking on the small arrow on the bass insert. Select ‘Sidechain to this track’ from the menu.
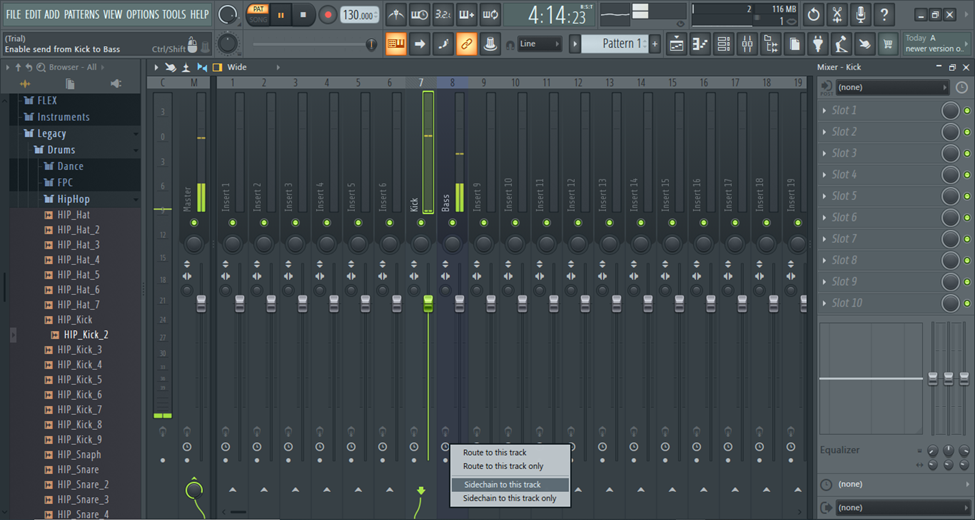
- If you don’t want your kick to be heard you can select “Sidechain to this track only”. This is usually known as using a ‘Ghost Kick’. The kick insert will not output to the master track.
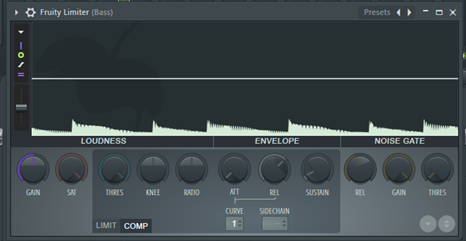
- Open Fruity Limiter and change from Limit to Comp mode.
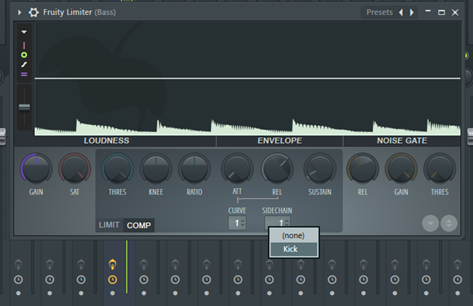
- In the sidechain box , drag up or down until it changes to 1. You can also right click on the sidechain box and select an input.
- Lower the threshold to the level you want the compression to take effect. Adjust the knee to adjust the compression curve.
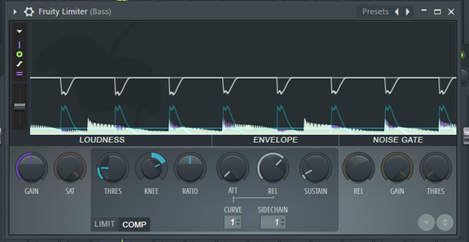
- Increase the ratio until it sounds the way you want it to.
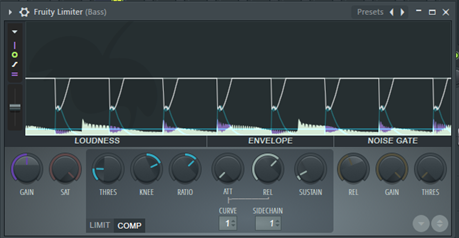
Other settings you should ideally play with, are the attack and release.
Adjusting the curve will allow you to determine the tension of the attack and release. A short curve means that the attack and release will be immediate. In contrast to longer curve times that allow the attack and release to be achieved gradually.
Sidechain using Fruity Peak Controller
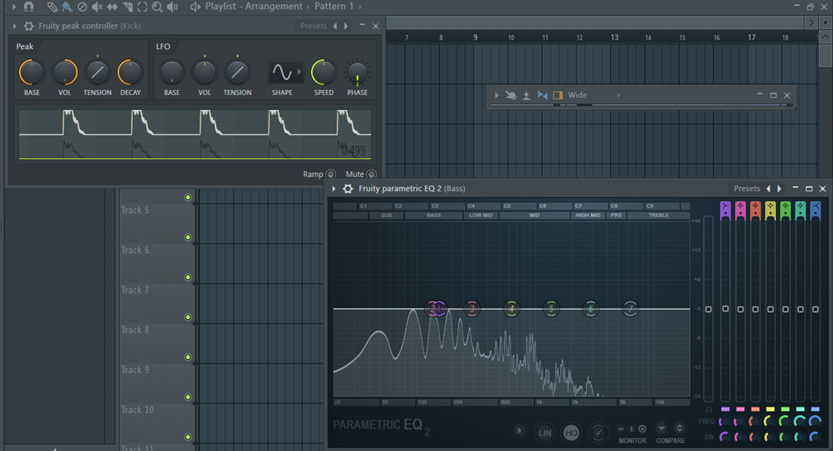
We’re still going to use a kick and bass to demonstrate this technique. When using sidechain compression, the whole bass signal ducks as the kick plays. What if you want to preserve the high end frequencies of the bass? You can use a combination of Fruity peak controller and Fruity parametric EQ2 to sidechain a specific frequency range. You can control the automation signal using the Peak and LFO controllers.
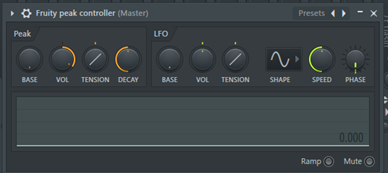
Peak Controls
- Base – sets the base value of the control output.
- Volume – this knob controls how the peak controller is affected by volume peaks. It is bipolar and goes from -200% to 200%.
- Tension – adjusting this parameter changes the shape of the attack and release curve.
- Decay – this defines the time it takes for the signal to get back to the base level.
LFO controls
- Base – sets the lowest value output by the LFO
- Volume – determines the highest value of the LFO output. It ranges from -100% to 100%
- Tension – this alters the shape of the curve mapping the LFO values to the LFO controller.
- Shape – Use this to select the shape of the LFO waveform (Triangle, Square, Sine, Saw or Random).
- Speed – this determines the speed of the LFO
- Phase – this defines the start position of the LFO.
In our case, we’re going to use the kick to trigger the sidechain effect on the bass. To start, load the fruity peak controller on an effect slot in the kick track.
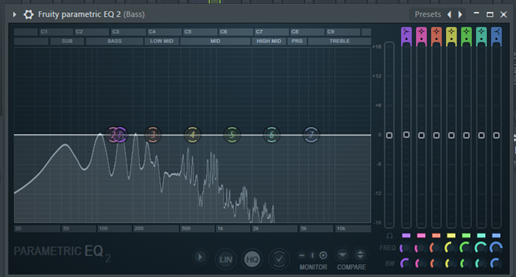
- Add the Fruity parametric eq to an effect slot on the bass track.
- On the parametric eq, set the frequency range you want to sidechain. You can do this by selecting the first frequency band and dragging it to your preferred frequency. If you’re looking to sidechain the low end frequencies, you should set it to around 100-150Hz.
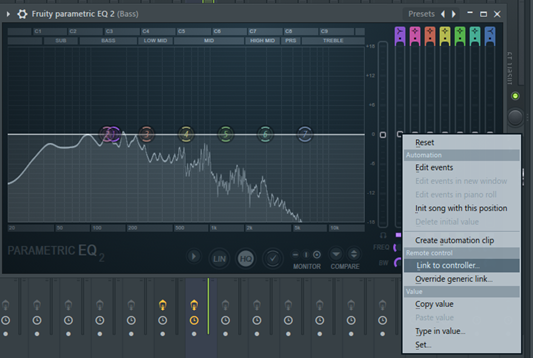
- The next thing to do is to right click on the first frequency band and from the menu that appears, select ‘link to controller’
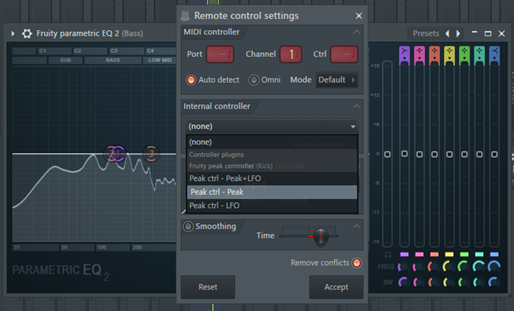
- In the internal controller menu that appears, select ‘Peak ctrl – Peak’ to complete the link to the Fruity peak controller on the kick track.
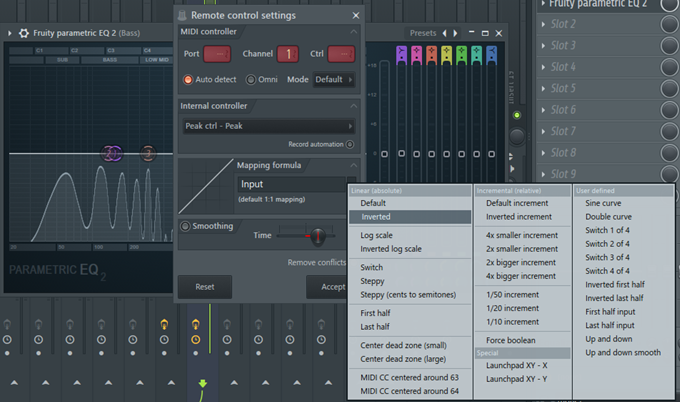
- Select ‘inverted’ under the mapping control menu. This means that every time the kick plays the low frequency band will duck.
- In the peak controller, set the ‘Peak base level’ to 50%. This puts the volume of the low frequency band in the eq at 0db.

- Set the ‘Volume’’ to 200% or lower. This will lower the volume of the low frequency band by about -18db everytime the Kick hits. Adjust this to taste. Your peak amount may vary depending on how much you want to lower the volume of the bass when the kick plays.
Another way to achieve this effect is to link the fruity peak controller with the fruity balance plugin.
- Add the Fruity balance to an effect slot on the bass track.

- Right click on the volume knob and select ‘Link to controller’
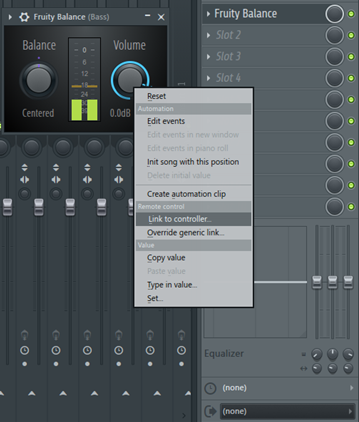
- From here, just follow the same procedure from step 4 above.
Sidechain using Automation
This method is more of a workaround because the volume of the bass is determined by the automation curve and not affected by the kick output. It is relatively easy and allows you to have complete control over your bass. It is especially useful when you are trying to create a specific sound effect that will not run continuously through the whole song.
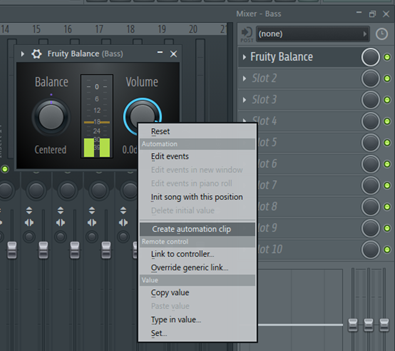
- To sidechain your bass track, add Fruity balance to an empty effect slot.
- Right click on the volume knob and select ‘Create Automation Clip. this will create an automation clip that appears in the playlist.
- The next thing is to shape the automation such that the bass ducks when the kick hits. It is important that you know where your kick starts and ends so that you can shape the automation clip to fit.
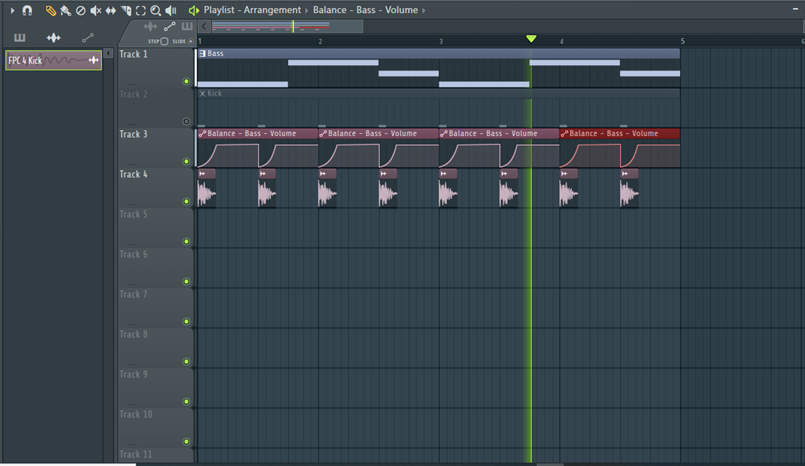
- To shape your automation clip, right click any part of the clip area to create a control point. To delete a control point, right click on it and select ‘delete’.
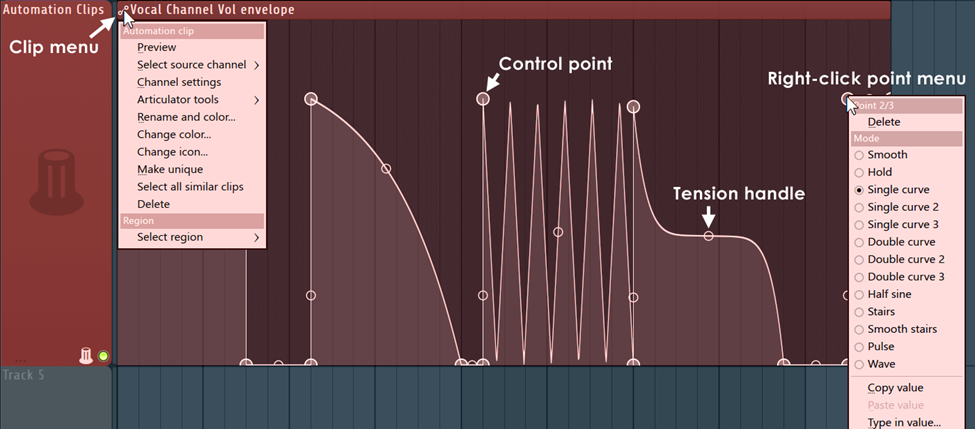
- When you create more than one control point, there’ll be a tension control point that is automatically added between 2 points. Left clicking and dragging up or down on the tension control will change the steepness of the curve. To undo all your changes, Right click on the tension handle.
- You can change the curve type by right clicking the control point and selecting an option from the menu.
- You can change the length of your automation clip by dragging the right-most control point.
- When you are done shaping the automation clip, you can copy paste it across the track or wherever you deem fit.
Sidechaining using Gross Beat
Gross beat allows you to duck your signal without setting up complex sidechains. It is arguably the easiest way to do sidechaining in FL. It has a 2-bar buffer that allows you to manipulate the volume and pitch of the buffered audio using the time and volume presets. You can also draw your own waveform in the graph for a more custom sound.
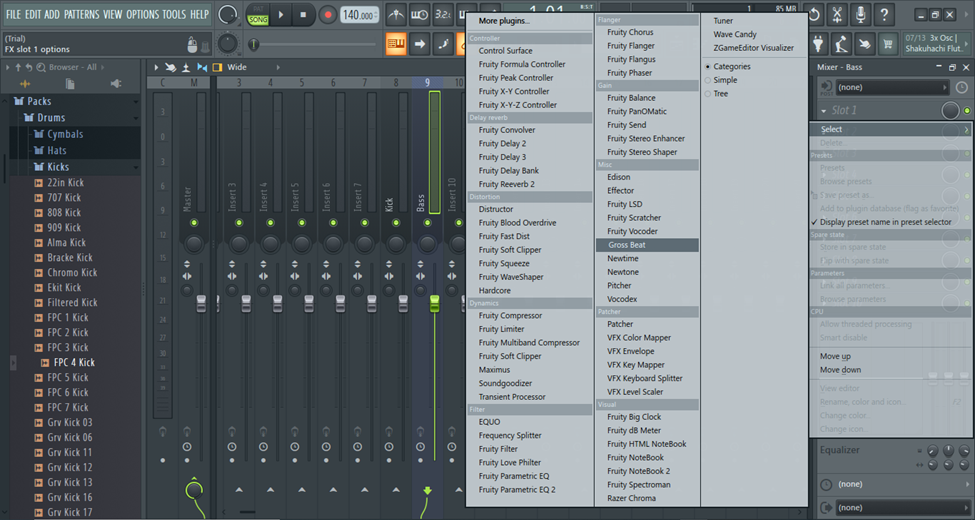
- Add Gross beat to your bass insert.
- Select ‘sidechain’ from the volume presets on the bottom left and let the magic work.
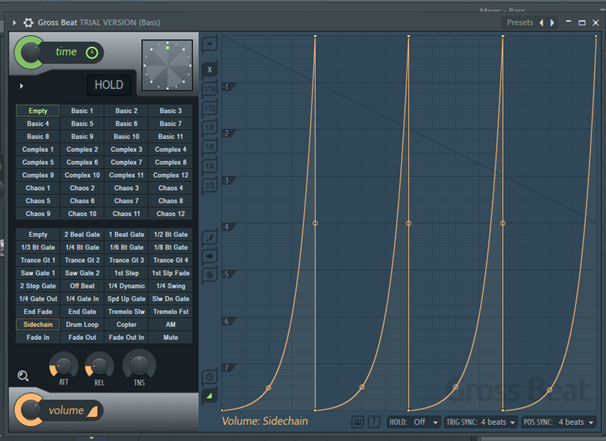
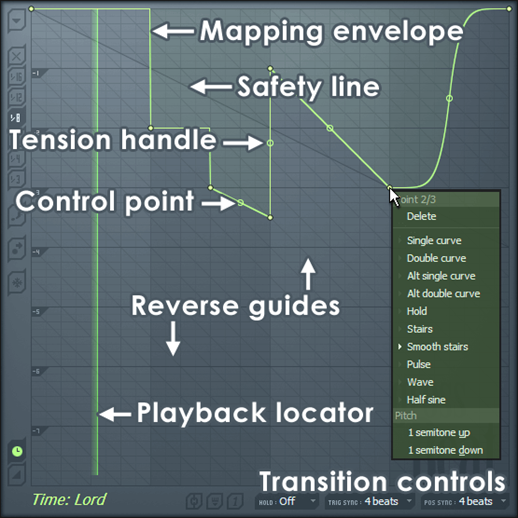
- You can manually edit the waveform to fit your track or choose from the myriad of presets available. Editing the waveform follows a similar workflow to editing an automation clip.
The only drawback to using Gross beat is that it may add some latency to the signal. An easy way to fix this is to export the sidechained signal once you’ve finished setting up your gross beat and re-importing it back into the project.
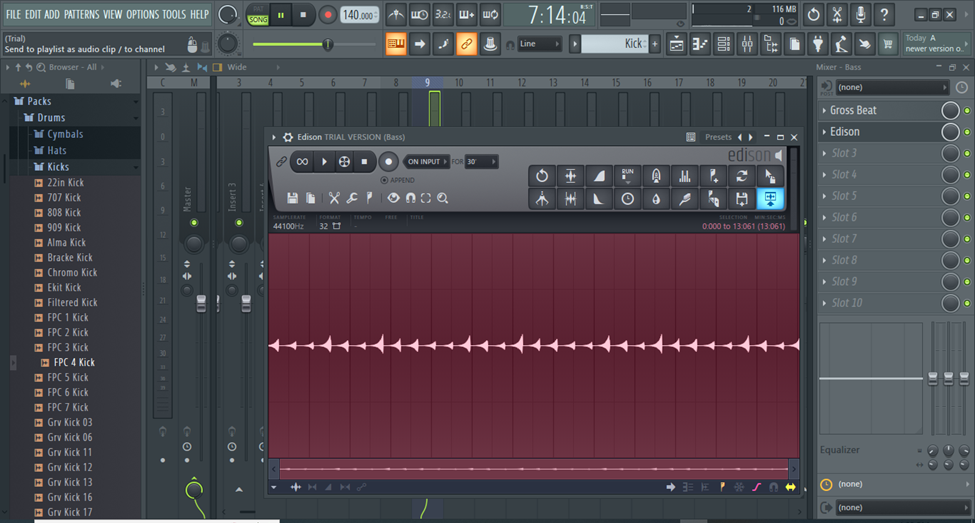
- You can also add Edison in an effect slot after the Gross beat and record the output, then use it to replace the signal in the playlist.
Conclusion
And just like that, you’ve successfully done sidechaining in FL. There’s more than one way to do it. Just make sure to choose what works best for your track. Sidechaining, like most production techniques, is most effective when used subtly. Too much salt is bad for your food, so don’t do it too much. You can always try gain-staging, panning and subtractive eq to clear out clashing frequencies before pulling sidechain from your hat of tricks. Sidechaining lets crucial elements in your mix shine without affecting the volume of something else.
Using Gross Beat is the easiest and fastest way to sidechain. You can also use the Fruity limiter set to comp mode, create custom automation clips and even use Fruity Peak controller linked to a parametric eq or fruity balance. Depending on what you’re looking for, one or all of these methods may help you achieve the sidechaining technique.
Wishing you all the best on your next track.

- FL Studio Tempo Changes When I Press Play [FIXED] - January 14, 2023
- How to Speed up / Stretch Sample in FL Studio - January 14, 2023
- How to Find / Detect Tempo BPM in FL Studio - September 30, 2022

![FL Studio Slide Notes Not Working [FIXED]](https://ProRec.com/wp-content/uploads/2023/06/slide-note-and-normal-note-side-by-side-labeled-fl-180x180.jpeg "FL Studio Slide Notes Not Working [FIXED]")

