Introduction
Removal of vocals is the elimination of the voice with the intent of remaining with the instrumental. In the end, you might keep the vocal part for future use or discard them. For some reading this article I strongly believe that you have tried using online sites that have this function. These sites allow you to upload an audio file, process it, and give you an end product which might be just the vocals, instrumental, or both. Unfortunately, these sites do not give quality results.
You can also use software like pioneer DJ software to do this as well and just like the online sites you will not get quality results. Quality results mean that at the end of the process you will end up with an audio file with purely the instrumental and no trace of vocals on the file.
Unlike the options suggested above Audacity allows you to make additional changes as you make this edit. When removing through an online site it is dependent on just clicking a button and hoping the machine learning gives you a good result. In Audacity, there are sliders, buttons, and features to help you make the end product better.
The limitations of using Audacity for this kind of edit will be addressed in the conclusion.
The Process
Import the audio file using Ctrl > Shift > I. Next, select the part that you want to remove vocals. This can be a case where there might be a part that is offensive and the rest of the vocals do not have any issues. In some instances it might be the whole file has vocals that you wish to remove if that is the case select all.
Next, click on Effects in the menu tab. In the dropdown list that comes up click on the Vocal Reduction and Isolation option.
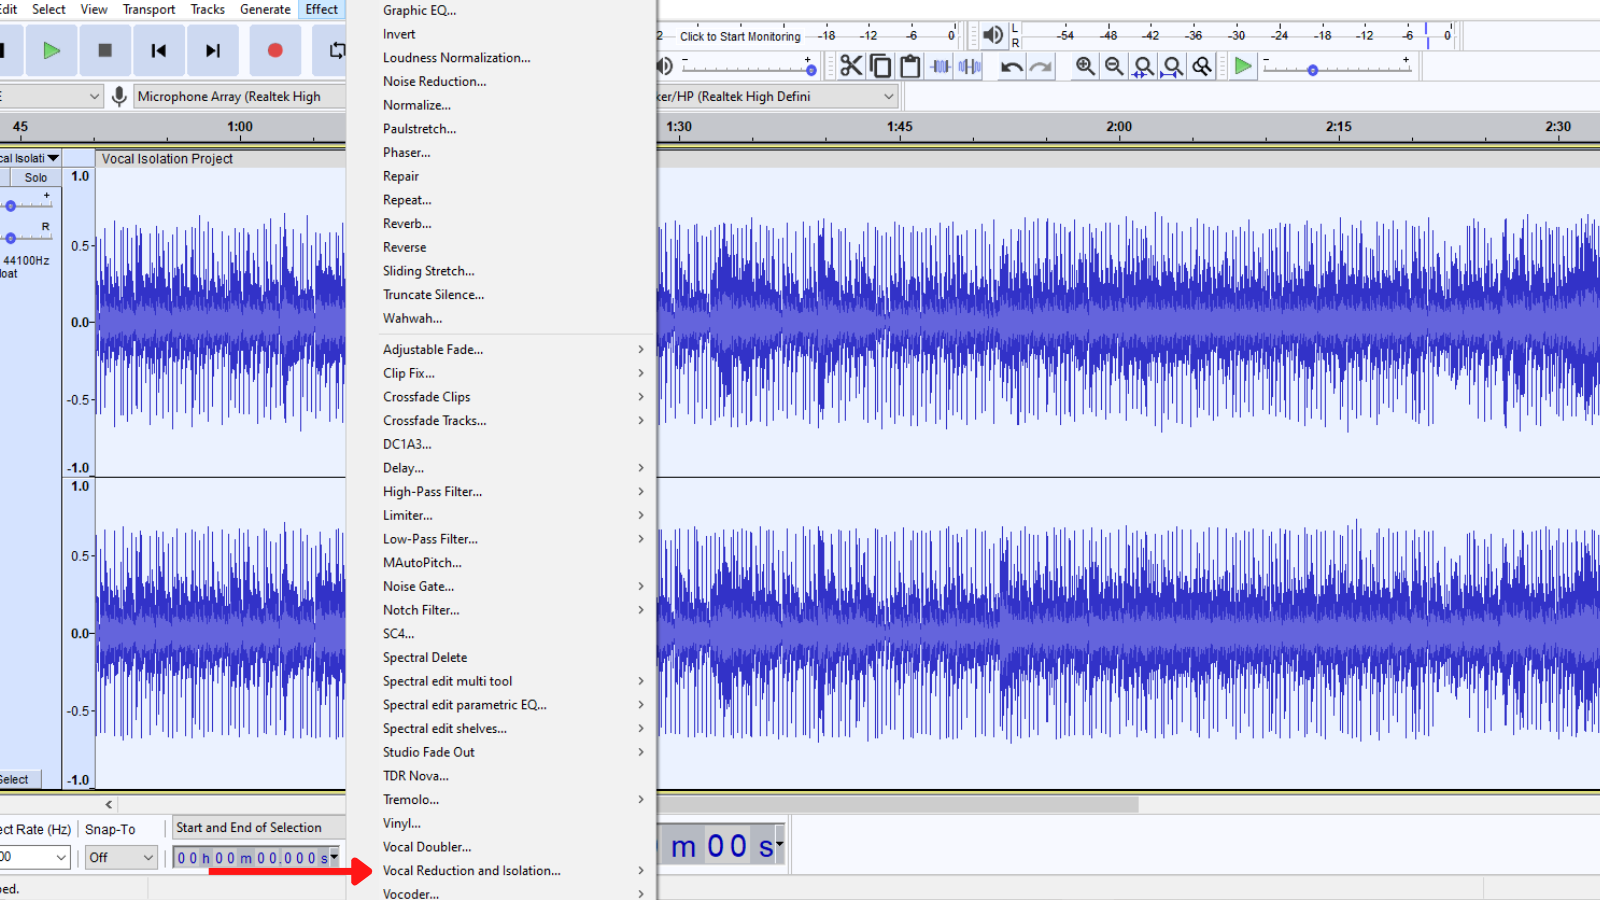
Clicking on this option will open the Vocal Reduction and Isolation pop-up box.
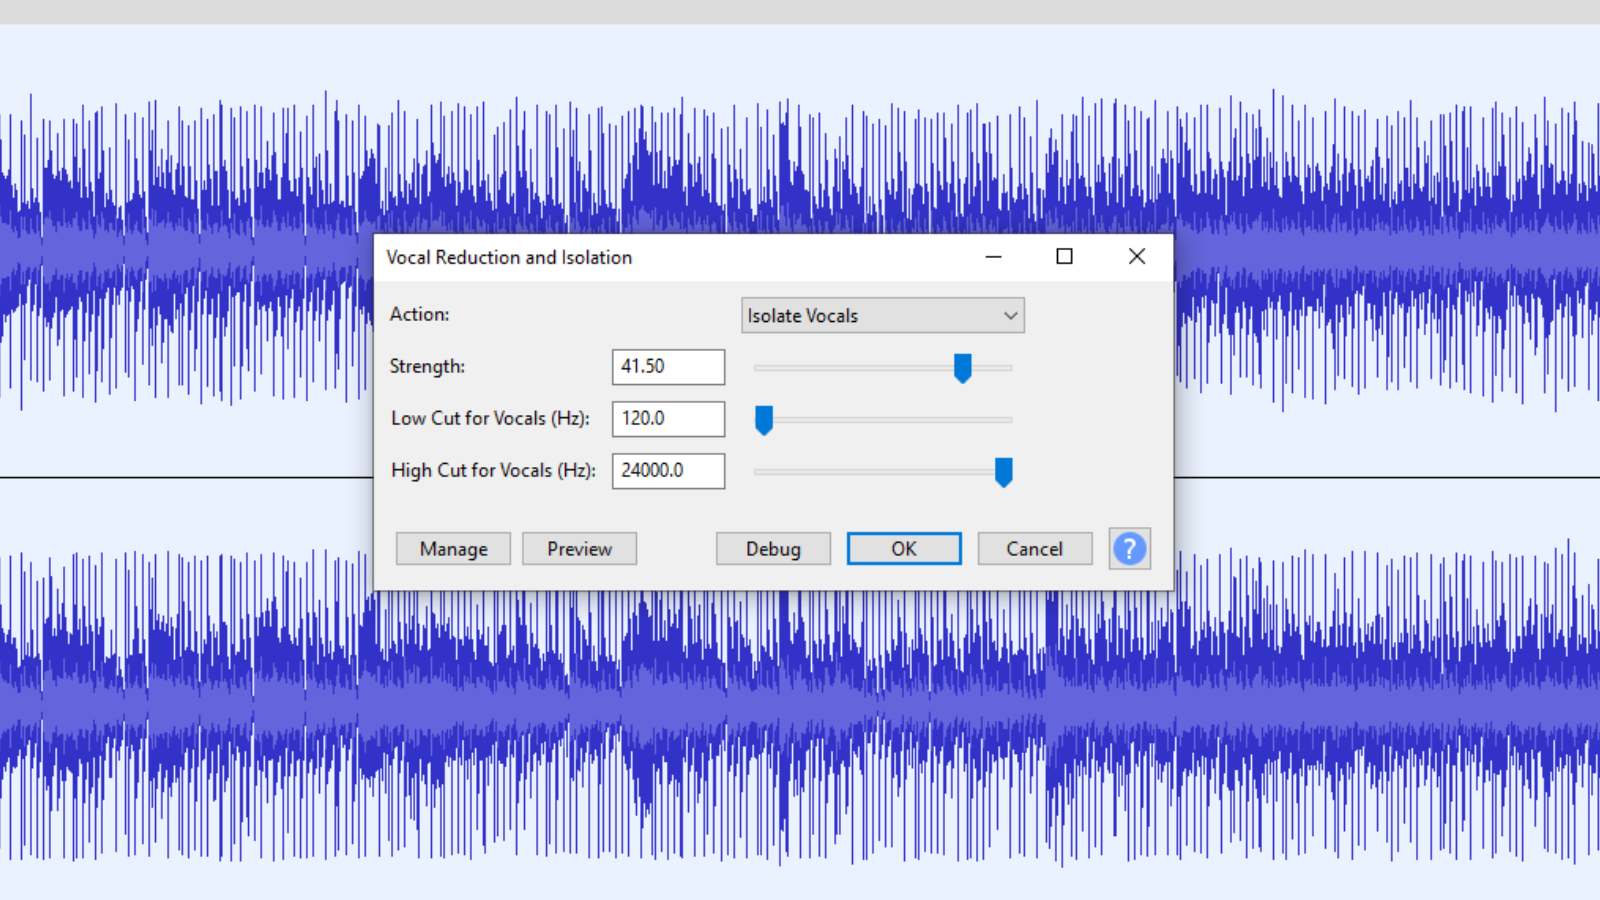
In this box, there are a number of entries, sliders, and buttons. I will address them systematically, from top to bottom.
The first one is Action. This is an entry with several presets to choose from. This entry allows you to select what change you intend to make to the audio file. The image below shows the options that will appear when you click on the entry.
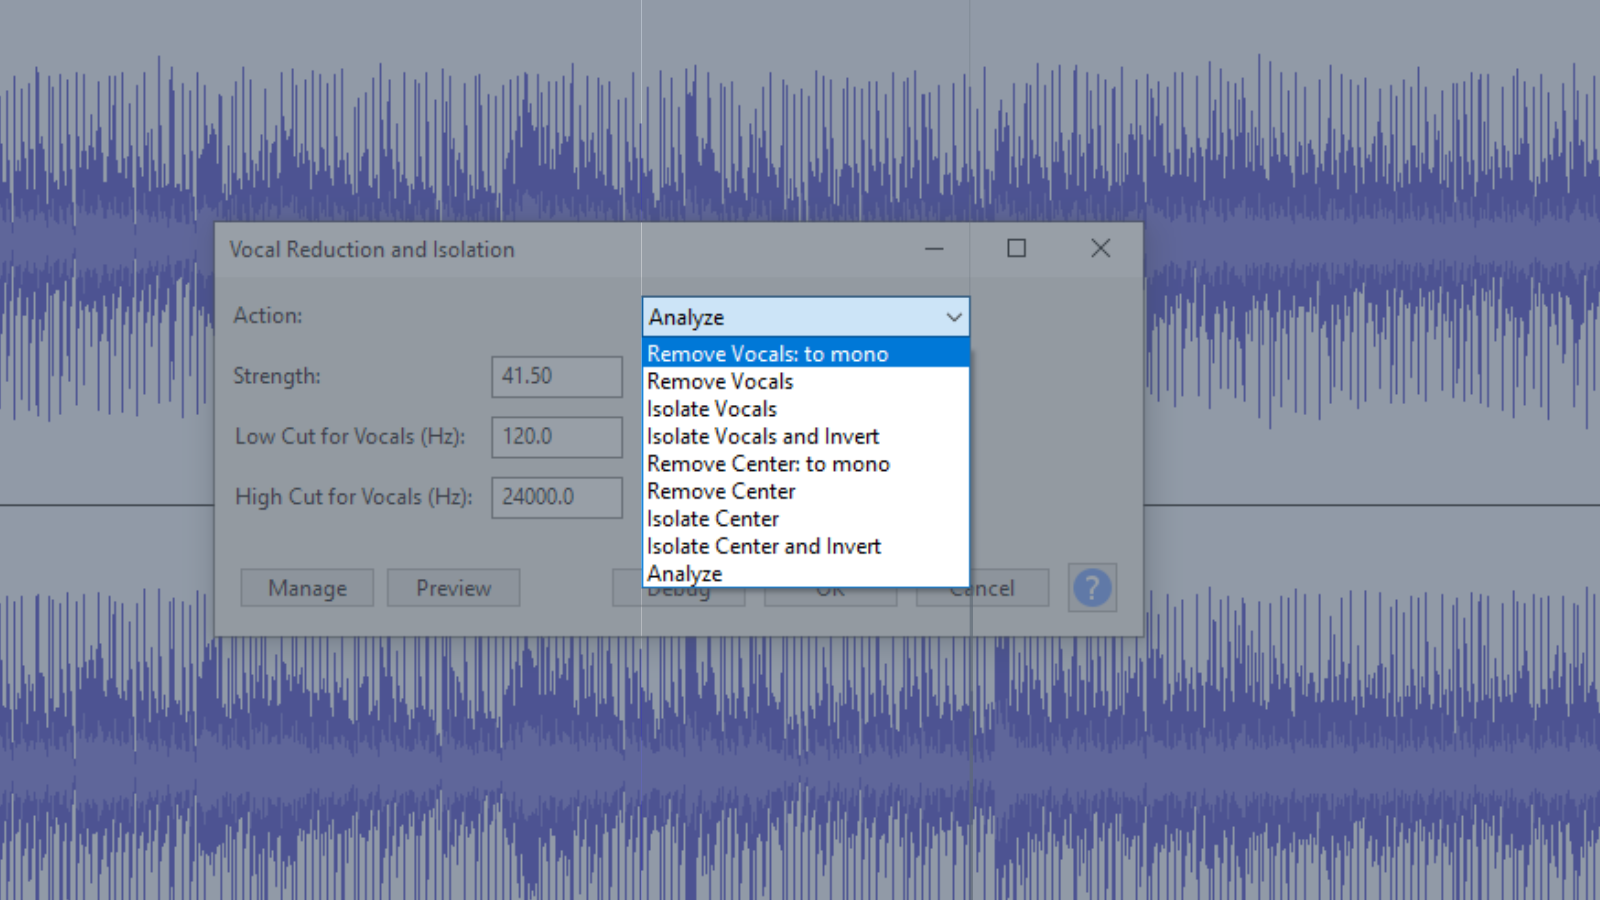
For this exercise, the preset that you ought to use is the Remove Vocals preset listed as number 2. When working on centered panned audio this preset removes the vocal range using a set parameter. This parameter consists of the highest and the lowest figure that the vocals exist within.
Before proceeding to the other sections I will partly have a quick overview of the other presets. These presets are divided into two categories. These are Bandwidth Limited Actions and Full Spectrum Actions. The first 4 presets fall under the former and the last 4 falls under the latter.
These categories are might be useful in the future for other activities. I will only cover the Bandwidth Limited Actions presets.
- Remove Vocals to mono: This is the default setting whenever you open this pop-up box and it is used whenever audio is centered panned. There are two sliders namely Low Cut for Vocals (Hz) and High Cut for Vocals (Hz) – addressed later on in this article – which are used to set the range for these centered panned vocals that you intend to remove. The audio is reverted to a dual mono track.
- Isolate Vocals: This option reverts the audio back to a dual mono track after extracting a vocal range determined by the Low Cut for Vocals (Hz) and High Cut for Vocals (Hz) sliders.
- Isolate Vocals and Invert: Works like the second preset reverting the audio back to a dual mono track but the difference is that it returns the audio as an inverted.
In this next section, I will look at the sliders. There are three sliders which are Strength, Low Cut for Vocals (Hz), and High Cut for Vocals (Hz).
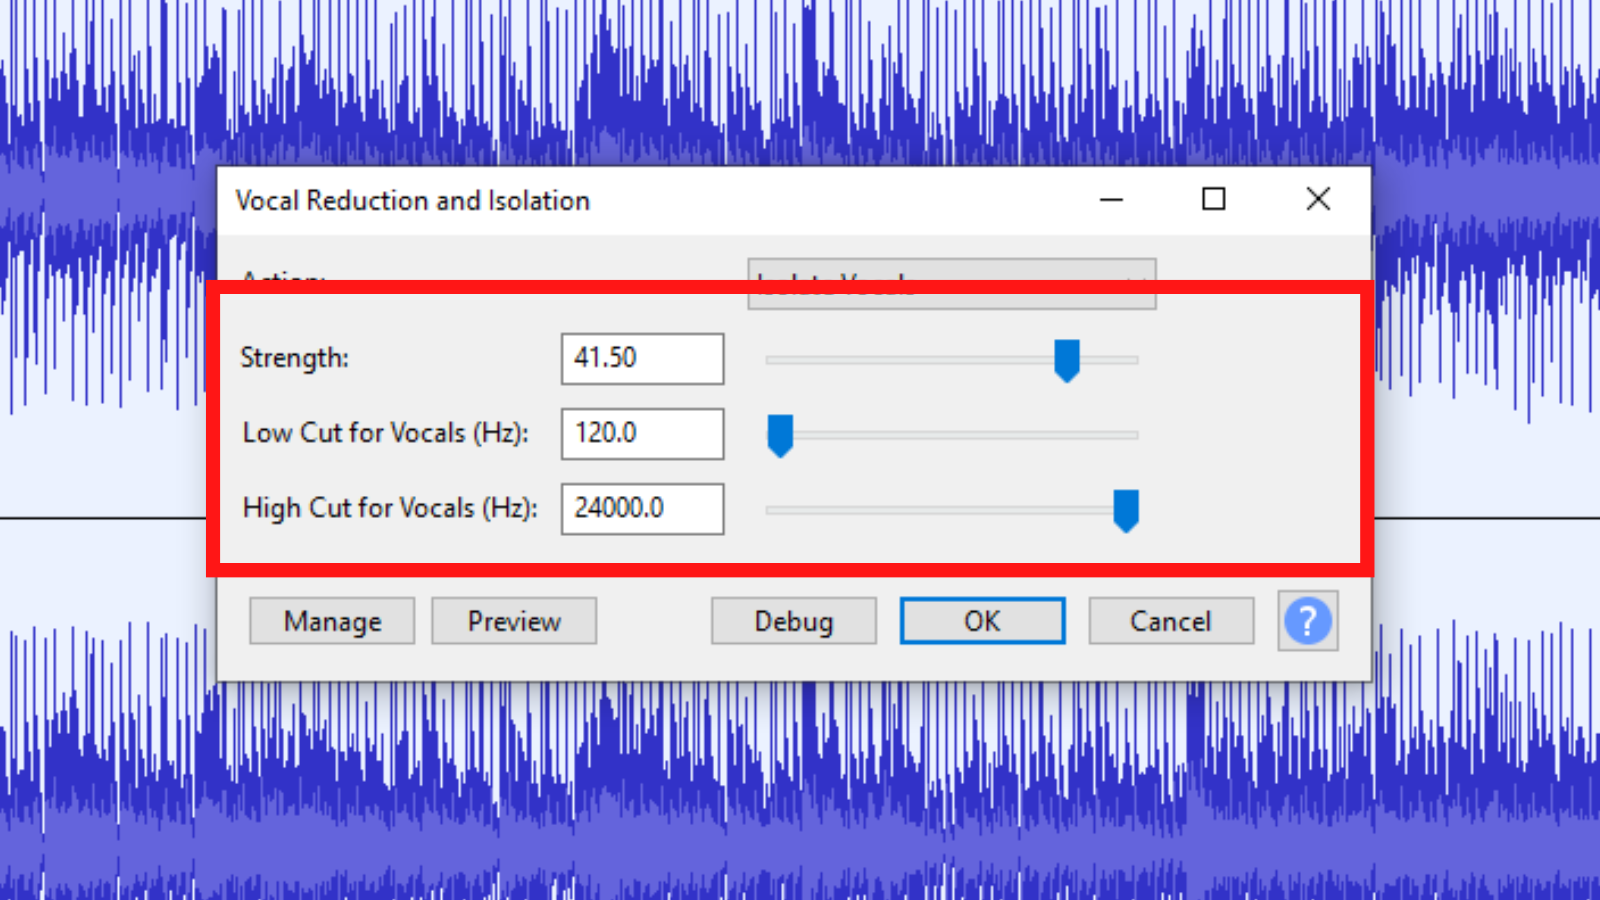
The first slider, Strength is used to determine the degree of vocal removal and isolations. Higher values are achieved by dragging it to the right. This will increase the extent of removal or isolation. The furthest left figure is 0 which is the lowest and this does not have any effect on your audio file. I will not suggest a particular figure. You can drag it to the right while clicking on the Preview button to listen back to how the effect is being applied. The only point to note is quite higher values tend to leave an unnatural effect on your audio file.
The Low Cut for Vocals (Hz) and High Cut for Vocals (Hz) are parameters. The latter slider is used to set a level at which frequencies higher than the value set will not be removed or not included in the isolated audio. Similarly, the frequencies below the figure set in the Low Cut for Vocals slider will not be removed or not included in the isolated audio. Also with these sliders, you have to keep adjusting while listening back using the Preview button to sample how the effect is being applied.
There are 6 buttons on the bottom part of the pop-up box.
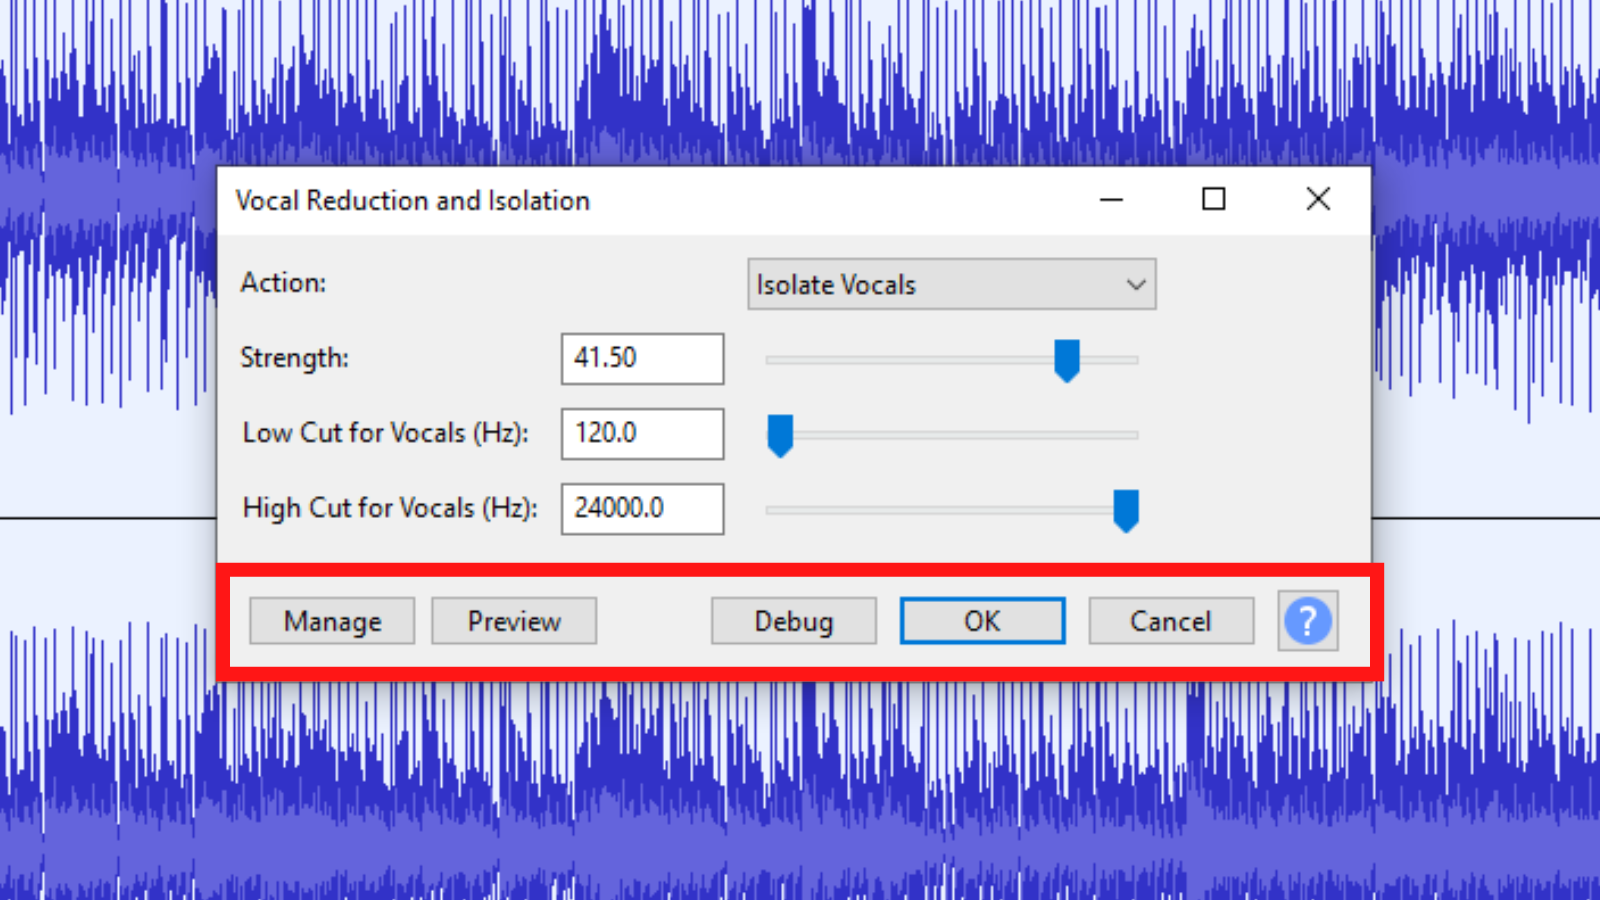
The Manage button has a number of functions. Some of these functions include saving new presets and deleting, importing, and exporting presets as well. You can also find information about this particular effect.
Clicking on Preview will play a 5-second sample to give you a sample of how the effect is being applied. This is key in informing you whether to finalize or keep tweaking.
The Debug button is used to apply the changes. The OK button does this as well but the difference is the Debug button is used to identify errors. The Cancel button is used to close the box if you do not wish to proceed with applying the effect.
Lastly, the button with the question mark redirects you to this page which has an additional breakdown of the functionality of the vocal reduction and isolation preset.
The Alternative
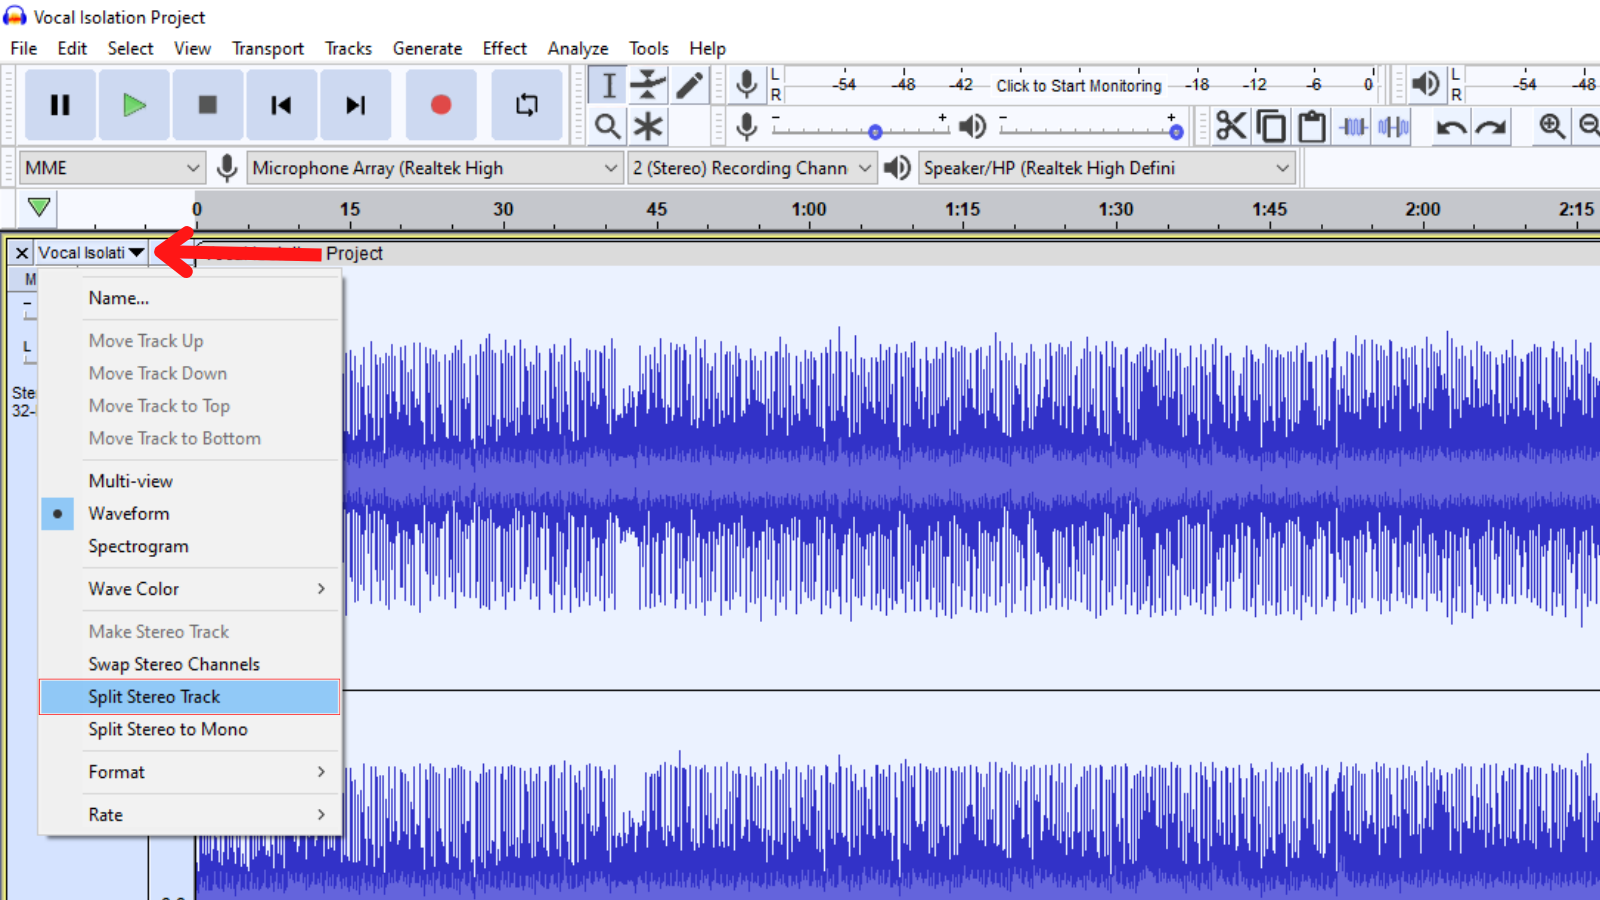
If you have an audio file with particularly vocals being centered panned you can pick the Remove Vocals preset, split the stereo track into the left and right channels, make these two channels mono and lastly invert them.
Click on the highlighted section in the image below to split the track.
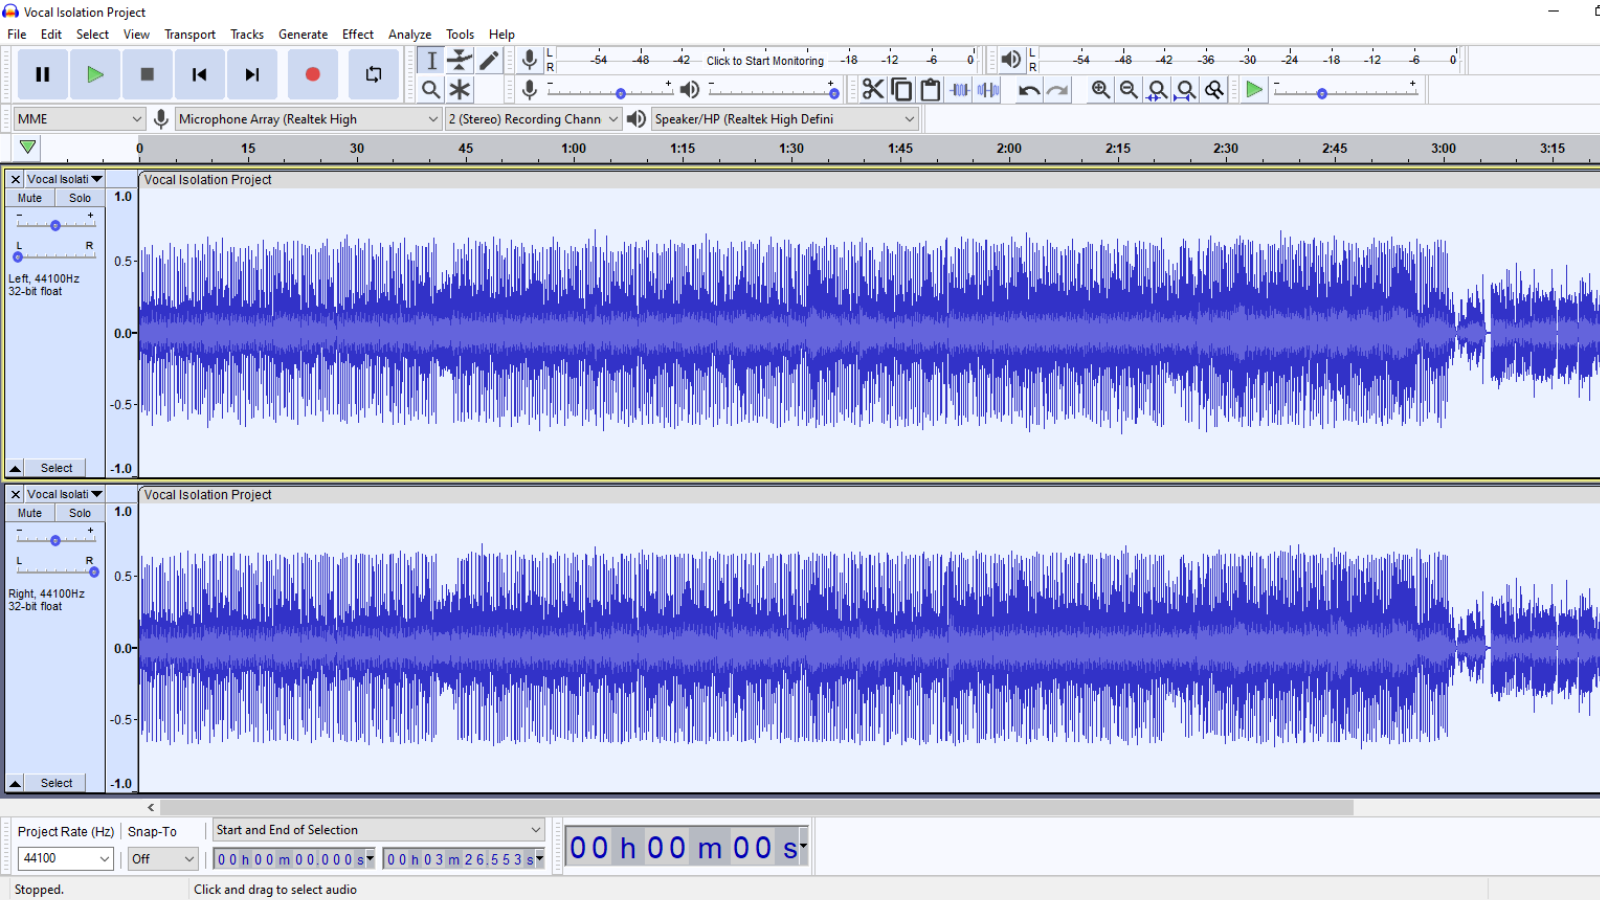
You will have two separate audio waveforms as shown below.
After splitting double click on the waveform on top and invert it. This effect is gotten in the Effects option in the menu tab.
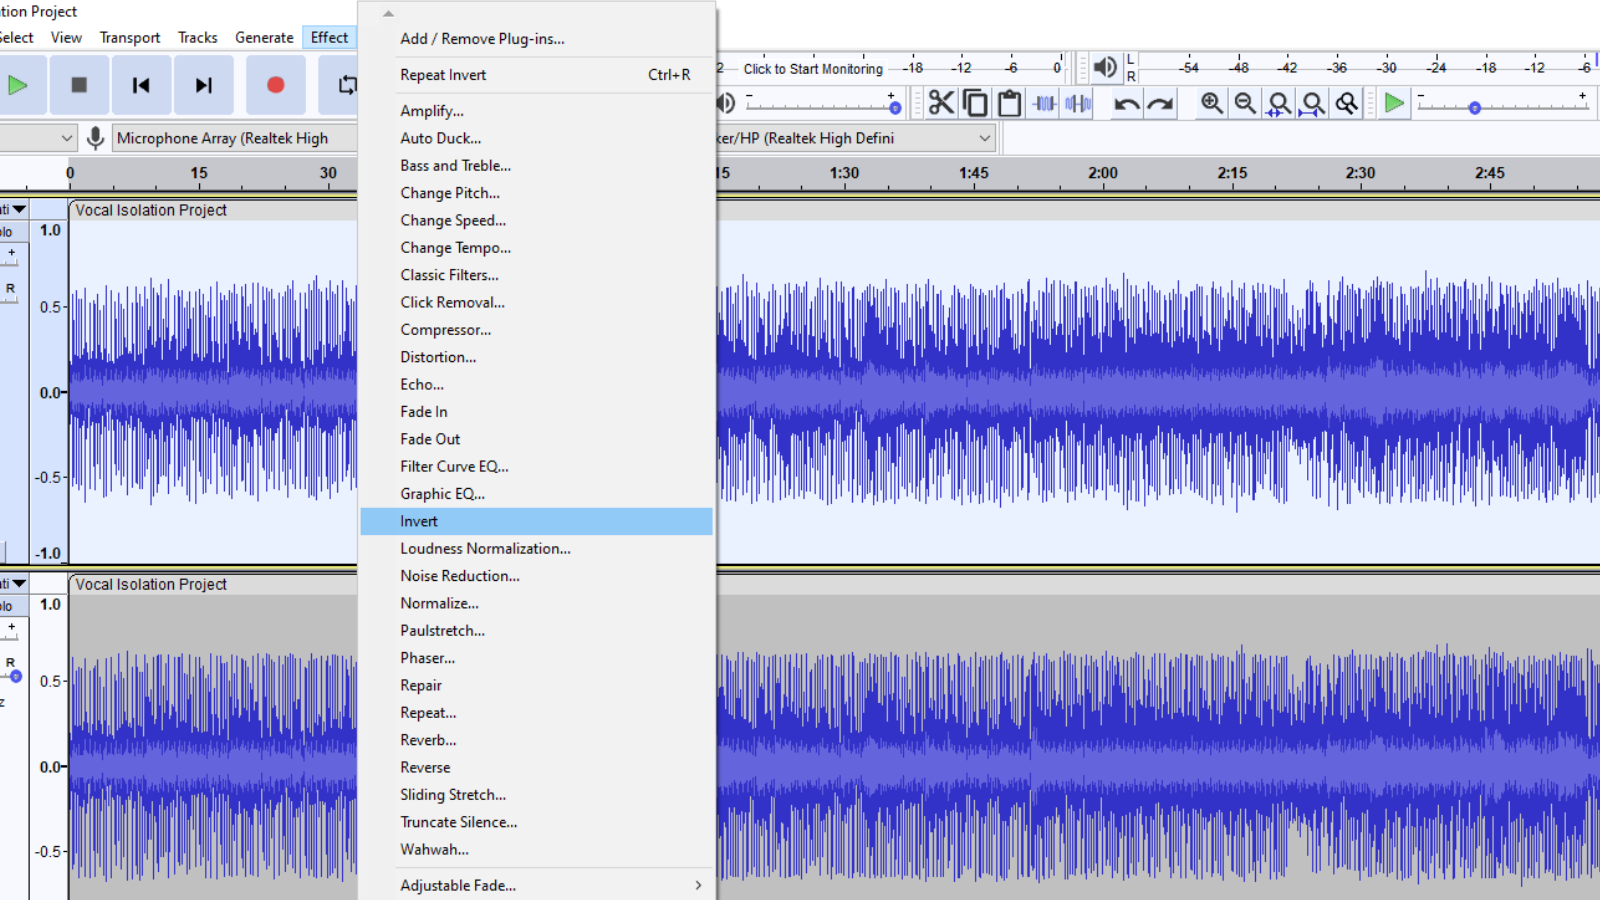
This process might be unconventional but it will reduce the strength of the vocals or remove them.
Lastly, here is another process that you can find useful in very few instances. You might be working with an audio file that is stereo with one channel having the vocals and the other one having the instrumental. In such a case, split the stereo track and delete the one having the vocals.
Conclusion
In the section that I was addressing picking the preset, I categorically used these words – When working on centered panned – When music or generally when audio is mixed panning allows you to distribute the sound signal. You can distribute this sound to the right channel when using a stereo signal. The words centered panned imply that this effect works best when the vocals were panned at the center.
The Vocal Reduction and Isolation effect has a number of functions. From the number of presets you can create acapella and karaoke versions of songs. The preset covered in this article will be used to create a karaoke version by removing the vocals and keeping the instrumental.
You can also use it to remove a section of an audio file that has both vocals and instrumental and the vocals contain offensive comments. The biggest beneficiary I would say of the preset is producers and DJs who look to create mash-ups and remixes.
Note that it is an exercise that will not always give you a perfect end product as it is dependent on the mixing practices of the audio engineers that worked on the song.


