Dealing with audio is a customary practice in music production and knowing how to manipulate clips is no different. Time stretching allows us to lengthen or shorten an audio clip without affecting its pitch. This is useful when you want to change or automate the tempo of a project without affecting or stretching the audio.
In this article, we are going to look at how to change tempo without affecting the audio using stretch modes. But before we start, you will need to know the sample’s original tempo so that you can fit it to your project’s tempo. If you don’t know how to do that, check out my article on How to Change the BPM/Tempo of a Sample in FL Studio.
What are Stretch Modes?
Stretch modes enable you to change or maintain the pitch and timing of a sample as the tempo changes. They control how the audio clip changes as it is affected by the tempo. FL Studio comes with four different types of stretch modes. Depending on the contents of the audio clip, there are different options that you can use.
To access stretch modes, double-click on the audio clip to open the sampler channel.
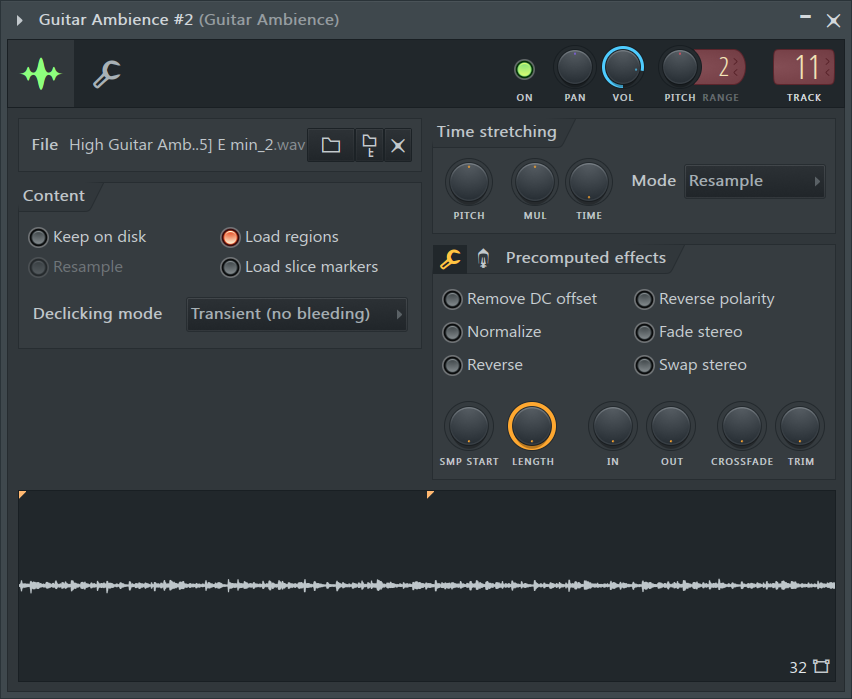
Once it is open, navigate to the Time Stretching panel and click on the dialogue box next to the word ‘Mode’. In this dialogue box you will find the different types of stretch modes. On default, the mode is set to ‘Resample’.
This will open up a drop-down menu with options for different stretching modes.
From the options, pick the stretch setting that best suits your audio clip.
Choosing the right stretch mode depends on the type of tempo change, as well as the contents of the audio, and whether the tempo change persists or varies throughout the song. In the next section, we will go over this in detail.
Tempo Changes for Songs with Varying Tempo
Tempo variations are becoming easier to implement in FL Studio with every release. For example, you may want a beat to start at 120 BPM, change to 140 BPM in the next section, and then end slower at 100 BPM. To do this, first, you have to prepare the audio clips used for the tempo change to be assured that they keep the same pitch and timing. If the tempo changes at different points in the song, use this quick fix to prepare your audio clips for the tempo change.
Go to Tool menu>Macros>Misc>Switch all audio clips to>Realtime stretch. This ensures all the audio clips retain the same pitch and timing as the tempo changes.
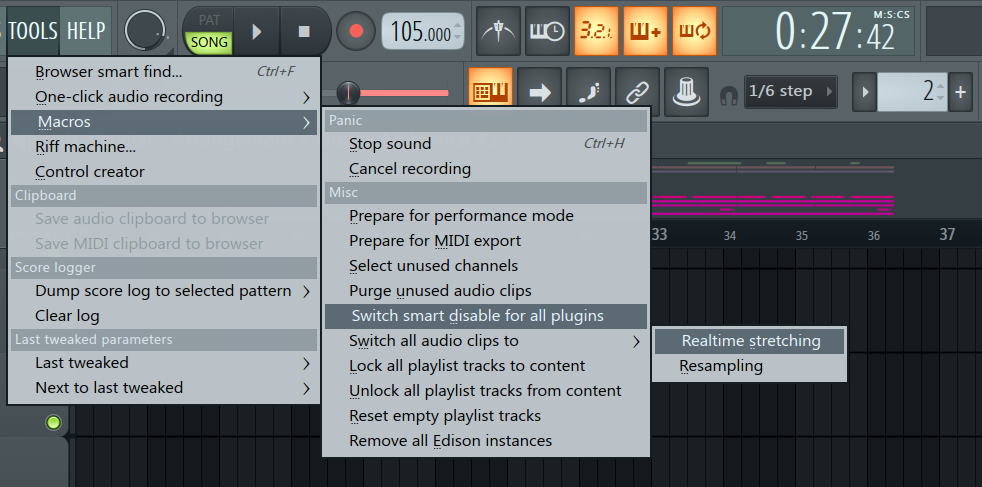
This will change all the audio clips used in the project to realtime stretching.
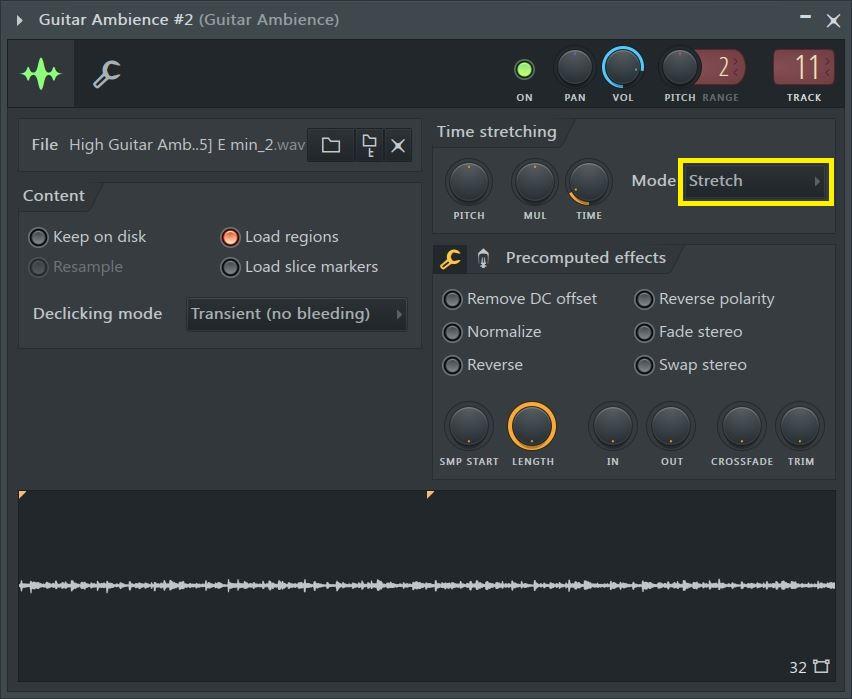
To check if realtime stretching has been applied to the audio clips, double-click on any clip and open the sampler settings.

Once the sampler settings are opened, check the stretch mode being used. When realtime stretch is on, it is indicated as ‘Stretch’ in the dialogue box shown next to the word ‘Mode’.
With realtime stretch turned on you can apply as many tempo changes as you’d like without compromising the audio.
Tempo Changes for Songs with Fixed Tempo
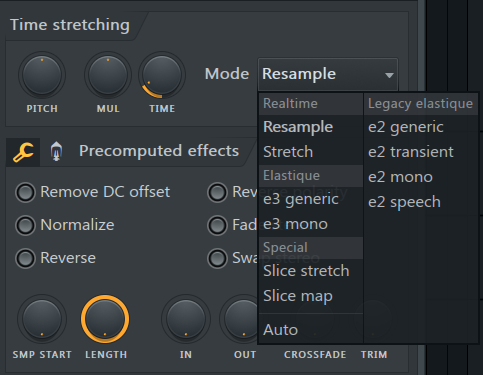
The elastique modes are the best option when the tempo is adjusted but remains constant throughout the song. For example, you started working on a beat at 124 BPM and later decide that the beat would sound better at a faster tempo, like 140 BPM. This is where elastique modes come into play. Use them when you’re changing the overall project tempo which remains constant throughout the song. Elastique modes produce the highest quality out of all the options. However, they cannot be used where the tempo changes at any point during the song. They are tuned to cater to specific forms of audio. They are:
E3 generic – Designed to work on complex audio forms, for example, whole songs and polyphonic audio.
E3 mono – For use when changing the tempo of monophonic sounds like vocals or solo instruments. This setting retains the formants in the audio and reduces artifacts.
For drums and percussion, use the Special stretch modes to retain the transient information of the sample. They are:
Slice stretch – To be used when you are increasing the tempo of the project or where the audio is recorded at a slower tempo.
Slice map – It is used when you are decreasing the tempo of a project or where the audio was recorded at a faster tempo.
Conclusion
It can be daunting to deal with audio clips during tempo changes. Knowing how to maneuver in such situations could be all you need to bring back that missing element to your track. There have been many times when I found the perfect sample, but when I imported it into my project and adjusted it to fit the tempo, it just didn’t sound the same. If you also encounter this problem then selecting the right stretch mode could just be the fix you need.
When changing the tempo, choosing the right stretch mode boils down to two things. One, whether the project tempo will be changed to a value that stays constant from start to end, or, two, if it varies throughout the project. Hopefully, next time you change the tempo you’ll be able to do so without affecting the audio clips.

- How to Add Drum Kits to FL Studio - September 18, 2023
- Best Free Drum Kits for FL Studio - September 18, 2023
- How to Create Drum Patterns & Loops in FL Studio - September 12, 2023


![How to Fix Latency / Lagging in FL Studio [FULL Guide]](https://ProRec.com/wp-content/uploads/2023/09/audio-settings-fl-studio-1-180x180.png "How to Fix Latency / Lagging in FL Studio [FULL Guide]")
