As an Amazon Associate ProRec.com earns from qualifying purchases. Any links that take you to products are affiliate links, and we may earn a commission if you make a purchase. We appreciate your support.
All text and image links lead to Amazon unless stated otherwise. All product scores are based on ProRec’s in-house scoring model
| Thumbnail | Low Latency Audio Interfaces | ProRec Score | Price |
|---|---|---|---|
 | 9.6 | Check Price on Amazon | |
 | 9.2 | Check Price on Amazon | |
 | 8.4 | Check Price on Amazon |
Introduction
When you work with audio, no matter what you do, you’re going to run into latency issues every now and then. The truth is that latency will always be there, your goal should be to control and minimize it. A good interface can help bring latency down to a few milliseconds, a point where it becomes practically unnoticeable.
Once you do have a good interface, you want to address the other culprits affecting latency such as your OS, software, plugins and everything else that is part of your processing chain. Every piece of software, and every single VST that you’re running is a contributing factor. You have latency when you are hearing the processed signal via your computer, otherwise most interfaces can easily zero latency monitor unprocessed signals.
When choosing a low latency audio interface, don’t go by the latency values you find quoted by manufacturers, they don’t exactly offer the best judgement. Manufacturers really do not take into account latency induced by other external factors i.e. your software and hardware, both of which have the greatest impact.
It is imperative that you go with a manufacturer that is known for having good drivers or is core complaint with your OS. Driver issues can impose latency and may also be a cause for audio dropouts. You can also look at interfaces that come with the low latency mode.
A great way to not have any plugin processing bog you down is by investing in an interface that comes with an onboard DSP. DSP interfaces, while cost a bit more, take care of all the plugin processing that goes on, and as a result you can easily get 1-2ms latency in real time which is pretty negligent.
Finally, adjusting your sample rate and buffer size will help get rid of any latency issues for the most part. If you increase your sample rate, your latency will go down, however this will put more load on your CPU. Similarly, a lower buffer size will also reduce latency but it may introduce clicks and pops in your tracks. For Sample rate, 44.1 kHz is generally the max setting and then you can adjust the buffer size accordingly (160, 128, 96) if you start having issues, you can raise it back up until you find the perfect balance.
Recommended Read: How to Choose an Audio Interface
Best Low Latency Audio Interface Reviews
All text and image links lead to Amazon unless stated otherwise. All product scores are based on ProRec’s in-house scoring model
The 8×14 I/O Zen Tour Synergy Core offers USB 2.0 and TB3 connectivity both. With a max 192 kHz/24-bit recording resolution, the unit features options for input expansion, via coaxial S/PDIF channels or optical ADAT I/O.
The desktop style interface houses all I/O and ports on the front and back. The front panel features four outputs i.e. 2 headphone outs and 2 preamp outs, and four Hi-Z inputs. The rear panel houses four mic/line inputs, the USB and TB3 ports, ADAT and S/PDIF I/O, eight stereo line level outputs, two monitor outs and a DC-IN power connector.
All controls are present on the main panel including a small touchscreen, that allows quick access to the Systems Menu and other features like presets etc. A large rotary knob that allows you to set the gain or volume levels sits next to three function keys (HP, Gain and Antelope buttons) on the top panel as well.
Ergonomically, the unit is pretty well designed. The main panel controls are handy and the frequently switchable channels are present on the front. The small touchscreen is responsive, the volume encoder is smooth and the interface is generally well built.
After scanning a code for a URL link, we installed the drivers, which was followed by a launcher install and an automatic firmware update of the Zen Tour. Thereafter, we launched the Control Panel from the Antelope Launcher and were ready to record!
We then miked our Yamaha Storia with a Beyerdynamic M 160 and got to recording. The incredible headroom on the interface’s improved preamps became immediately apparent as our audio was really clean and pristine. The AD/DA conversion was commendable as well, and our recordings were clear and without artifacts; a nod to Antelope’s proprietary clocking technology.
We then plugged in a pairt of Adam A7 monitors, and although we had used them with other interfaces before, the results with the Zen Tour were exceptional; our audio sounded more lively, and rich in character. As for latency, it was basically non-existent. We had the unit set up with our Mac, and were using the TB3 connection; the round trip latency at 32 samples and 44.1kHz was only about 2.3 ms!
The touchscreen on the interface allowed us to control headphone/monitor levels, talkback, muting etc which was really helpful in a tight workflow. However, the Control Panel application (software) allowed an even better amount of control, from routing to presets and effects, which was fantastic for having precise control over our sound. The Synergy Core plugins included with the interface were amazing as well. Among others, we really enjoyed using the guitar amp emulations which added a dark sonic character to our recordings.
The predecessor of the Zen Tour SC is the original Zen Tour. While the new model debuts many new features, it has a less extensive I/O configuration than the Zen Tour, losing a pair of ¼” monitor outputs and limiting expansion via ADAT to 8 channels only, through 1 optical channel (in contrast to two optical I/O in the original). The SC version, however, includes the dynamic Synergy Core plug in bundle. The unit also has better THD on the mic inputs (an improvement of -2 dB, from -106 dB to -108 dB).
Although the Zen Tour is undoubtedly a great interface, it can be improved in some areas. For instance, the touchscreen is pretty underwhelming and offers a relatively small degree of control. Ideally, it should offer more control options so we don’t have to reach out for the software mixer for every other setting. Also, Antelope’s Control Panel doesn’t have the best UI; it cramps a lot of options into a small area which takes quite some time to figure out, however, this can be made more intuitive.
All in all, the superior clocking technology of the Zen Tour SC, the onboard DSP and low latency recording make it a fantastic option to consider if you are on the lookout for an interface that will help you record, monitor and edit your sound easily. Coupled with a great I/O configuration and the Antelope software, you really get a bundle deal with the Zen Tour!
Zen Tour Synergy Core Benefits
The unit offers a lot of options for input expansion.
The onboard DSP allows you to run multiple plugins, without lag.
The TB3 port gives really low latency values.
The included SC plugins offer a lot of different recording effects.
Zen Tour Synergy Core Drawbacks
The touchscreen doesn’t offer a lot of control options.
Antelope’s Control Panel UI seems cramped, and is difficult to figure out.
All text and image links lead to Amazon unless stated otherwise. All product scores are based on ProRec’s in-house scoring model
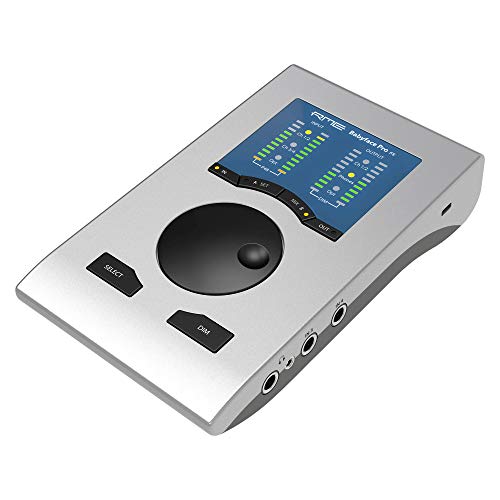
Despite lying in the mid price bracket according to the interfaces on our list, the RME Babyface Pro offers a lot for its market value. Featuring a 12×12 I/O configuration, a max recording resolution of 192 kHz/24-bit, USB 2.0 connectivity, MIDI channels, optical I/O (which can be used as ADAT or S/PDIF), the Babyface also boasts SteadyClock FS technology that reduces jitter by syncing signals up to femtoseconds.
In terms of layout, the main panel has a large LED display with 4 push buttons at the bottom; IN, SET (A), MIX (B) and OUT. Two other buttons, DIM and SELECT, are present beneath the large encoder which is used to control various functions via the buttons.
The back panel features two XLR inputs and two balanced line inputs. The sides house other I/O channels and ports i.e. the optical I/O, MIDI ports, (two) headphone outs, (two) line/instrument inputs, a USB port, a 12V power connector and a Kensington lock.
Buildwise, the all-metal body of the interface feels sturdy and stable, and has a weighted feel. The interface has a unique shape yet is very user friendly especially in terms of controls and I/O positioning.
Setting up the Babyface included plugging in the interface, downloading the drivers and installing the TotalMixFX software and we were ready to record! We then plugged in a Slate Digital Mic to record our Yamaha Pacifica; as we started playing the guitar, we couldn’t help but marvel at the cleanliness of the sound from the preamps.
Our recordings sounded crystal clear and transparent which was helpful in capturing a pure, uncolored sound. This allowed us to edit the sound easily in post production. With a dynamic range of up to 115 dB, the ADC/DAC on the interface were incredible too, capturing transparent highs yet a smooth low end.
The Babyface also had really low latency; we were able to run as many as two compressors, reverb and EQ at once (at a buffer size of 128 samples and 48 kHz) yet we didn’t run into any latency/lag issues. Also, while the unit has a USB 2.0 port, we still felt it was much faster than Thunderbolt on many interfaces. Even when we were applying live FX, we couldn’t hear any pops or cracks in our audio nor were we able to detect any delay or latency whatsoever!
Owing to its internal FS clocking technology, the interface was able to produce really clean audio; without any distortion or artifacts. As for the software, we were pretty satisfied with the mixing and recording possibilities offered by the TotalMixFX; we had options for reverb, loopback, EQ, routing etc and were able to alter our sound as we wanted.
The Babyface Pro, released in 2015, precedes the Babyface Pro FS version. Both models include significant differences i.e inclusion of the SteadyClock FS clocking technology, better ADC which reduces latency by 6 samples and improved THD on the mic inputs (an 8 dB improvement) and headphone outputs (a 10 dB improvement), in the new model. The Pro FS version also features a 19/14 dB switch that decreases output signal levels, has better power on the TRS outputs (90mW in comparison to the original 70 mW) and an improved SNR value on the mic inputs (113.7 dB).
Although it was hard to find faults with the Babyface, there are a few improvements which we would like to see. Although we have been in the audio niche for years and have used countless interfaces, we still found the TotalMixFX software to be slightly baffling and had to go through a learning curve to understand, and use it properly. We believe RME can make the software more user friendly. Also, despite being released relatively recently, the interface doesn’t feature a USB-C port which is the standard on most computers nowadays.
Overall, we were seriously impressed with the performance of the Babyface Pro FS as a compact interface capable of delivering quality recordings. In spite of the fact that the interface had a USB 2.0 port, we were able to use multiple plugins and FX at once, without any audible latency in our recordings. Therefore, if your main concern is getting an excellent sound and low latency recordings with an all rounder interface, it is unlikely you will find a better device than the Babyface!
RME Babyface Pro FS Benefits
The preamps on the unit deliver clean, uncolored recordings.
The USB 2.0 port is very fast, and doesn’t induce any latency whatsoever.
The internal clocking technology reduces jitters in the audio output.
RME Babyface Pro FS Drawbacks
The TotalMixFX software isn’t easy to understand.
The unit features a USB 2.0 connection despite USB-C being the standard nowadays.
All text and image links lead to Amazon unless stated otherwise. All product scores are based on ProRec’s in-house scoring model
The Steinberg UR44C is a 4×6 I/O USB-C interface with a sampling rate of 192 kHz and a bit-depth of 32-bit. The unit can be bus powered via the USB port but also features a 12V power supply. The interface includes an on-board DSP effects as well as Steinberg’s own software, dspMixFx.
The front panel of the unit features 4 combo inputs (2 mic/Hi Z inputs and 2 mic/instrument inputs). Each of the inputs have their own gain controllers, with LED indicators. You will also find two 48V switches here. Other than that, you will find two headphone outs with individual volume knobs, and a large volume encoder for the main outputs as well.
The back panel houses 6 outputs; 4 line outs and 2 main ¼” outs (for your monitors). Apart from that, you will find 2 line inputs, a pair of MIDI channels, a 12V power connector, the USB-C port and a power switch.
Buildwise, the unit is housed in a metal casing and, at 1500 g, it feels relatively heavy yet very strong and sturdy. Everything else on the unit also feels pretty solid i.e. the ports, jacks and the knobs.
The UR44C was extremely easy to set up; we only had to install the drivers on our PC, update the firmware and set up the interface in Cubase. Since we were ready to record by then, we DIed our Ibanez bass guitar into the UR44C while also plugging in a pair of Yamaha HS5 monitors and AKG K240 headphones.
As we started to record, we realized just how detailed and clear Steinberg’s preamps were. Although we weren’t able to crank the gain up to the maximum levels, the interface was still able to capture a good DI signal. The AD/DA conversion on the interface was great as well, recording a slightly colored yet smooth sound.
Since the unit comes with a USB 3.0 connection, we encountered no latency while recording with it. In spite of the fact that we were using multiple Yamaha DSP plugins simultaneously, there was no lag or delay which was seriously impressive for a unit of its price. Also, using the integrated Cubase DAW and creating mono, as well as stereo tracks, with the interface was pretty easy.
As for our monitors, they sounded very clean, and seriously loud, with the UR44C. The headphone amp on the interface was incredible as well; the sound from our headphones was loud yet had an amazing low end. One thing, however, that you should be mindful of is that while the headphone amp was able to drive our 55 ohm AKG K240 headphones, you may need to use an external amp for higher impedance pairs.
The UR44C was released along with the UR22C and the UR816C interfaces as part of a series. While all three interfaces have USB-C ports, MIDI connectivity and a max recording resolution of 192 kHz/24-bit, they differ in terms of price, the number of I/O channels and additional features. In comparison to the UR44C, the UR22C offers 2×2 I/O whereas the UR816C has a 16×16 channel configuration. The UR816C also has options to expand I/O digitally (via ADAT and S/PDIF), rackmount functionality and also comes with internal word clocking technology. Consequently, it is the most expensive interface in the series, while the UR22C is the cheapest.
Although our recording experience with the UR44C was mostly smooth, we faced some issues with the interface which are worth mentioning. For instance, most of the time normal gain levels were enough to drive our instrumental signals, however, cranking gain all the way up (to boost the signal) resulted in a lot of self noise in our audio which sounded very bad. Additionally, when bus powering the interface, our laptop would automatically shut down every fifteen minutes or so which was a real nuisance. We could find no solution to this and in the end, had to resort to using an external power supply.
Overall though, considering the price of the UR44C, the unit delivers great sound quality and comes with a plethora of additional features like DSP powered plugins, Cubase etc, which make it even more valuable. Combined with its incredibly low latency sound conversion, the Steinberg UR44C is the best affordable interface you will find for your monitoring and recording needs.
Steinberg UR44C Benefits
The interface comes with a free version of the Cubase DAW.
The unit features onboard DSP effects, and offers latency free monitoring.
The amps are able to drive a good volume for monitors and headphones.
Steinberg UR44C Drawbacks
Our laptop randomly shut down multiple times when we were bus powering the interface.
Cranking gain all the way up added a lot of white noise to our recordings.
Verdict

According to our scoring model, there is close competition between the interfaces in some categories i.e Price to Performance, and Additional Features, while on the other hand some show a wide variance in scores. In Price to Performance, the Babyface stands out, while the Steinberg UR44C, which is 2x cheaper comes in second with a score of 9. The Zen Tour also manages to score a 9 despite being way pricier than both interfaces.
In Additional Features, the Zen Tour and Babyface go head to head, both scoring 9.5 points, since they come with a good quantity, and quality, of extra features. The UR44C comes last here, although to be fair, it still has a decent score when taking its price into consideration.
The Zen Tour has the top scores in all categories, except Price to Performance. The incredible 8×6 I/O of the Tour, along with its input expansion options that reconfigure its I/O to as many as 32×32, place it far ahead of its competitors. The UR44C falls especially behind in this regard, scoring only 7.5 points, owing to its 6×4 I/O channels. Featuring the ultra fast TB3 technology, as well as USB-C, the Zen Tour scores a bull’s-eye in the Connectivity category. The superior sound quality of this interface, via its ultra quiet preamps and excellent ADC/DAC, yet again place it in the lead.
As for Additional Features, the Zen Tour offers ADAT and S/PDIF, an amazing collection of software i.e the included SC bundle, Antelope software, as well as internal clocking technology and touchscreen controls, which add to its overall Price to Performance score. However, its price in comparison to other interfaces, doesn’t let it claim the top spot.
The overall score of the Babyface Pro FS is only 0.4 points less than that of the leading interface. In Price to Performance, the Babyface bags the top score whereas in Additional Features and Sound Quality, it shares the stage with another unit. Featuring clean preamps and SteadyClock FS clocking technology which significantly reduces audio jitters, the Babyface gives the significantly expensive Zen Tour a tough competition for Sound Quality. The unit comes with the TotalMixFX software, MIDI connectivity as well as optical I/O, which place it in the ranks of the Zen Tour. However, in terms of Connectivity, it falls last due to its USB 2.0 port, behind the UR44C which has a USB-C port.
However, of all three interfaces, the Antelope Zen Tour Synergy Core comes out on top with the highest overall score (9.6) outperforming the UR44C and the Babyface in almost all categories. Featuring the most flexible I/O configuration of all interfaces, and the extensive Synergy Core plugin bundle, the unit also offers incredible sound quality. Offering dual connectivity via TB3 and USB-C, the Zen Tour gives you an ultra low latency monitoring experience. Overall, this makes the Zen Tour an excellent interface; one you cannot go wrong with!
![Best Rackmount Audio Interface [2023 Reviewed]](https://ProRec.com/wp-content/uploads/2022/07/rackmount-audio-interface-180x180.png "Best Rackmount Audio Interface [2023 Reviewed]")
![Best Audio Interface for AT2020 [2023 Reviewed]](https://ProRec.com/wp-content/uploads/2022/05/at2020-180x180.jpg "Best Audio Interface for AT2020 [2023 Reviewed]")
![Best 4 Input Audio Interface [2023 Reviewed]](https://ProRec.com/wp-content/uploads/2022/06/4-input-audio-interface-180x180.png "Best 4 Input Audio Interface [2023 Reviewed]")
![Best Audio Interface for DJing [2024 Reviewed]](https://ProRec.com/wp-content/uploads/2022/07/DJ-Laptop-180x180.jpg "Best Audio Interface for DJing [2024 Reviewed]")