As an Amazon Associate ProRec.com earns from qualifying purchases. Any links that take you to products are affiliate links, and we may earn a commission if you make a purchase. We appreciate your support.
All text and image links lead to Amazon unless stated otherwise. All product scores are based on ProRec’s in-house scoring model
| Thumbnail | Beginner Friendly Audio Interfaces | ProRec Score | Price |
|---|---|---|---|
 | 8.9 | Check Price on Amazon | |
 | 7.6 | Check Price on Amazon | |
 | 7.1 | Check Price on Amazon |
Introduction
When choosing an audio interface as a beginner, there are a few things you want to take into account. Before we get into those, you should first know that Audio Interfaces work with any DAW program, you do not have to worry about what software you’re using at all.
Secondly, the only physical limitations you have are in terms of connectivity and I/O. Interfaces generally have USB and Thunderbolt ports, some also have FireWire. Make sure to choose an interface that connects with your hardware. If you move around a lot then get a portable interface with a USB port simply because it is a more readily available option everywhere. You don’t always get better latency with more advanced ports, but if a unit is built well then pretty much any configuration will be latency free.
Before you actually start looking at interfaces, it is crucial for you to decide how many channels (input and output configuration) you need. This is simply a matter of how many instruments/mics you want to plug in at the same time while you record, all of these will be your input channels. If you’re recording drums or a live band then you want something with at least 8 channels. The next thing is output channels which tie into your monitoring requirements for which you will need studio monitors or headphones. A two channel interface will fulfill your need for both headphones and a pair of monitors.
If you’re planning on connecting mics, specifically condenser mics such as the AT2020, then you want to be sure that at least one of the ports on your interface feature Phantom Power. You should always turn the feature off when plugging/unplugging your mic. Most modern interfaces have this option available but always look at the specs to be sure.
The features discussed up until now were the main things to look out for. Moving on, anything else will be more of a luxury addition to your interface which is going to drive the price up. The more advanced features include onboard DSPs, ADAT/SPDIF (expanding your I/O via another device), 32 bit audio, plugins and so on. If you’re just starting out, you can simply ignore these features, and if you’re just a hobbyist then you’re probably never going to need them in the future either.
What you do not want to ignore though is the build quality. Get an interface that is built well and is manufactured by a company that has a good history with audio interfaces. Most of these interfaces are either going to be plug and play, or they are going to come with drivers. Driver installation is usually pretty simple but it is a very important feature that has a high impact on the output and latency.
Don’t worry too much about all the additional features. When you’re starting out, it’s okay to go with a basic low to mid range budget interface that is user friendly. Once you spend time with your interface and as you learn more, you’ll know exactly what you want in a more advanced interface. This is why we don’t recommend buying something extraordinary upfront. Just get something simple and start your journey, you can always upgrade in the future when you are better informed and have more experience.
Best Audio Interfaces for Beginners Reviews
All text and image links lead to Amazon unless stated otherwise. All product scores are based on ProRec’s in-house scoring model
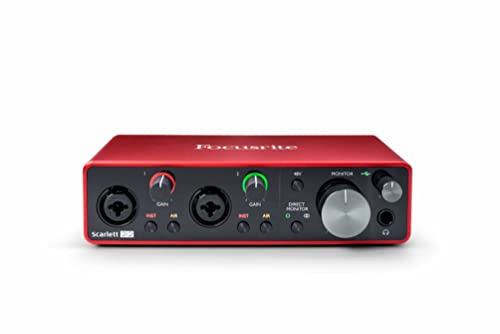
The Focusrite Scarlett 2i2 3rd gen is a powerful USB audio interface that features 2 inputs and 2 outputs. It is one of the most popular interfaces in the market partly because of how inexpensive and beginner friendly it is. Its rather compact, simplistic, and elegant design is also one of its primary selling points.
The 2i2 has all the main features you would expect from an audio interface. On its front panel, you’ll find 2 XLR/TRS combo inputs each with its separate set of controls including: a gain knob, an AIR button, and an INST toggle (used for high impedance inputs). You can also activate phantom power for both your inputs simultaneously through their common 48V toggle.
The unit also features a direct monitoring button which sits next to the large monitor control knob. This button allows you to choose your audio input source (either your PC’s audio stream or your connected inputs). You’ll also find a ¼’’ headphone jack that has its own volume encoder on the same panel. These are basically all the controls/inputs on the 2i2 after mentioning the 2 line outputs and the USB-C port on the unit’s back panel.
The 2i2 features a maximum sampling rate of 192kHz and a 24 bit depth. The sound quality is really good! we found the preamps on this thing to be arguably one of the best in its price range. They are very clear with a fair amount of headroom and rarely cause any sort of clipping/distortion. This is really impressive considering the price, the output is great as well, the unit is equipped with awesome A/D and D/A converters that can retain a lot of details. In terms of sound quality, this is a bang for the buck type of unit, Focusrite is really well known for that, rightfully so!
As part of our tests, we wanted to try out several instruments/synths with the 2i2 to see how well it can handle them. For starters, we hooked up an SM57 mic into its XLR input and started gradually increasing the gain. We were already getting granular and noise-free output with low gain levels but wanted to limit-test the 2i2. We did eventually run into some clipping albeit at very high gain levels. Even then, the halo around the gain knob was a great indicator for that. Meanwhile, we were using the AKG-k702 for monitoring and only kept its volume at 50% which was more than enough for us to hear clearly. Also, the AIR feature is one the best we’ve ever seen on a budget interface. It adds a unique effect to our high-end frequencies and works exceptionally well with our guitars and on vocals.
Compared to its 2nd generation predecessor, the 3rd gen 2i2 underwent great improvements. Overall, the 3rd gen model has slightly better specifications. For example, the 2nd gen features a 106 dB dynamic range on its mic inputs while the 3rd gen features a 111 dB dynamic range. The newer model also has much better THD+N sitting at >0.0012% compared to the 2nd gens 0.002%. Most importantly, you’ll find that the 2nd gen models don’t feature the renowned AIR circuitry which is included in the 3rd gen model. The Latency was also decreased on the 3rd gen model partly because it is a USB-C interface as opposed to the USB-B 2nd gen model. Even then, Focusrite has managed to release the 3rd gen at the same price of the 2nd gen which is truly remarkable.
However, the unit isn’t without its drawbacks. For example, when we hooked up the 2i2 3rd to a Linux computer, we expected it to work right out of the box just like its 2nd gen predecessor. Instead, we had to fiddle a lot to get it to work and eventually had to install extra drivers. This may not be an issue for most people but we wanted to highlight the point anyway.
When we moved on to the Windows, the unit was pretty much plug and play, however we noticed some crackling sounds. This issue is frequently reported by 2i2 users and there still doesn’t seem to be a universal solution. In time the sounds went away, however, we still had issues when we increased the sample rate beyond 48kHz. Additionally, the 2i2’s metallic red design looks great but it is a magnet for fingerprint marks and scratches. We had a ton of those in a couple weeks while using the interface. Again, this may not be a huge concern for most people, certainly wasn’t for us, but if you’re one for aesthetics then you should probably handle it with care, you may even get gloves haha.
Overall, the 2i2 3rd gen is undoubtedly a perfect choice for beginners. It is cheap, easy to use, and has all the main features. It is also rightfully one of the most popular interfaces in the market. We really recommend the 2i2 3rd gen if you’re just starting out. You will love this thing!
Focusrite 2i2 Benefits
It is very compact and very durable. It’s built to last.
It features a maximum sample rate of 192kHZ which is quite remarkable for such an inexpensive interface.
The 2i2 has one of the best preamps in this price range.
It contains Focusrite’s renowned AIR circuitry which is great for adding subtle pleasant effects.
You won’t have any hard time using the 2i2, because it is extremely beginner friendly.
Focusrite 2i2 Drawbacks
You might have to install extra drivers specifically if you’re on Linux.
The 2i2 sometimes produces cracking noise if you’re using Windows especially at higher sample rates.
It is extremely prone to scratches and fingerprints.
All text and image links lead to Amazon unless stated otherwise. All product scores are based on ProRec’s in-house scoring model
The Steinberg UR-RT2 is a powerful USB 2.0 audio interface that features a 192kHz sample rate and a 24 bit depth. It has 4 inputs and 2 outputs along with MIDI I/O. You can also use it with most devices including iPads and Linux systems. Most importantly, It is one of the most beginner friendly user interfaces in the market.
In terms of I/O and features, the RT2 has all of the basic configurations you need. On its front panel, you’ll find 2 TRS/XLR combo input jacks that each have its own corresponding gain knob. They also have 2 separate Peak LEDs that indicate clipping and a common 48V LED indicator. Plus, you can use the HI-Z button for input 1 if you want to connect high-impedance inputs. This same panel features Rupert Neve’s design transformers toggles. Other than that, you’ll find an output volume controller and a ¼’’ headphone output which has its own volume knob.
The back panel of the UR-RT2 contains your 2 line outputs, 2 line inputs, and MIDI I/O. It also has the USB-B port, a 12V power socket, a power switch, and your phantom power (48V) switch. Besides the main controls/buttons, Steinberg has managed to embed great converters and preamps into the RT2. It contains 2 very powerful D-PRE preamps that provide you with great audio and a lot of headroom.
In terms of design, the Steinberg UR-RT2 is extremely well built. It is completely enclosed in metal and is relatively compact. We also really like how the buttons/knobs feel on the RT2. They are smooth and very well placed so you won’t have any trouble reaching them. The unit is also very user-friendly. We reckon that anyone with even a speck of knowledge in audio can figure out how to operate and use this thing.
We tested the UR-RT2 with a few different devices and with regards to sound quality, it produces nothing less than great audio. For one, it is class compliant which means that we were able to use it with an iPad and didn’t have to install any extra drivers when we shifted to Mac/Windows devices. The Rupert Neve designs transformers are also one hell of an addition! They made the audio sound much more full bodied and added a great deal of warmth. Even without this option toggled, the preamps sounded extremely pristine and clear. Additionally, we really appreciate the almost zero latency on this thing. We were also able to monitor in real-time because of the unit’s powerful built-in DSP.
The UR-RT2 did perform slightly better compared to the UR242(its precursor). Now most of these improvements had very subtle effects on audio quality e.g slight improvement in dynamic range, THD, and I/O impedance. Also, both units basically have the same number of I/O, controls, and a very similar design. However, the RT2 does contain an extra component which is Rupert Neve’s Design Transformers. Essentially, the RN transformer is the main difference between both units. It also explains why the RT2 costs almost twice as much as the UR242.
Similarly, the RT2 does have its fair share of downsides. For instance, the RT2 isn’t bus powered, instead you’ll have to plug it in a 12V power supply (Which is a lot of power). However, we certainly expected this given that the Rupert Neve transformers will require a lot more power than can be supplied through USB. Additionally, while you won’t notice any latency on the RT2, the USB 2.0 is a bit regressive considering that USB-C and TB technology are readily available on the market. Also, even though the Neve transformers are a great addition, we really think that they don’t justify the extra cost. You can definitely find interfaces that offer more I/O sand features for the same price, so that is kind of a bummer!
Overall, the Steinberg UR-RT2 can definitely be a great choice if you’re just starting out. As a beginner, you want something that is simple to use, has all the basic features, and produces great audio. Befittingly, the UR-RT2 checks out in each one of these aspects. It is also extremely durable and solid. To sum it all up, we really recommend the UR-RT2 if you want a powerful yet simple interface to get you cracking.
Steinberg UR-RT2 Benefits
The UR-RT2 is one the most simple to use interfaces in the market.
You can use the UR-RT2 with iPad devices and they’re class-compliant with all computer systems.
The unit contains Rupert Neve transformers which can add an exceptionally pleasant effect to your recordings
The UR-RT2 has a built-in DSP which provides you with a zero-latency experience when monitoring.
It has amazing build quality. It’s fully enclosed in metal and it’s built to last.
Steinberg UR-RT2 Drawbacks
You can’t power the UR-RT2 solely through USB. Instead, you’ll have to connect it to a 12V power source.
The UR-RT2 features the more regressive USB 2.0 technology.
While the Rupert Neve transformers are great, we don’t think they justify the extra cost.
All text and image links lead to Amazon unless stated otherwise. All product scores are based on ProRec’s in-house scoring model
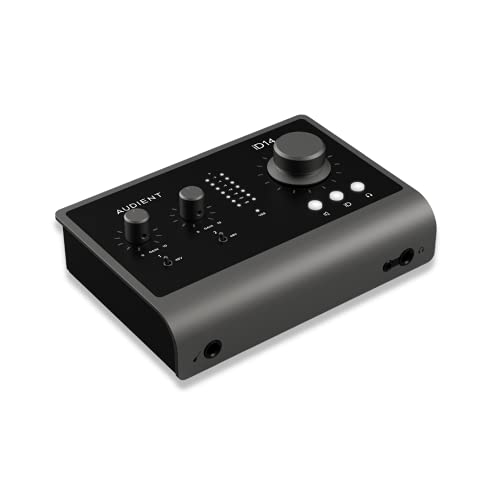
The iD14 MKII is a powerful USB-C audio interface that features a maximum sample rate of 96 kHz and a 24 bit-depth. It is part of the Audient’s user-friendly iD series. The iD14 features 10 inputs and 4 outputs including the SPDIF inputs. All of its controls are placed on its main panel which is very easy to navigate.
On the rear panel, you’ll find 2 XLR/TRS combo inputs, 4 line outputs, and an optical input socket which allows you to connect up to 8 extra mic inputs. The same panel features your USB-C port which is also your unit’s sole power supply. On the front panel, you’ll find a dedicated JFET instrument input and 2 headphone jacks (a ¼’’ jack and a ⅛’’ jack).
The main panel of the iD14 is where the real action happens. This panel features 2 gain knobs for your 2 separate mic inputs. Each of those knobs also has its own 48V (Phantom power) switch. The main element of this panel is the large iD knob which sits above 3 function buttons. This knob is in part a monitor control. So, you can use it to control both your headphone and output levels depending on which button is toggled. However, you can also use this controller as a virtual scroll wheel by engaging the iD button. This means that you can integrate your iD controller in your DAW for a pleasant hands-on experience. You’ll also find a 9-level LED meter on the same panel which is extremely helpful for detecting clipping.
For its price tag, the iD14 MKII is packed with extremely powerful components. For instance, the unit’s DAC (digital-to-analog converter) and ADC (analog-to-digital converter) provide you with a whopping 126dB and 121dB of dynamic range respectively! Additionally, the iD14 contains 2 of Audient’s Class A preamps. These are the same preamps used in high-end Audient products like the ASP8024-HE! You also get 50 dB of gain to play with on your JFET D.I with an extra 10dB through software.
As far as sound quality goes, the iD14 has hands-down the best audio output when compared to interfaces of a similar scope. It sounds really good considering how inexpensive it is. The audient preamps have always been sort of these workhorse units, whatever they do to build them, they do it just right. The pres sound a lot fuller and are extremely clear when compared to focusrite, which is a big statement since the scarletts are known to have the best preamps in their price range. The pres on this thing though are a lot more detailed, and you’ll love them if you choose to go with this interface. The iD14 also has an incredibly low round-trip latency.
We also found the iD encoder to be incredibly useful with multipurpose functions such as activating talkback and controlling output level, we mostly used it for its scroll wheel functionality. The feature is exclusive to Audient products, most interfaces could benefit from a knob that integrates with your DAW because of how great it is.
Compared to its MKI predecessor, the MKII had fairly small sound improvements. These were mostly in the form of small increases in dynamic range, THD+N, and SNR. Otherwise, there aren’t really a lot of major differences between both units since both of them feature the same number of Inputs and outputs. The MKII does however contain an extra headphone jack. It also features a more progressive USB-C connection compared to the MKI’s USB-B port. Additionally, while the MKI can be bus-powered, it won’t operate solely on it if phantom power is active. On the other hand, the MKII is exclusively powered through USB.
All this craze doesn’t mean that the iD14 doesn’t have any downsides. The unit does have some minor drawbacks. While we didn’t have any issues with setup, people have reported having trouble getting the device to work. We advise you to update the firmware right away, we did that and it was probably the reason why we didn’t have any trouble. The audio settings also got reset whenever we plugged or unplugged the unit, our volume level would either be set to 0 or to a screeching loud volume. We really would’ve preferred if the unit had an ON/OFF button. Receiving 48V solely through USB can be great, but this also means that the iD14 will eventually overheat. That’s why having an ON/OFF toggle would have been a better alternative to constantly plugging/unplugging the unit.
Overall, we believe that the iD14 is one the most powerful budget/user friendly interfaces in the market. It has a lot of I/O, amazing sound quality, and plenty of extra features all combined into a compact and well-designed user-friendly unit. We highly advise you to go for the iD14 if you want a powerful unit that’ll put you on your feet.
Audient iD14 MKII Benefits
The iD14 offers the best sound quality for its price range.
It has an extremely low latency.
You can use the iD knob for various purposes like a virtual scroll-wheel within your DAW.
It features a dedicated JFET instrument input which sounds great.
The iD14 features loopback connectivity which is perfect for streaming purposes.
Audient iD14 MKII Drawbacks
The iD14 doesn’t feature an ON/OFF button.
You might have to update your unit’s firmware before you use it.
The unit resets your audio settings whenever it loses power. You might also get random loud noises.
Verdict
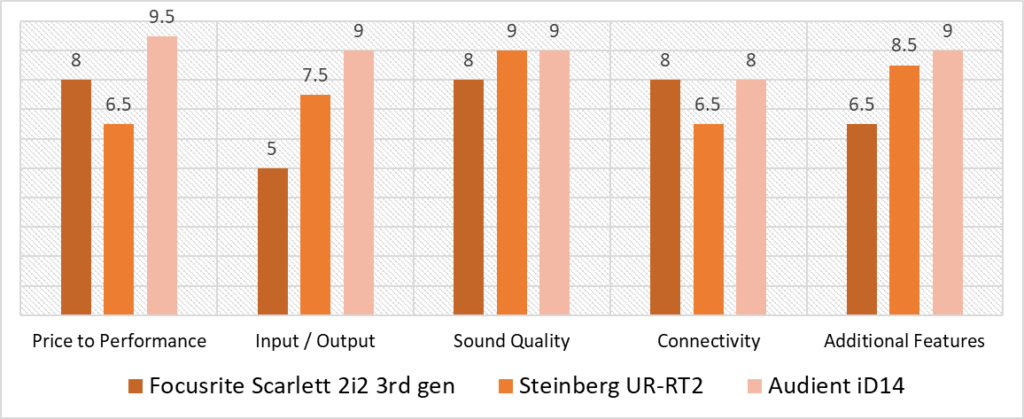
Based on the scoring model, there is a huge amount of variance (1.8) between the highest and lowest scoring products. If you analyze the charts further, you’ll see an even higher amount of variance within the individual categories. While all 3 units have relatively similar scores in the connectivity and sound quality categories, you’ll find a huge disparity in their scores within the Price to performance, input/output, and additional features categories.
Of the 3 units, the Audient iD14 has the highest scores (or tied for the highest) in all 5 categories. You’ll find that the iD14 vastly outclasses the UR-RT2 and the 2i2 in terms of Inputs and outputs. It also beats them in price efficiency by a huge margin as well! With regards to sound quality, you can see that the UR-RT2 scores the same as the iD14 with the 2i2 remaining in close proximity. Even then, all the scores rule in favor of the iD14.
However, we truly believe that the UR-RT2 can be a solid runner-up for the iD14. If you put both units’ price difference and number of I/O aside, the UR-RT2 will be on par with the iD14. As you can see, both units score fairly similar in sound quality, connectivity, and additional features category. Additionally, the UR-RT2 features RN transformers unlike the iD14. You should know that these extremely powerful RN transformers are essentially UR-RT2’s main selling point.
Out of all three, the iD14 is the best audio interface for beginners with the highest average score of 8.9. The unit outperforms both the UR-RT2 and the 2i2. With its huge number of I/Os, great sound quality, and amazing price efficiency, Audient has set a new standard on how all-inclusive an audio interface can be. The iD14 is frankly the best sounding interface in its price range. It gives you access to amazing features including ScrollWheel control and talkback connectivity which are all packed into a well-designed and extremely easy to use unit. We really can’t find any major issues with the iD14. Its incredibly well-rounded and offers a lot more than what you would expect from a budget interface. We recommend the iD14 as a solid purchase, especially if you’re just starting out. You won’t regret this purchase!
Frequently Asked Questions
What sort of I/O Configuration is good for an Audio Interface for Beginners?
A two input/output audio interface is ideal for starting out. You’ll be able to record pretty much anything even with a single channel but dual input/outputs are going to give you more control if you want to plug in a mic and an instrument at the same time, plus you’ll have better monitoring options since most people use a pair of studio monitors. If you’re just using a headphone then a solo output will be fine as well, but we don’t recommend going that route.
What sort of connectivity would you recommend for a Beginner Audio Interface?
A USB-C connection is the best way to go. If you have a mac with a Thunderbolt port then that is also a viable option. However, a USB device is more versatile in the sense that you can move around and go to different places without carrying your laptop with you always. USB is available everywhere and there is not really a much higher benefit with a TB port in terms of latency in our experience.
What are other considerations when purchasing an Audio Interface for Beginners?
Always look out for something user friendly, and make sure that the installation process isn’t a drag. You also want a unit that is either plug and play or the company has good drivers that don’t give you issues down the road. Phantom power is also something you should consider since it is a requirement for connecting any condenser mics.
Finally, you should hold yourself back from spending too much the first time around. Get to know your interface and learn more about them. Play around and in time you will know what features you desire. You can then me more specific when you choose to upgrade.
Will my Audio Interface be compatible with my other Audio gear/software?
Software isn’t really a concern, all interfaces work with all DAW programs. In terms of hardware you only need to worry about the connectivity, which is why we recommend getting a USB interface.
How do I set up an Audio Interface?
You can follow the instruction manual that comes with your interface. The setup should be fairly painless and straightforward. If you have trouble, it is a good idea to look up a video on YouTube.
In addition to an Audio Interface, what else would I need to setup a beginner Studio?
A small setup would entail studio monitors, a mic, and a laptop. You can also go for a mixer and then tread your room, but those are more advanced things that you should hold out on and only go for those once you have a better understanding.
![Best Audio Interface for Podcasting [2023 Reviewed]](https://ProRec.com/wp-content/uploads/2023/02/podcasting-180x180.png "Best Audio Interface for Podcasting [2023 Reviewed]")
![Best Audio Interface Under $1000 [2024 Compared]](https://ProRec.com/wp-content/uploads/2023/01/1000-USD-180x180.png "Best Audio Interface Under $1000 [2024 Compared]")
![Top Audio Interfaces with ADAT [2023 Reviewed]](https://ProRec.com/wp-content/uploads/2022/09/ADAT-180x180.png "Top Audio Interfaces with ADAT [2023 Reviewed]")
![Best High End (Most Expensive) Audio Interface [2024 Reviewed]](https://ProRec.com/wp-content/uploads/2023/08/audio-interface-1-180x180.jpg "Best High End (Most Expensive) Audio Interface [2024 Reviewed]")