Audacity is a free open-source software for audio editing as well as recording. It is easy to use compared to other audio editing software. These merits make it ideal for users who are just getting started with recording and editing. In terms of features, it might be limited in comparison to competitors such as Adobe Audition, but it largely tries to address most of the pertinent issues that podcasters, audio editors, or other users have.
One concern for most podcasters and audio engineers is background noise. It is standard to any environment that you are recording in. The only time you might sit back and relax, and note the usage of might, is when you’re working in an acoustically treated environent. While recording in treated spaces does not guarantee a clean recording, the output in most cases is always superior.
A whirling fan or a buzzing hard drive are examples of background noise that is easily picked up via sensitive mics. In this article we will look at reducing and minimizing such noises in an already recorded file.
Removing Background Noise In Audacity
Launch Audacity then open your file using keyboard shortcut keys Ctrl + Shift + I. Here is a zoomed-in image of my waveform with two highlighted areas.
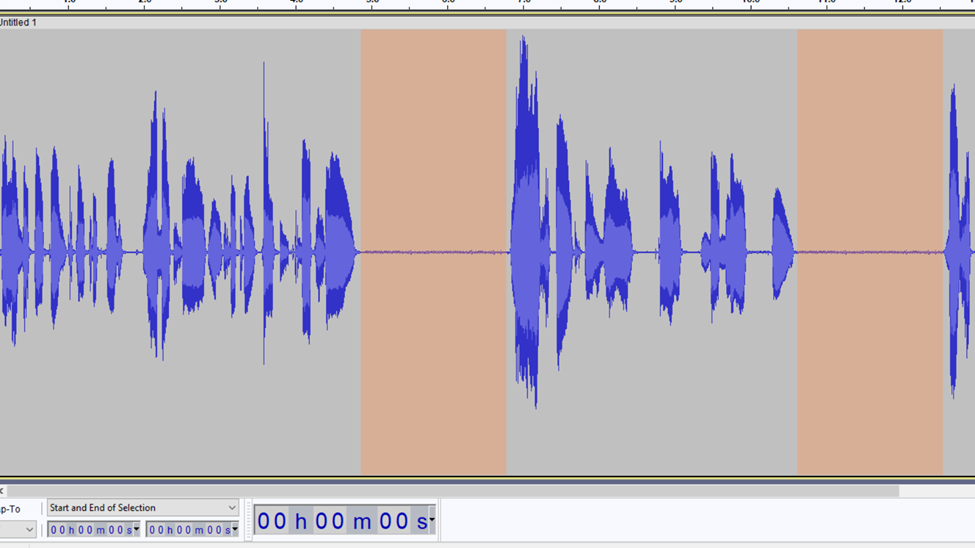
Listening to my audio the noise is present all through my entire audio file. If you look closely, there are little bristles along the gaps in between the speech parts.

This is the background noise that we need to remove. Listen back to different sections of your file to confirm its presence.
Next, select any of the areas with a pause. Make sure to make a sizeable selection. This is because the noise reduction process in Audacity requires an analysis of a small section so that the proposed changes are applied to the whole file. Therefore a sizeable selection will give a better analysis.
Select by clicking and dragging. From my file, I selected the second gap as shown in the image below. Next, click on the Effect option in the menu bar. After you click on effects a dropdown list will open with several options. Click on the Noise Reduction option.
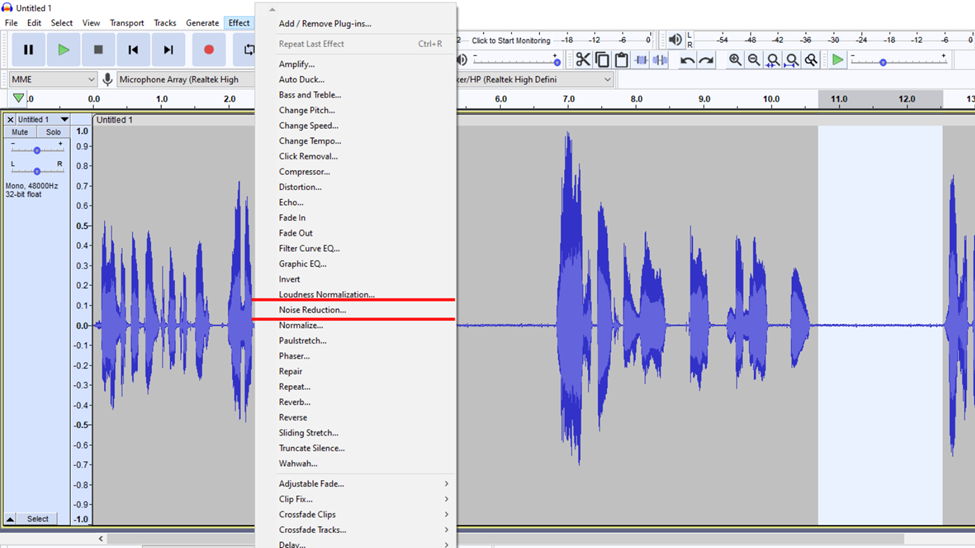
If you click on this option a new dialogue box will open, a Noise Reduction dialogue box.
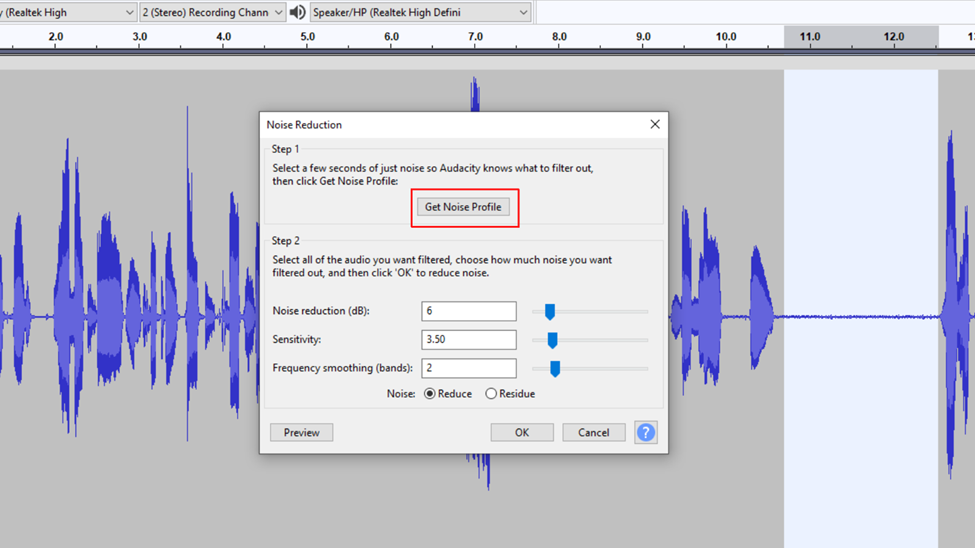
Click on the Get Noise Profile button. Once you click on Get Noise Profile the dialogue box closes. What happens in this instant is that audacity has analyzed the noise present in the section that you made
Next, double click on the file or you can alternatively use keyboard shortcuts Ctrl + A to select all of the audio file so that the changes can be applied to the entire file. Remember you might be working with an audio file that does not necessarily require these changes to be applied in the entire file hence select appropriately.
Once the file is selected click on the Effect option in the menu bar once again followed by the Noise Reduction option.
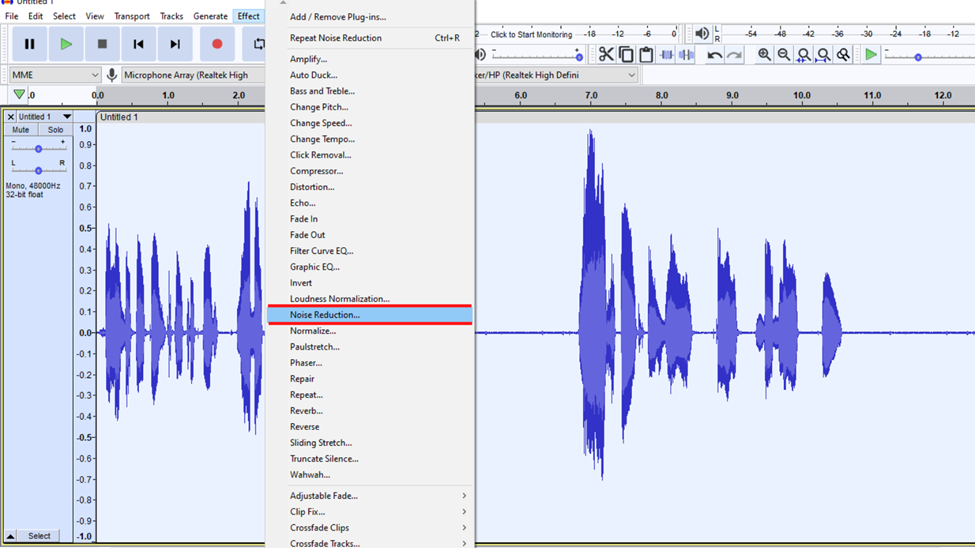
It will once again open the Noise Reduction dialogue box.
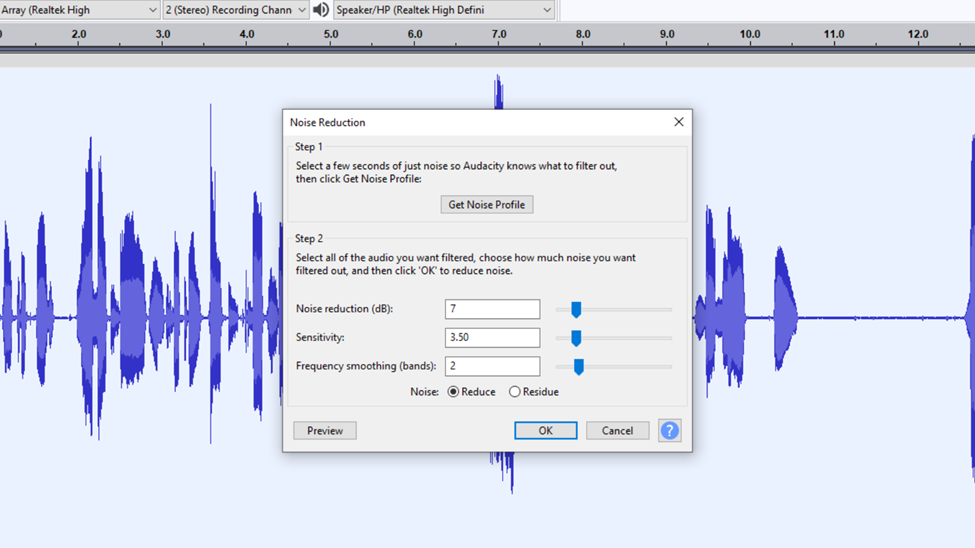
If you look keenly at this dialogue box you will notice that it has been segmented into two sections. There is a Step 1 and Step 2. When you clicked on Get Noise Profile that was Step 1 which is also clearly described in the dialogue box. Now we are in Step 2 which involves adjusting how much noise needs to be removed.
To filter this noise you will need to adjust these three sliders.
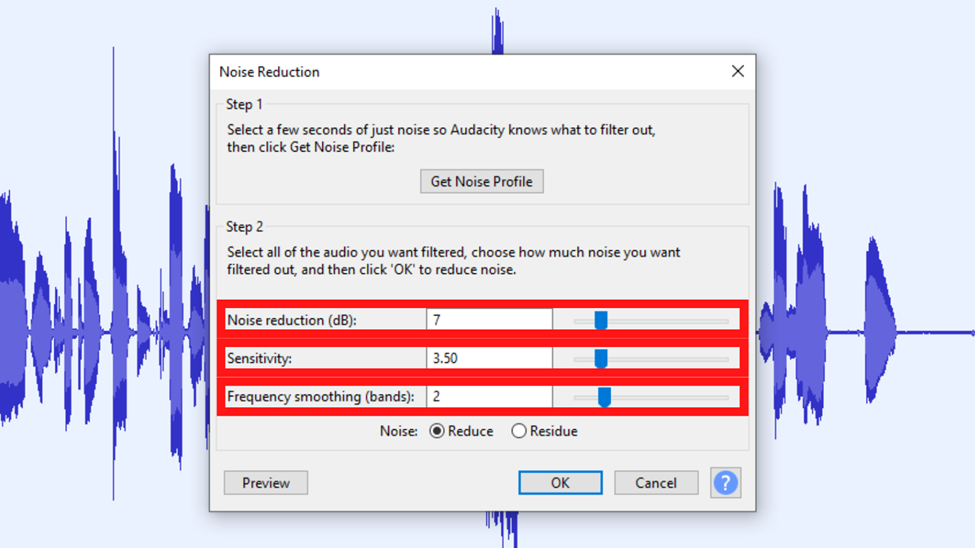
The first one, Noise reduction gets to reduce the noise as you drag the slider towards the right. It reduces how loud your noise is. It is important as you are dragging the slider that you click the preview to listen back to how these new changes are being applied. The further right you drag the slider the cleaner your recording will sound. And most importantly, the more it will start affecting how some parts of your recording sound.
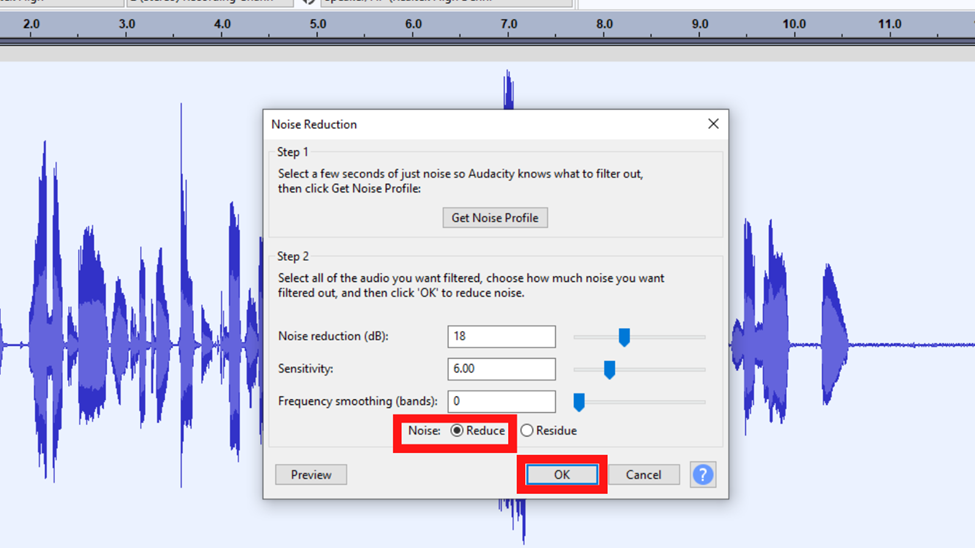
For my file, the background hiss was a bit aggressive so I pushed the Noise Reduction slider to 18. This was my ideal point where the voice of my voice-over artist was not affected.
The Sensitivity controls how much of the audio will be considered noise. As you drag this slider to the right you will get more noise removed as well but this will affect some parts of your audio. Also, you should not drag it further left. For my recording, I set it at 6.
Lastly, the Frequency Smoothing (Bands) option changes the signal that you want to have at the end of the noise reduction process. I recommend having a low figure or even off.
Below these three options with sliders, there are the Noise Reduce and Noise Residue options.
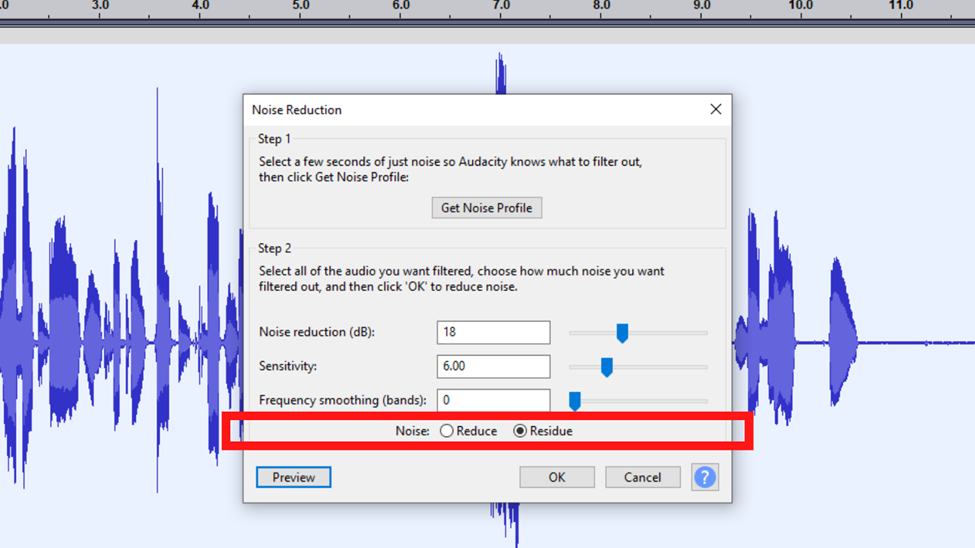
With the selection being on the Noise Reduce option when playing back using the preview button we get to hear a recording with the noise filtered out. This gives you a chance to listen to how your final audio will sound. When the selection is on the Residue option and you preview the file you will get to hear how much noise is being filtered out. During this play-back moment listen in to hear if parts of the person’s voice are being affected by the filter settings. If you are hearing parts of the speech when this selection is on you have not set the sliders at the perfect positions hence you need to readjust them.
Remember to leave it under the Reduce option before finally applying the changes. Once you have previewed and the audio sounds good click on the OK button to apply these changes.
You will now have a file free of background noise.
Here is a quick breakdown of a scenario that you might find yourself concerning background noise. You might have been recording for 30 min and there was a constant hiss throughout the recording. Once you have gone through the noise reduction process you will be able to remove that hissing noise. But what if a laptop started buzzing from the 8th minute until the 15th minute?
In your first attempt at removing the noise, you got a profile of a hissing room noise sound but not a buzzing laptop sound. Chances are that you will have succeeded in removing the former referenced sound yet failed to remove the buzzing laptop noise. Therefore you must repeat this process for this section. (8th minute to 15th minute).
A quick overview of this process would be: make a selection in between this period (8th minute to 15th minute) where we are having this laptop buzzing noise. Next, get the noise profile, select from the 8th minute to the 15th minute, open the noise reduction dialogue box again, readjust the sliders then lastly apply these changes to remove the noise in this specific area.
Other times you might have two sources of noise that end up being removed by one noise removal process hence no need of removing them separately.
Note: Before you start editing out the background noise always play the whole file to find out what types of noise exist. This will help in identifying if you are dealing with one recurrent or a mix of multiple types of noise.
Pre Recording Damage Control – Minimizing Background Noise from the Get go
This part is important to those handling the audio from start to finish. This means that you are in charge of recording and editing, or either of the two stages. It is also important for those starting as editors who will soon be in charge of the recording session.
Why would you want to solve this issue at the recording stage? Well think of it as damage control. You should always aim for a recording that does not require much added effects later on. Effects alter how the recording is supposed to sound naturally. When a file is treated for noise reduction, the audio tends to sound more like an “underwater” recording. It is always beneficial to solve a problem earlier on.
When you first launch Audacity, do a trial or two. Trial recordings are meant to listen to how much noise there is in the background so you can assess the environment around you. Is there heavy traffic, are you in an urban setup, or what equipment is present in the studio? Always check for what will cause noise within the room that you are recording in, as well as what will come from outside. The recording will help capture the low-frequency sound signal usually described as white noise.
Step one is always checking your surroundings. By doing this have a quick look at the items and activities in the room and audible elements a bit far away from your room.
Most of the time when we are trying to remove background noise it is usually a trial at removing white noise. White noise is characterized as the “shh” background noise that you get in your recording. If you do end up recording louder noise the speech parts of your recording will be affected when applying the filtering effects. Therefore you need less or no noise in your file.
What we are looking at in this case is the gain level. On your mixer always set the gain at an optimum level. An optimum level means that the level of the audio source being recorded is audible and concurrently the room noise level is at the lowest level. This also applies to some USB mics that come with a gain knob to amplify the sound being recorded. If adjusted higher you will increase the room noise level. Also, pay attention to the fader level on your mixer.
Lastly, have an organized setup. Sometimes the buzz, hisses, and noise are a result of your equipment being placed over each other. Multiple cables running on top of each other or loosely plugged cables are always a source of noise, so make sure to look at such instances and do some pre recording damage control.
Conclusion
Generally, I find the process of removing background noises in Audacity satisfactory. Some changes can be made to the background noise removal process. Largely, the process works great as it is but some changes can be made to the process. As for this problem, you must be equipped with the knowledge of tackling it at the prerecording stage and during the post-production stage.


