The beauty of Ableton Live, and what sets this software apart from other Digital Audio Workstations such as Logic Pro and Pro Tools, is that Ableton is designed for speed and ease of use for producers. Ableton is not only a DAW, in the hands of a creative and skilled user, it can transform into an instrument for live performance.
The speed and ease-of-use of Ableton is clear when it comes to sampling audio. Ableton comes with two primary sample editors namely, Simpler, and Simpler’s bigger brother Sampler. Ableton also allows users to integrate external sample editors such as RX 8 by Izotope or Adobe Audition, depending on the user’s preference. I this piece, I shall demonstrate how to edit samples on Ableton.
Sampling audio was originally pioneered by Hip-Hop DJs in the 1980’s and 90’s. this was done by identifying breakbeats in funk songs, and loop these breakbeats over and over to which crowds in parties would dance to. These days, sampling has gotten more sophisticated with the use of digital sample editors and sound design tools, to a point where a producer cannot only sample song sections from previous records, but also specific drums and percussions sounds, as well harmonic and melodic lines, and run the samples through any of these tools to create new, interesting and creative sounds for their music.
Recommended Read: How to Sample and Resample in Ableton Live
Simpler
Simpler is the primary sample editor in Ableton. Producers are able to edit one sample at a time with this tool. It is found in the instrument folder in Ableton’s browser. The user can open Simpler by simply dragging and dropping it in to a MIDI track or double-clicking Simpler.
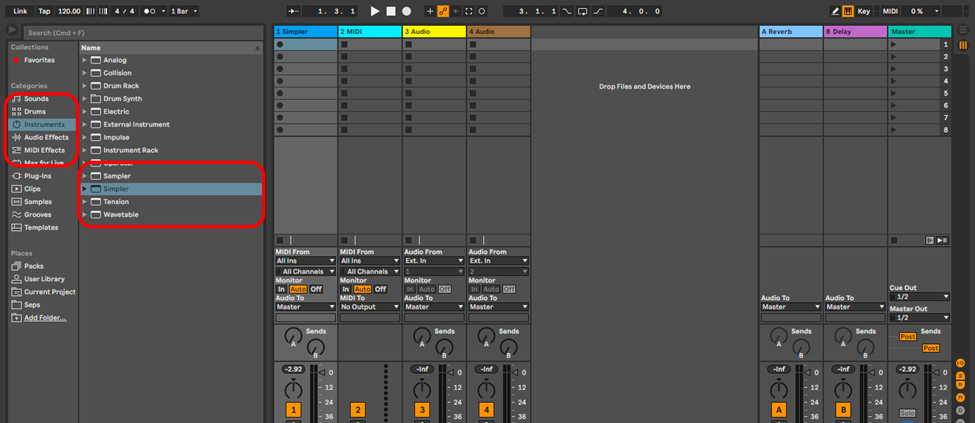
You can also open simpler by creating a MIDI track and then double-clicking the sample to open Simpler. If you open Simpler through the first method, there will be no sample loaded and you have to drag and drop the sample manually. By default, below is how Simpler looks.

Different Views in Simpler
You will notice that there are 3 views in simple: Classic, 1-shot and Slice. Each view allows you different functions. I will first start with the functions specific to each view, and move on to the universal functions.
Recommended Read: How to Retrieve & Activate Offline Samples in Ableton
Classic View
When you open Simpler, it will open on the Classic view. This view is for simple and fast sample editing. In this view, how long the sample plays is controlled by how long you hold down a note. Classic view allows you to loop the sample once the sample plays from beginning to end by clicking on the loop function.

Shot View
This view is even simpler, as its main function is the trigger or gate option. The trigger function allows you to trigger the sample to play by one click on any note, while the gate function allows you to dictate how long the sample plays by holding down any note and releasing the note to stop the sample.

Slice View
The final view on Simpler is the Slice view. This view chops the sample in to different sections depending of the user’s preference. It slices the sample by either transients, beats (bars), regions, or the user can manually slice the sample. These slices are mapped on the keyboard and are playable by notation.

You can choose to allow Simpler to either play one slice at a time, multiple slices at the same time to create chords, or play the sample through to the end from the which slice you play from via the playback function

Universal View Functions
For each view, there are functions that are found no matter the view. these are:
- Gain – which controls the volume of the sample
- LFO – the low frequency oscillator
- Fade in and out for both 1-shot and slice view
- Simpler’s global volume control knob

Warping in Simpler
Warping the terminology used for time stretching in Ableton. This algorithm allows you to stretch audio so that it matches the tempo of the project even when the audio is played at different pitches.
Ableton has different algorithms of which the user can warp samples depending of the nature of the sample and the intended purpose and desire of the user. These are the functions, and what they are designed to do:

- Beats: this is designed for rhythmic audio I. E. Drums and percussions
- Tones: this function is best for monophonic (melodic) audio with a clear pitch I. E. Vocals
- Texture: this function is best for harmonic samples I. E. chords
- Re-Pitch: this function re-pitches the sample by analyzing the difference between the tempo of the project, and the tempo of the sample
- Complex & Complex Pro: this function is best for samples that have various elements in them for example full songs or song sections.
Recommended Read: Best Free Sample Packs for Ableton Live
Sampler
Sampler is a much more sophisticated sample editor in Ableton. Just like Simper, Sampler can be found in the instruments folder in Ableton’s browser complete with stock templates, and presets.

Sampler’s user interface is much more advanced and this is evident from the moment you open it. You will see that there are different sections that will provide you with different function that you can use to affect your sample. The sample view is the default view Sampler will open in.

Different Views in Sampler
Sample View
On this view you can reverse the sample, trim and control the volume and pan of the sample. You can also assign the original key of the sample, and also detune the sample.
The most exciting function of this view is the sustain and release modes. When you hold a note down, the sample will play to the and stop. But with sustain mode, you can sent Sampler to reverse of start over from the beginning of the sample as long as you sustain the note or chord.

On the other hand you can set Sampler to play a different section of the sample after you release the note. you can set the loop length as you wish, and set the loop length for Sustain and release mode. This function opens and avenue for creative sample manipulation for production, performance, sound design and composition.
Pitch/Osc View
This view is helpful when it comes to sound design. You can affect the sound of your sample by using the pitch envelope to detune the sample and using the oscillator to add artifacts to your sample.

Filter/Global View
This section contains a filter which functions as the standard filter in Ableton but in Sampler, you can define how the filter behaves as the filter comes with its ADSR control. In this view, you shall notices two ADSR control. The second envelope control is the global control of the sample

Zone View
This view is what set Sampler aside from Simpler by a mile. You can drag and drop more than one sample into Sampler in this view. and then map the samples into different keys as you wish. There are 3 zones in this view to which you can map samples, the Key, velocity and selector. Sampler can sort your samples for you by either selector, velocity, key or alphabetically.
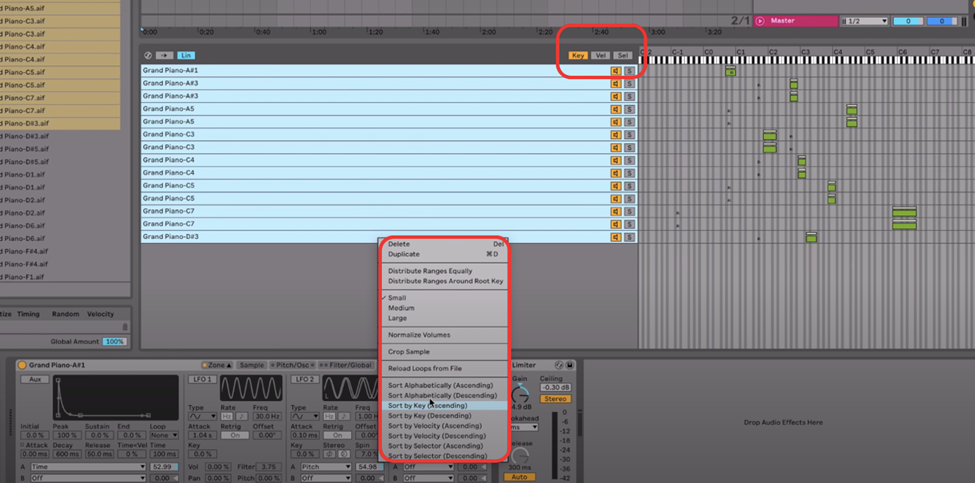
This sorting method allows you to layer samples to create new and interesting sounds.
External Sample Editors
Ableton is equipped with powerful sample editors, but sometimes you might want to use an third party sample editor for whatever reason. Within Ableton you can set up an external sample editor to handle your sample for you. This is how:
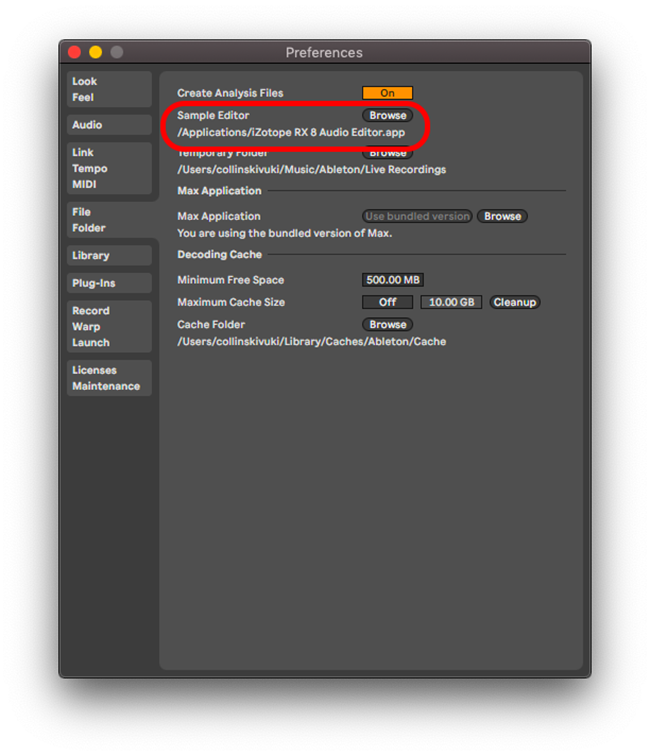
Step 1
Go to Ableton preferences, and in the file and folder tab, there is the Sample editor tab. Browse for you preferred sample editor in applications In my case, I am using RX 8 as my external sample editor.
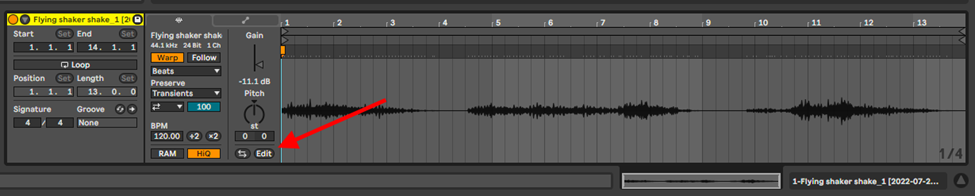
Step 2
Next, select your sample and press edit. This will open the audio in you selected sample editor.
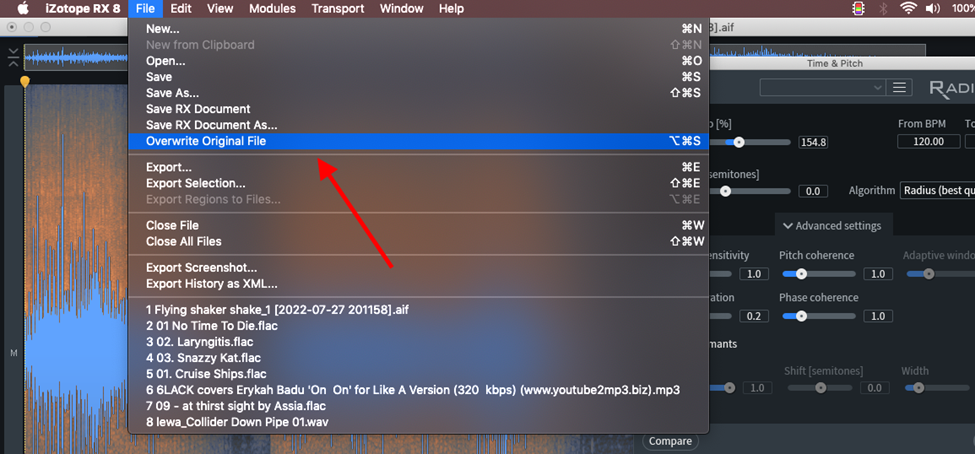
Step 3
Edit the sample that you have and save it. in this case, RX 8 allows me to overwrite the original sample in Ableton without having to save the new sample edit, and then import it to Ableton.
Conclusion
Sampling is cool way to make music and design sound. We have gone through Ableton’s sample editors and explored their different ways you could use them. We have also gone through how you can use an external sample editor through Ableton. You can use these sample editors to create a whole new instrument, warp samples into sounds that will fascinate, and entrance your listeners. So explore, keep an open mind and be creative.
- How to Use Ableton Live’s Arpeggiator? - September 18, 2023
- How to Use the Piano Roll in Ableton Live + Shortcuts - September 18, 2023
- Ableton Arrangement View (Optimization & Usage) - September 16, 2023


![Ableton Not Recording Audio OR MIDI [FIXED]](https://ProRec.com/wp-content/uploads/2023/07/midi-ports-ableton-1-180x180.png "Ableton Not Recording Audio OR MIDI [FIXED]")
