Usually, my mastering jobs are a private matter between my client and myself. This time, however, we agreed to make the process public.
Mastering this song as a single took the best part of a morning. While my days are typically split into three sessions (10am, 2pm, and 8pm), I find it’s best to do mastering in the morning. That’s when my ears are the most fresh and I trust my judgements the most.
Finding Reference Music
After having a listen to the raw WAV file, I trawled through my music library to find sonically similar music to reference against. I chose to reference four songs – two focusing on electronic pop and two focusing on ‘pure’ club dance. The songs were:
- Just Dance – Lady Gaga
- What You Waiting For? – Gwen Stefani
- Sotu Mundo – 2 Pie Island and Fluke
- Tracking Treasure Down – Gabriel and Dresden
Like the song to be mastered, all reference songs have female lead vocals.
I used two pop songs as a reference for strong lead vocals and a true radio-friendly tone. The two club dance tracks were referenced for the elements specific to the genre – tighter and more present kick drum and low end.
I always use several reference songs for two reasons:
- Any oddities in one reference song can be more easily identified when comparing it with other reference songs in the same genre.
- It’s almost impossible to master a song so that it technically conforms 100% to a single reference song. Differences in mixes, instrumentation, voicing, etc. give a song its own identity. Instead of trying to get a song to conform 100% to another song, I aim to get it ‘close enough’(probably about 90%) to all the reference songs.
Technical Preparation
This is fairly mundane work. It consists of starting up the studio, creating the project file, and importing the audio.
My preferred software environment is Cubase 5. Dedicated mastering engineers will use systems like Pro Tools, Sequoia, or Sadie. I choose to use Cubase because mastering is just one part of my work. I also spend a lot of studio time composing, recording, producing, and mixing.
Once the project is technically prepared, it looks something like this:
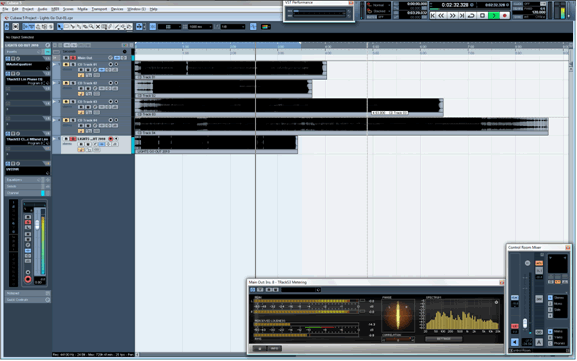
Ignore the track inserts on the left hand side for now. Notice that I have each reference song on its own audio channel, alongside the song to be mastered (the fifth audio file in the screenshot). I always work with the track in solo mode. This way I can easy switch between the song I’m working on and each reference song by simply using the up and down arrow keys to change the active track.
Also notice the T-RackS meters at the bottom of the screen. I don’t rely on them as often as their ‘always-on’ window might suggest. I just glance at them every now and then to confirm that I’m hearing the same audio that the computer is throwing out. The T-RackS meters are inserts on the master channel, so they always reflect whichever track is playing.
Technical Audio Analysis
This is where I analyze the tone and level of each song. First, I use the Cubase Statistics function to analyze the level characteristics of each song. I use this information to inform me if I might need to raise the level or use compression.
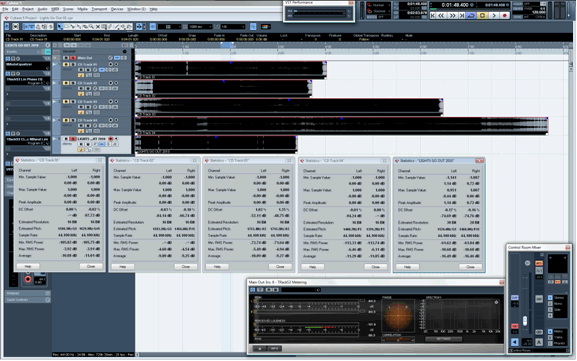
There are three areas of interest in the Cubase Statistics window; Peak Value, DC Offset, and RMS.
Peak Value
Notice that the four reference songs have peak amplitudes of exactly 0dBfs. The song being mastered actually has peak values slightly above 0dBfs. Normally, audio files can’t have peaks above 0dBfs, but it’s possible in this case because the audio file was provided in 32-bit float format, which is the native processing format of most DAWs.
DC Offset
This measures how far away(on average) the waveform is from the ‘centre line’. It’s normally not a problem unless there’s a very big offset, which can reduce headroom and make it difficult to achieve transparent limiting. The song being mastered has a DC offset in the same range as the reference tracks, so this isn’t something to worry about.
RMS
This roughly measures how loud the song sounds. The two values of interest here are ‘Max RMS Power’ and ‘Average’. As RMS is a momentary measurement, a song might have different RMS readings at different points in the song(e.g. a low RMS reading in a quiet intro, and a high RMS reading during the loud final chorus). ‘Max RMS Power’ shows the reading at the loudest part of the song. ‘Average’ shows an average of all the RMS readings for the song. This is useful in a number of ways.
The ‘Average’ reading is an indication of how loud the song sounds overall. The difference between the song being mastered and the reference songs provides an indication of how much the level has to be raised in order to conform.
The difference between the ‘Average’ and ‘Max RMS Power’ reading for each song is an indication of the dynamic range for the song. This difference is roughly 6dB for all five audio files. If the dynamic range of the song to be mastered is much greater than the dynamic range of the reference songs, then it might be appropriate to use (single band) compression to reduce the dynamic range. On the other hand, if the dynamic range of the song to be mastered is much less than the dynamic range of the reference songs, then the song to be mastered is probably over compressed or the reference songs might not be appropriate.
Keep in mind that RMS measurements are indicative of how loud the song sounds, but it is not exact. Many factors affect how loud we perceive sound. In this particular case, I raised the level of the song to be mastered by 9dB, even though the RMS reading suggested I might only need to raise it by 6dB to conform to the reference songs.
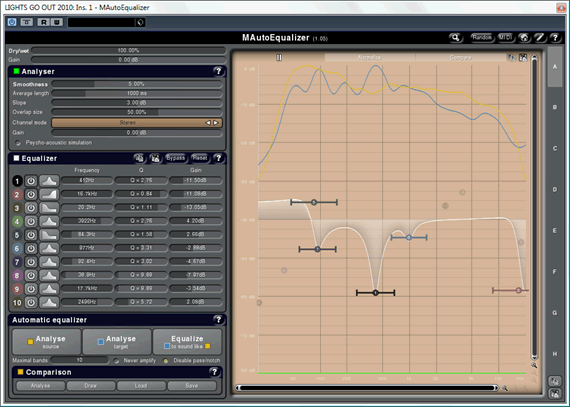
Technical Tone Analysis
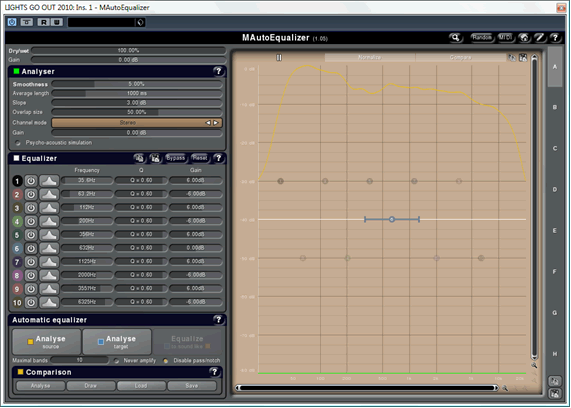
After performing a technical analysis of the level, I perform a technical analysis of the tone. I use MeldaProduction’s MAutoEqualizer for this. A technical tone analysis tells me if and how I might need to adjust the tone of the song being mastered.
First, I analyse the reference songs. Their combined (average) tonal shape is represented by the yellow line on the graph:
Next, I do the same analysis on the song being mastered. The tonal shape of the song being mastered is represented by the blue line:
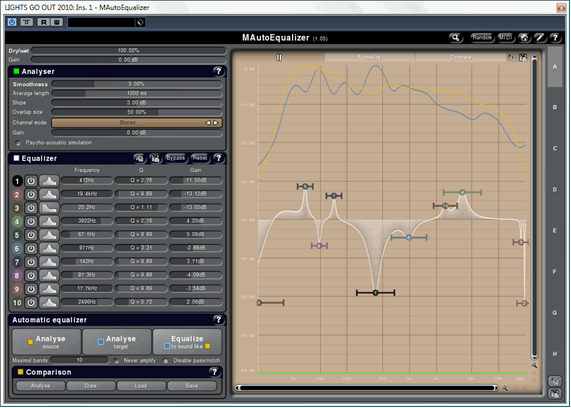
You’ll also notice a number of EQ adjustments. This is MAutoEqualizer’s best guess as to how to apply EQ to make the song being mastered sound like the reference tracks. This varies in accuracy. Sometimes, it’s about 98% there, while other times(like this time), it’s more like 60%.
Like the level analysis, the tonal analysis does not tell us everything about how the song sounds. It is merely an indication. Automated analysis and correction can usually bring a song about 80% of the way there. It takes a human, however, to improve it from there.
Fine Tuning, Level, Tone, Width, and Headroom
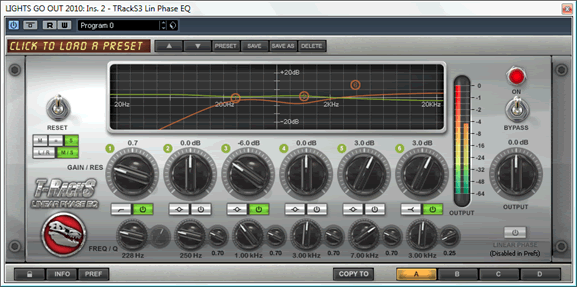
Fine-tuning the level is usually straight forward. As I wrote above, this particular song required a level increase of 9dB. It’s important to realize that this can change as other aspects of the sound change. For this song, I initially thought a 7dB increase would be sufficient, but by the time I’d adjusted the tone and stereo width, a 9dB increase was necessary.
Fine-tuning the tone is more involved. MAutoEqualizer’s best guess EQ was about 60% of what I wanted the final tonal shape to be. By audibly comparing the song being mastered with the reference songs, I finally came up with these EQ settings:
The next step is to adjust the stereo width of the track. For this I use the T-RackS EQ in mid/side mode. This allows me to widen or reduce the stereo image by different amounts at different frequencies.
Balancing the stereo width is a balance between focus and dimension. Reducing the width improves focus, and widening it increases dimension. Most songs benefit from more focus in the lower frequencies and more dimension in the upper frequencies, but the details are different for every song.
My approach for this song was threefold:
Collapse the low frequencies to mono
This focuses the kick and bass, and because of the gentle curve and high cut-off frequency, works on the lower mids to a lesser degree.
Slightly reduce the width of the midrange
This brought a bit more focus to the lead vocal- something it needed because it is actually quite dark and muffled.
Slightly increase the width of the upper mids
Reducing the width in the lower frequencies can sometimes reduce the overall sense of dimension to the song. Here I compensated by slightly increasing the width of the upper mids. This way the song sounds wide, even though the low frequencies and the vocal are quite focused.
My instance of the T-RackS EQ looked like this:
The final step is to control the headroom of the song. You’ll recall that I raised the level of the raw audio by 9dB to bring it to the same level as the reference songs. As you’d imagine, this caused the peaks to go over 0dBfs. In order to keep the audio at the same perceived level while reducing the peaks, I use the T-RackS Multiband Limiter.
I find it is most transparent when used as a multiband clipper/saturator. For small levels of gain reduction(where the RMS levels remain unchanged), clipping/saturation is usually more transparent than ‘clean’ limiting. ‘Clean’ limiting tends to be more transparent when pushed to extremes(when RMS level are being changed by the limiter).
When using the T-RackS Multiband Limiter, I use a very short release time and maximum overload level. The short release time ensures that the gain reduction only affects the peaks and is not audible in the moments after the peaks. The maximum overload makes the gain reduction work less, making it even less audible at the expense of slight clipping.
Overall, though, this limiting and clipping is much less audible than you’d expect because this processor splits the signal into three bands, and each band is limited and clipped separately. This means that the limiting and clipping works much less than a full-band limiter and clipper would. It also means there’s much less inter-modulation distortion, where song signals in one frequency affects the whole signal. For example, this multiband approach means the bass can be heavily limited and clipped if necessary, while keeping the mids and highs perfectly clean. Similarly, volume spikes in the midrange or high frequencies(such as errant vocals or cymbal crashes) don’t bring the level of everything else down.
My instance of the T-RackS Multiband Limiter looked like this:
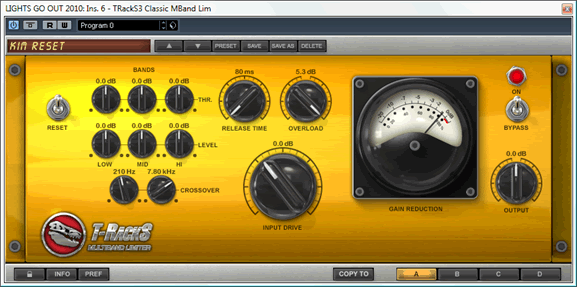
The end result was that, for this particular song, I was able to reduce the peaks by over 7.5dB without affecting the RMS levels or producing audible artefacts.
It’s important to take a break at this stage. Often I’ve reached this stage, thinking the fine-tuning was finished, only to come back in half an hour to realize there was still some work to do.
Final Check, Trim and Fade, Export
After the final sound check, I trimmed and faded the start and end of the audio and exported it.
That’s it! Done!
While the final result of this job worked out well, it could have been even better if the mix were improved.
The biggest potential improvement is in the upper mids. The vocal is very weak in high frequencies, making it sound dull and lacking definition. It appears this was compensated for in the mix by using a lot of sharp sounds in the upper frequencies to balance it out. The vocal could be made much clearer by allowing the upper mids to come through(and by subsequently toning down the sharp sounds up there).
Another area of potential improvement is in the kick drum. Like the vocal, it’s rather dull and muddy. The kick could be given more definition and presence by giving it more attack, or choosing a kick drum sound with more attack. Another approach that can work, particularly for a mix that’s almost finished, is to layer the kick with a separate attack sound. This will give the kick more attack while keeping the low frequencies unchanged.


