As a Reaper user, you probably have asked yourself how you can record your system sound, application audio, and other audio sources from your computer. It could be a chime from a notification or music from YouTube or your media player. Content creators constantly find themselves in scenarios that call for them to record such audio. It could be for podcasts, gaming, tutorials, voiceovers, or even sampling purposes. In this article, we shall look at how to route audio coming from your desktop and record it in Reaper, a process called loopback recording.
What is Loopback Recording?
Loopback recording is the technique of capturing audio output from your computer and recording it directly into your DAW. It allows you to capture audio generated by your operating software or any other audio sources on your computer. Reaper allows for this type of recording without the need for external devices, software, or complex configurations.
Setting Up a Track
Start out by launching Reaper and creating a new project. Go ahead and set up a track like you would for a normal recording.
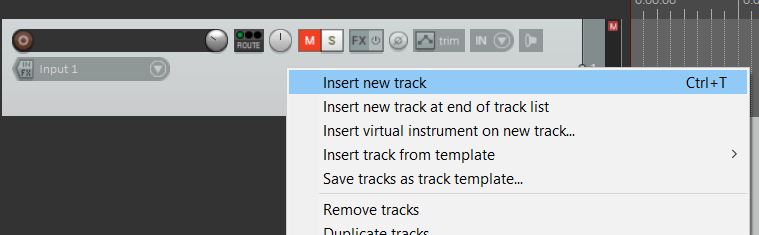
You can either double-click on the left side, use the shortcut Ctrl T (windows), Cmd T (Mac) or simply right-click on the left and insert track.
It is advisable you mute your armed tracks or disconnect their routing from the master, this is because you are creating a loop with potential for feedback which can be harmful
to your ears.
.
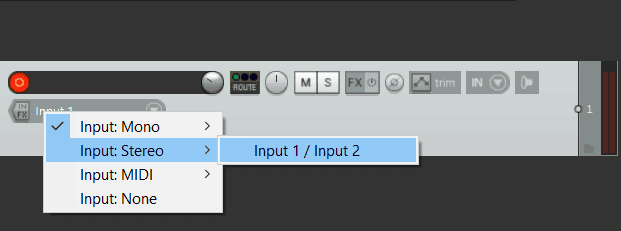
Once that is done, you can now arm the track and click on input under the arm button, then select input stereo to allow your track to receive audio from the desktop.
Note: You can set up your track before configuring Reaper or after.
Configuring Reaper For Loopback Recording
To instruct REAPER where to receive audio, go to options at the top bar, then select Preferences, alternatively dial in Ctrl P(windows), Cmd P (MAC) to take a shortcut there.
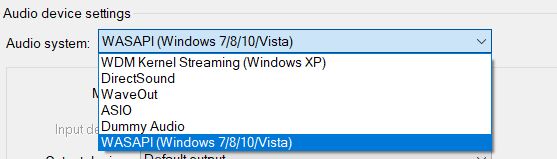
On the left side of the preference window is a list, go to audio and click on Device, a section will appear reading Audio system. When you click on that section a drop-down menu appears showing a list of devices available, select WASAPI (Windows Audio Session API).
Choosing the Right Mode
Next, you’ll have to pick an option between shared mode and exclusive mode.
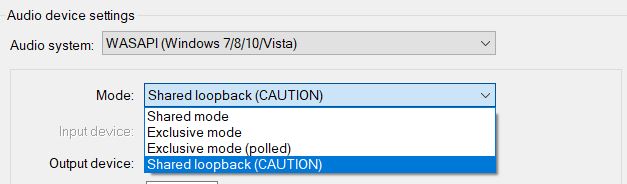
The shared mode allows multiple applications to access the audio device, however, the different audio streams are mixed together.
The exclusive mode is more precise as it provides exclusive access to the audio device and does not split it amongst multiple applications. It allows us to record without interference. The downside is that only Reaper will have access to the audio device.
Making a selection between the two modes is a matter of preference. If you would like to record a single source, let’s say a song playing on your windows media player and intend to only capture audio coming from the said application then the exclusive mode would serve your needs best.
But let’s assume you are a gamer who intends to capture sounds from the video game and the input from your microphone on your headset and maybe some music playing in the background simultaneously in one recording, this is where the shared mode becomes your friend, it combines all those audio streams and feeds Reaper as inputs regardless of whether they are coming from different application and mixes them into one single output.
Choosing your Inputs and Outputs
Just below modes, select the input device from the drop-down menu, it should be the device you intend to record the system sound from.

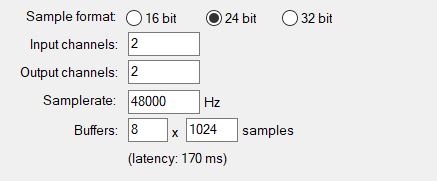
You will notice a check box at the bottom reading “allow projects to override device sample rate”, if checked the audio device system will use the project’s sample rate. This is important since the sample rate settings can affect your sound.
If your project is 44kHz/16bit, and the system sound you plan to record is 48kHz/24bit, adjust your project to read the same as the system sound.
You do this by accessing preferences > audio > device, Reaper will provide you with options you can select from and adjustable checkboxes .
Under the output section we shall select a device where we want to hear our playback of the recorded system sound from.
Accept and apply your configurations. You are good to begin recording.
Quick Tip: Think about the inputs and outputs as gates, entrance, and exit, respectively.
Recording the Audio
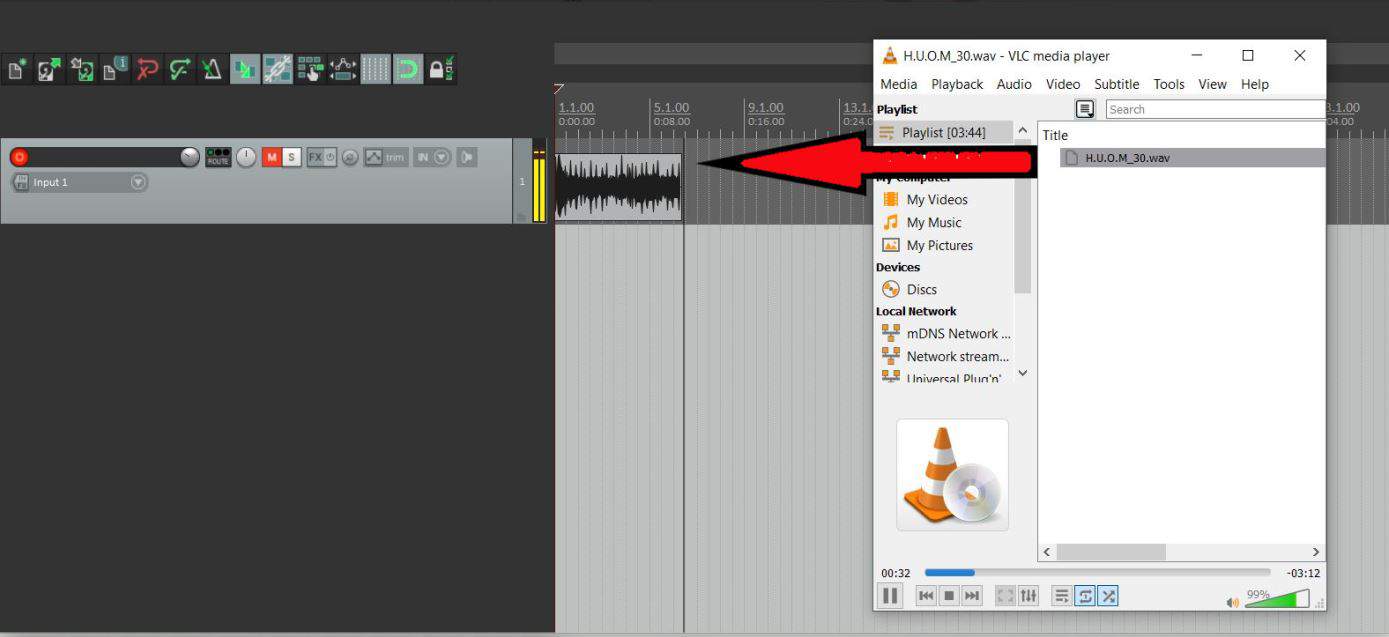
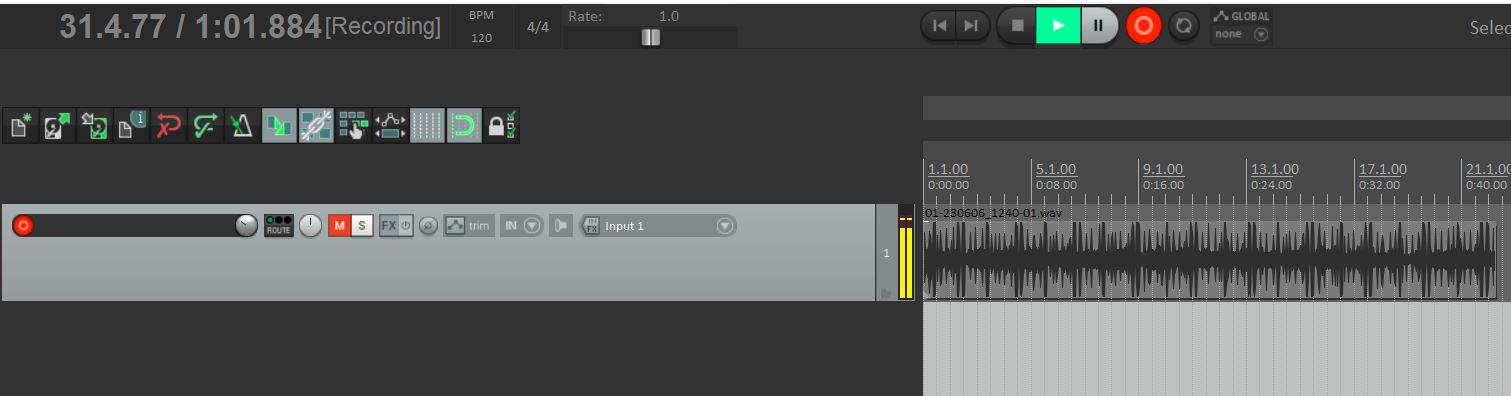
Once this is done start playing the system sound you want to capture, you will notice that a signal comes through in your armed track. Hit record and begin playing your audio from the point you want to capture. Reaper will initiate a recording and your beautiful waveform shall appear, your audio is captured.
Remember we had muted our track? Do not forget to unmute it after you are done so you can hear your recording playback.
Conclusion
Loopback recording in Reaper is a really valuable tool to any content creator and every Reaper user ought to understand how to go about it without headaches. Once you have considered your workflow feel free to explore and experiment with the different modes and configurations to improve and produce high-quality content while enjoying the seamless integration Reaper provides.


![Is REAPER a Good DAW? [Honest Opinion]](https://ProRec.com/wp-content/uploads/2022/09/image-271-180x180.png "Is REAPER a Good DAW? [Honest Opinion]")