As an Amazon Associate ProRec.com earns from qualifying purchases. Any links that take you to products are affiliate links, and we may earn a commission if you make a purchase. We appreciate your support.
All text and image links lead to Amazon unless stated otherwise. All product scores are based on ProRec’s in-house scoring model
| Thumbnail | Audio Interfaces for Blue Yeti | ProRec Score | Price |
|---|---|---|---|
 | 9.2 | Check Price on Amazon | |
 | 8.6 | Check Price on Amazon | |
 | 8.3 | Check Price on Amazon |
Introduction
Before you go looking for an audio interface for your Blue Yeti mic, make sure that you have the Pro version with the XLR out. All Blue Yeti mics come with a USB connection (only the Pro has both XLR and USB). USB mics do not require an audio interface, they have their own interface built in. As a result, they are plug and play and can be connected directly to your computer. All you need is the driver installation and you’re ready to go.
Recommended Read: SM7B and AT-2020 Audio Interfaces
XLR mics on the other hand always require an audio interface. These are analog mics that deliver far superior audio quality than their USB counterparts. If you have a Blue Yeti Pro, you can put this to test by recording the same track first in USB mode and then in XLR. Professional studios all over the world use XLR mics for their exceptional audio quality.
When choosing an audio interface for Blue Yeti, you have to look out for a few basic things that include an XLR connection, Phantom Power, Input Gain, Sampling Rate and Preamp Quality.
Almost all interfaces these days feature an XLR connection as well as Phantom Power (48V). However, it’s always a good idea to check before you go ahead and buy the interface. Make sure that the audio interface you choose has enough input gain to accommodate the Blue Yeti’s output level. This will help prevent distortion and ensure that your recordings come out clean.
The preamp in your audio interface will affect the sound quality of your recordings. Look for an interface with a high-quality preamp to get the best sound from your Blue Yeti. You also want to pay attention to the AD and DA converters, since they greatly impact your sound. Finally, for high quality recordings your audio interface should support a 24-bit/96kHz sampling rate, which is the maximum sampling rate that the Blue Yeti can handle.
Other considerations include the I/O configuration. Depending on your use case, you want to get at least 2 channels on your interface. If you are planning on recording multiple tracks simultaneously, then look for an interface with at least 4 or more inputs. You can also expand the inputs later on if your interface features ADAT.
One last thing you should take into account is that the Blue Yeti is a condenser mic. What this means is that it is pretty sensitive to background noise. It is not exactly beginner friendly and will take some optimization to sound good. However, if you have experience with audio or if you already have the mic then you can always play around with different settings and watch online tutorials to set it up right. You can also look into acoustically treating your room as well as Noise Reduction plugins that work with your DAW to clean up your recordings.
Recommended Read: How to Choose an Audio Interface
Best Audio Interface for Blue Yeti Reviews
All text and image links lead to Amazon unless stated otherwise. All product scores are based on ProRec’s in-house scoring model
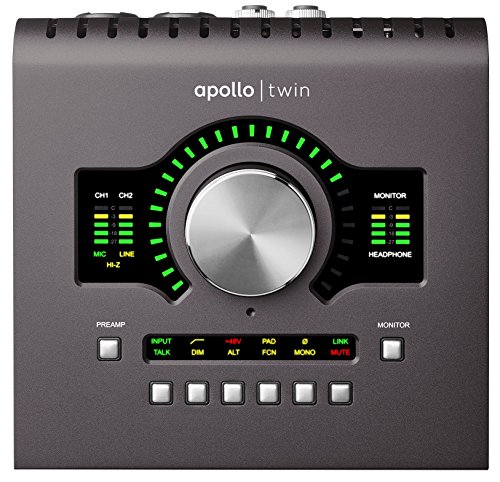
The UA Apollo Twin MKII HE is a 10×6 I/O interface with TB2 connectivity. The unit offers a max recording resolution of up to 24-bit/192 kHz, and features the superior Unison-enabled mic preamps, that offer up to 65 dB of gain on the mic/line inputs.
The interface offers incredible DSP processing power via powerful DUO UAD cores and comes fully integrated with the LUNA Recording System. It also comes with optical I/O, allowing for up to 8 channels of input expansion via ADAT.
The front of the unit is simple and features a headphone output and a high impedance instrument input. The rear panel houses two mic/line inputs, two line outs, two headphone outputs as well as the optical I/O, thunderbolt port, power supply connector, and an on/off switch.
The top panel features the main hardware controls including a large rotary knob surrounded by LED indicators showing preamp gain and volume levels. Various preamp options (i.e. 48V, Pad, Input etc), as well as multiple monitor functions such as Talk, Dim, Alt, Fcn, Mono, and Mute, are controllable via the top panel.
Buildwise, the unit has a sleek metal body and is built like a tank; sturdy and strong. The hardware controls have a really nice feel to them; the volume knob is smooth while the buttons are stiff yet tactile. The layout of the unit is straightforward and since the main panel has individual buttons for various functions i.e dimming, talkback, etc, handling controls is pretty easy.
After installing the drivers and setting up the Apollo Twin, we plugged in the Blue Yeti Pro with an XLR cable (included with the interface) and started recording vocals. Initially, we used the gain on the mic itself but since this added a lot of noise to our recordings, we decided to use gain from the interface and turned the mic gain down.
As the mic/line/Hi-Z inputs offer up to 65 dB of gain, the Unison preamps were able to power the Blue Yeti easily and produce warm yet clear audio. Adopting the strategy of only using the interface’s gain removed the noise and distortion which was messing up our recordings, and revealed the raw, uncolored sound from the interface.
The dynamic range on the AD/DA converters is commendable, paired with the sensitivity of the mic, our recordings were pretty authentic to the source, they had incredible nuance, depth and clarity to them. The analog sound from the interface was pleasant, even as we miked an acoustic guitar with the Blue Yeti; the audio was noise free yet transparent and accurate.
The software and plugins included with the Apollo Twin really take the cake! The interface comes with the Realtime Analog Classic bundle, as well as five extra plugins, the Heritage Edition bundle, including two compressors (UA Teletronix and the 1176), Pultec EQ, Pure Plate Reverb and the UA 610. Audient’s software, paired with the DSP plugins and Unison preamps, gives you access to an integrated ecosystem which not only makes recording easier but also allows you to take your mix to the next level (with the amount of FX options you get).
The predecessor of the Apollo Twin MKII was the Apollo Twin from the previous generation (MKI), which has undergone many changes. For one, the MKII version has three variants with different DSP power i.e. the Solo, Duo and Quad core models.
The new generation models, as a whole, have better dynamic range on line outputs 3 and 4 (a 3 dB increase) and hence, better converters. The functionality of the monitor controller has also been improved; you can now control mute, dim, alt, mono etc all via the monitor knob. The MKII models offer talkback functionality as well which was absent on the MKI. For the Heritage Edition of the Apollo Twin MKII, though, there are no differences vs. the non HE except for the inclusion of the plugin bundle.
While the interface has amazing functionality, there are a few areas where it falls behind. For instance, the unit can get pretty hot once it has been in use for a while, which can be a challenge, especially in long recording sessions when you may need to use the interface for an extended period. Also, the setup process with the Apollo Twin is pretty long; restarting the interface after downloading the drivers and then setting it all up was pretty cumbersome, but fortunately it is just a one time thing.
To sum it up, we found the Apollo Twin MKII HE to be an amazing all rounder interface; it has great hardware, comfortable controls and build quality, and comes with a good software ecosystem involving plug-in bundles and FX that give you creative freedom, allowing you to produce unique mixes. With its Unison preamps, the interface works beautifully with the Blue Yeti Pro producing clear and distortion free audio while the DUO core DSP reinforces its superiority as a versatile interface.
Universal Audio Apollo Twin MkII HE Benefits
The layout of the unit is intuitive and pretty user friendly
Individual buttons for various functions make control handling easier.
The Unison preamps offer up to 65 dB of gain, and produce clean recordings.
The DSP power on the unit is amazing; you can run multiple plugins at once.
The interface comes with two plugin bundles; the Realtime Analog Classic and Heritage Edition bundles.
Universal Audio Apollo Twin MkII HE Drawbacks
The interface heats up once it has been in use for a long time.
The setup process is time intensive.
All text and image links lead to Amazon unless stated otherwise. All product scores are based on ProRec’s in-house scoring model
The Clarett+ 2Pre, released in 2021, is part of Focusrite’s Clarett range of audio interfaces. The interface offers 10×4 recording/playback channels, MIDI connectivity as well as optical I/O which can be used as S/PDIF or ADAT. The 2Pre offers a max recording resolution of 24-bit/192 kHz, and features a USB 2.0 port that supports bus powering via a 15W source.
The interface has Focusrite’s immediately recognizable claret red color on the front panel, and is enclosed in an aluminum casing with a smokey grey finish on all sides. The front panel features two combo XLR jacks, with a gain knob, INST and AIR LEDs, and a 48V switch for each mic/line input. A large monitor volume control knob sits next to a ¼” TRS headphone output whereas indicator LEDs for USB, power and clock synchronization are also present here.
The rear panel houses more I/O channels, featuring four balanced line outputs, MIDI ports, a TOSLINK connector for ADAT (8 channels of input at 44.1/48 kHz sample rate or four channels at 88.2/96 kHz) or S/PDIF. A USB-C port, an external DC power port, a power switch and a Kensington lock are present on the back as well.
Physically, the unit is sturdily built and has a solid, weighted feel to it. The sleek metal finish gives it a high end look, and the rotary controls have a good turning resistance and weight to them.
Installing the drivers and setting up the Focusrite Control software took no time, the setup was pretty hassle free. The software has a minimalist look and is very easy to navigate and operate. It provides access to the hardware settings as well which made recording a lot easier as we could control everything from the same place.
We started off by laying some vocal tracks with the Blue Yeti Pro. The preamps on the interface offer up to 57 dB of gain and are based on Focusrite’s all-analogue Air circuitry, they closely mimic the sound of the company’s famous ISA 110 console preamps which they achieve via an impedance switch (2.2 kΩ) for the XLR input, while also adding a boost to the higher frequencies. This made the high end of our vocals sound really crisp and lively, highlighting the breathiness in the sound which was really pleasant to listen to.
We then positioned the Blue Yeti in front of a Yamaha FG800 and the preamps worked wonders capturing the crisp detail of the acoustic guitar. By plugging in an instrument directly into the interface, you can switch the preamps to a high imped JFET circuit, if you choose to DI an electric guitar. However, we didn’t go that route since we were testing the interface with an acoustic.
The dynamic range on the interface’s ADC and DAC is really good for an interface at this price point. By recording with the mic volume turned all the way down and boosting it up in post production produced cleaner and more nuanced recordings. The Air function on the 2Pre is great for livening up your vocals and can be controlled via software. We were also able to set up low latency monitoring through the software which was quick and lag free, and the audio output was clean, clear, and undistorted.
Although the plugins included with the interface are few, they are really useful; these include the Red 2 EQ and Red 3 EQ Compressor which help produce an accurate, analogue-like sound without making your recordings sound artificial or heavily post edited.
The 2Pre was released, along with the 4Pre and 8Pre, as part of the Clarett+ series which is an upgrade from the Clarett series originally introduced in 2015. The 2Pre has a 10×4 I/O config whereas the 4Pre and 8Pre feature 18×8 I/O and 18×20 I/O respectively. Improvements in the Clarett+ models as a whole include better dynamic range on the line inputs (increased from 6dB to 124 dB), a 3dB increase in the range of headphone out as well as a decrease in THD from -107 dB to -110 dB on the inputs as well as on the headphone and line outs.
Although the 2Pre is a great interface, there are a few drawbacks. Even though the Focusrite Control software is easy to use and offers a lot of hardware control, some features like the Air function are only switchable through software. For people who prefer more hands-on control, this may not be the ideal scenario. Also, the unit requires 15W of power via a USB-C connection, not the usual 7.5W or 12W like most other interfaces. Finally, the USB-A-to-USB-C cable included with the interface is really short and you will have to purchase a longer cable or you risk damaging the interface since it may fall while being plugged in with such a short cable.
All in all, though, if you are looking for a midrange audio interface for use with your Blue Yeti Pro, the ease of use, incredible sound quality and the intuitive control software on the interface makes a solid case for the Clarett+ 2Pre as your next studio investment!
Focusrite Clarett+ 2Pre Benefits
The build quality is good; the controls are smooth and weighted.
The preamps and AD/DA converters produce clean, undistorted audio.
The Focusrite Control software is intuitively designed and easy to use.
The low latency (direct) monitoring allows you to monitor your mix in real time.
Focusrite Clarett+ 2Pre Drawbacks
Some features on the interface are only switchable via software.
The interface requires power via a 15W supply.
The USB-A-TO-USB-C cable included with the unit is really short.
All text and image links lead to Amazon unless stated otherwise. All product scores are based on ProRec’s in-house scoring model
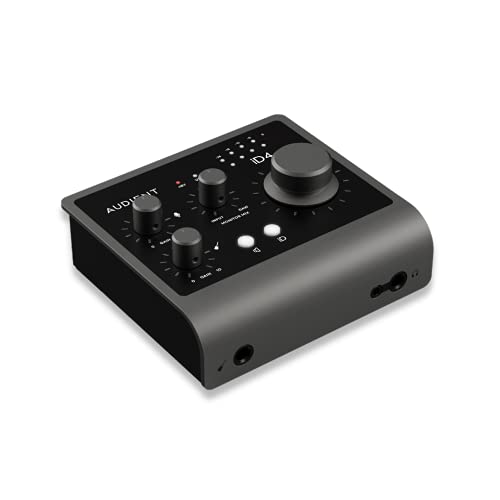
The iD4 MKII is the cheapest interface on our list, offering a 2-in/2-out config with a sample rate that ranges from 44.1 kHz up to 96 kHz, and bit depth of 24-bit. The unit has a small form factor with USB C connectivity and is bus powered through your computer.
The front panel features dual headphone outputs and an instrument input (based on JFET transistors). The rear panel includes a pair of monitor outputs, a 48V switch, the USB-C port and an XLR/TRS combo input. The preamps on the mic input are Audient’s standard ASP8024, that offer upto 58 dB of gain.
The main panel offers a multitude of control options via four knobs. Two of these control the preamp gain on both inputs (DI and mic pre), the large encoder controls the overall volume while an additional monitor mix knob allows you to monitor your inputs. Two LEDs indicate whether phantom power is engaged or if the interface is connected via USB whereas 5 colorful LEDs show the unit’s output levels (from -36 dB up to 0 dB).
An iD4 and a mute button are present on the top panel as well. The iD4 button has a unique function; when engaged, it turns the volume knob into a virtual scroll wheel, allowing you to control different features and various plug-in parameters within your DAW, basically integrating some software control into hardware which comes in very handy while recording.
The layout of the interface is pretty simple and hassle free. All controls are present on the top, it’s easy to see different meter levels and adjust the knobs. The unit’s metal body, compact form and smooth controls all attest to its superior build quality. The included manual is concise and super easy to follow. We were able to get the drivers installed and the unit set up in no time. The UI on the software is also intuitive, and pretty easy to use.
To start off, we plugged in the Blue Yeti Pro and set it up in front of our Taylor GSmini while monitoring through a pair of Slate VSX headphones. The mic preamps on the ID4 are quite good for the price; our recordings came out warm, rich and very crisp. The gain is excellent and the preamps have loads of headroom; even at max gain, the audio output was impressively noise free. However, some songs and arrangements sounded almost sterile as the output was too clean.
When laying vocal tracks, we could record at a sample rate of 192 kHz with the Pro (not possible with the USB version) since we could match the max sampling rate offered by the iD4. We were able to capture HQ details in our recordings, a testament to the excellent ADC/DAC on the unit. There was no latency through the monitoring chain and the conversion was very accurate, allowing us to make quick mixing decisions. The loopback feature is also pretty useful, especially for users who like to live stream.
In comparison to its previous generation predecessor (MKI model), the iD4 MKII has better dynamic range, both on the ADC (a 7 dB increase) and DAC (an 11 dB improvement). The headroom on the preamps is a huge improvement, which helps produce ultra clean recordings. The latency has been improved from 4.9 ms to 2.5 ms, at 128 samples, in the MKII, while the USB 2 connection has been upgraded to USB-C or USB 3. The new generation also features the Loopback function, absent in the previous model.
Although the iD4 performs well in most areas, there are some problems that we encountered when recording with the interface. In longer sessions, when we put our PC to sleep (or it turned off of its own accord), the interface automatically disconnected from the PC. The only solution we could figure out was to plug in the interface again and readjust the volume controls whenever restarting the PC, however, this got quite frustrating after the first few times.
Also, the interface would randomly start making really loud static noise during recording (or sometimes if it was just plugged in and not even in use); the only way we could resolve this was by unplugging and plugging it in again. According to Audient, this is a driver issue, however, our drivers were up to date and we couldn’t find a resolution for this issue.
All in all, the Audient iD4 MKII delivers excellent performance, especially for its price. The preamps on the interface are one of the best that you will find in this price range while the converters have great dynamic range. Combined with the highly sensitive Blue Yeti, the iD4 can really help capture nuances in your audio. And while the iD4 covers only the basics, it nails them just right. So, whether you are just starting out in the audio space or are a seasoned musician looking to record music with your Blue Yeti Pro, the iD4 is a remarkable interface which you should definitely consider!
Audient iD4 MKII Benefits
The usability of the unit is great; the iD scroll controller is especially helpful.
The hardware offers a lot of control, for instance, the iD4 scroller helps you control different functions i.e. parameters within the DAW itself.
The interface features Audient’s standard ASP8024 preamps which deliver ultra clean audio.
ADC/DAC on the unit can capture intricacy in your recordings.
Latency is almost undetectable when monitoring through headphones or monitors.
Audient iD4 MKII Drawbacks
The unit disconnects if your PC goes to sleep.
The device randomly starts making loud, buzzing static sound when recording or simply plugged in.
Verdict
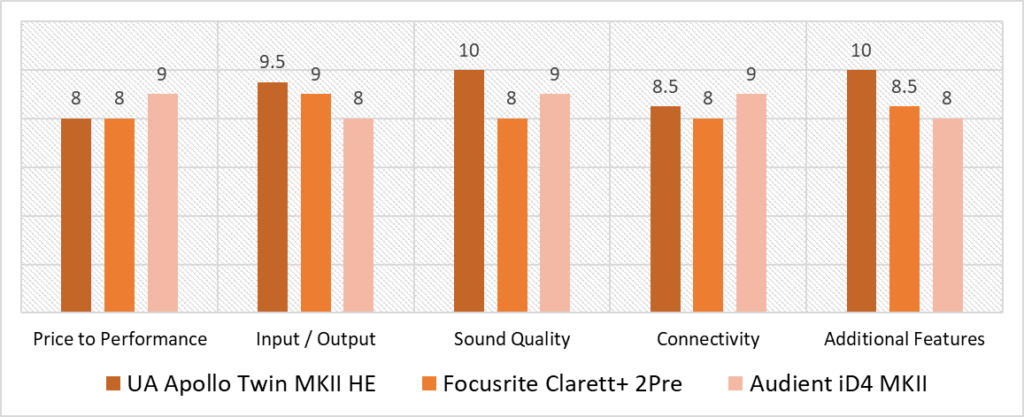
According to our scoring model, there is a difference of 0.9 points between the highest and the lowest scoring unit’s total average scores. In individual categories, however, the highest variance is in the Sound Quality and Additional Features categories, where the Apollo Twin secures the top spot while the 2Pre and iD4 compete for second place; in Additional Features, the 2Pre scores second whereas the iD4 falls right behind the Apollo in Sound Quality.
The Apollo Twin displays a trend of excellence in all categories. The Unison preamps outclass the 2Pre’s and iD4’s preamps by a wide margin, and the overall sound from the Apollo is authentic, uncolored and raw. In terms of Additional Features, the unit comes with the LUNA recording system and two incredibly useful plugin bundles. It has an awesome I/O configuration of 10×6, with options to expand inputs via optical I/O. Its price, though, in comparison to its competitors places it in second place for Price to Performance, while its TB2 port places it behind the iD4 which is a USB-C interface.
We should mention that although the iD4 is the cheapest interface on our list, it offers the next best sound quality in comparison to the Apollo Twin which is the most expensive. With low latency that allows for direct monitoring in real time, the iD4 also offers Loopback functionality, however, it scores low in Additional Features only in comparison to the other interfaces. The 2×2 I/O configuration, however, places it at the bottom of the I/O category, since the other interfaces offer way more channels.
Nevertheless, when it comes down to it, the Apollo Twin MKII HE emerges as the best audio interface for Blue Yeti. The unit leads with a score of 9.2, with commendable scores in individual categories. Featuring ultra quiet preamps, amazing converters and DUO cores for DSP, the Apollo Twin may be expensive but it gives you a wide range of recording and mixing options. So, if you are looking for an interface that will not only capture the sound from your Blue Yeti accurately but also offer versatility in recording and I/O, the Apollo Twin is one of the best interfaces you can invest in!
Frequently Asked Questions
Does a Blue Yeti Need an Audio Interface?
All Blue Yeti Microphones come with a USB out, so you do not technically need an audio interface. However, if you have the Blue Yeti Pro (which has an XLR out in addition to USB) you would greatly benefit from using an audio interface. Using the XLR output will give you significantly higher quality audio. So if you are serious about music/podcasting or just want a better, cleaner signal, then always use an audio interface with the Blue Yeti Pro.
What is the best Audio Interface for Blue Yeti?
According to our tests, the Apollo Twin MKII is the best audio interface to use with the Blue Yeti. If you’re getting an interface, at the most basic level you want ot make sure that it satisfies the requirements for powering the Blue Yeti (XLR connection, Phantom Power, Input Gain, Sampling Rate and Preamp Quality). The converters and preamps on the interface should sound good, and the sampling rate and input gain have to be a match.
How can I make my Blue Yeti microphone sound better?
You have to spend some time learning your mic, set the gain properly, make sure your recording environment is proper and when you record use the right settings and plugins. Using an audio interface will also greatly improve your sound. also focus on positioning, a well positioned mic sounds a lot better! It’s all about experimenting and learning as you go.
Can you plug Blue Yeti into XLR?
You can plug a Blue Yeti via XLR only if you have the Blue Yeti Pro. All Blue Yeti mics feature USB outs, the Pro version has dual outputs (USB and XLR).
![Best Low Latency Audio Interface [2023 Reviewed]](https://ProRec.com/wp-content/uploads/2022/07/2-channel-interface-180x180.png "Best Low Latency Audio Interface [2023 Reviewed]")
![Best Small Portable Audio Interface [2023 Reviewed]](https://ProRec.com/wp-content/uploads/2022/06/small-portable-audio-interface-180x180.png "Best Small Portable Audio Interface [2023 Reviewed]")
![Top Audio Interfaces with SPDIF [2023 Reviewed]](https://ProRec.com/wp-content/uploads/2022/08/SPDIF-180x180.png "Top Audio Interfaces with SPDIF [2023 Reviewed]")